
Homemade Strawberry Pop-Tarts
Ingredients:
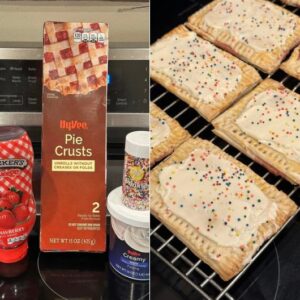
- 2 boxes of premade pie crust
- Strawberry jelly (or your favorite flavor)
- 1 egg
- Frosting (store-bought or homemade)
- Sprinkles
Instructions:
- Preheat your oven to 425°F (220°C) and line a cookie sheet with parchment paper.
- Lay out each pie crust and, using a knife, cut out rectangles or squares of the desired size for your pop-tarts. You should have a total of 16 pieces.
- Arrange 8 of the cut pieces on the prepared cookie sheet, leaving some space between each.
- Spoon approximately 1 teaspoon of strawberry jelly onto the center of each of the 8 pieces on the cookie sheet. Gently spread the jelly, leaving a small border around the edges.
- Place the remaining 8 pieces of pie crust on top of the jelly-covered ones, creating a sandwich. Use a fork to press down and seal the edges of each pop-tart, ensuring that the filling is securely enclosed.
- With a toothpick, poke a few holes in the top crust of each pop-tart. This will allow steam to escape during baking.
- In a small bowl, beat the egg to create an egg wash. Brush the top of each pop-tart with the egg wash to give them a golden finish.
- Bake in the preheated oven for 7-8 minutes or until the pop-tarts are lightly golden brown.
- Once baked, transfer the pop-tarts to a wire cooling rack and allow them to cool completely.
- Once cooled, spread a layer of frosting over the top of each pop-tart and sprinkle with your favorite sprinkles.
- Let the frosting set before serving or storing.
- These homemade pop-tarts can be stored in the refrigerator and reheated if desired. Enjoy the deliciousness, and have fun sharing this baking experience with your kids!
Making homemade Strawberry Pop-Tarts can be a fun and delicious baking project. Here are some tips to ensure your homemade Pop-Tarts turn out perfectly:
Strawberry Filling:
- Use Fresh Strawberries: Opt for fresh, ripe strawberries for the filling. Frozen strawberries can also work if fresh ones aren’t available.
- Balance Sweetness: Adjust the sweetness of the strawberry filling to your liking. You can add a bit of sugar to enhance the sweetness, especially if the strawberries are tart.
- Thicken the Filling: To prevent the filling from becoming too watery, add a thickening agent such as cornstarch or tapioca starch. This will help maintain a stable and gooey consistency.
Pastry Dough:
- Chill the Dough: Ensure that your pastry dough is well-chilled before rolling it out. This helps in handling and prevents the dough from becoming too sticky.
- Roll Evenly: Roll out the dough evenly to create uniform layers. This ensures that the edges of your Pop-Tarts will seal properly, preventing the filling from leaking during baking.
- Cut Uniform Shapes: Use a ruler or a straight edge to cut the dough into even rectangles or squares. This makes it easier to match the top and bottom layers when assembling.
- Prick the Tops: Before baking, use a fork to prick the tops of the Pop-Tarts. This helps steam escape during baking and prevents the pastries from puffing up too much.
Assembly and Baking:
- Leave a Border: When adding the strawberry filling to the pastry, leave a border around the edges. This makes it easier to seal the Pop-Tarts without the filling oozing out.
- Seal Well: Press the edges of the Pop-Tarts firmly to seal them. You can use a fork to create a decorative edge and ensure a tight seal.
- Egg Wash for Shine: Brush the tops of the Pop-Tarts with an egg wash before baking. This gives them a golden and shiny appearance once baked.
- Chill Before Baking: After assembling, chill the Pop-Tarts in the refrigerator for about 15-20 minutes before baking. This helps them hold their shape during baking.
- Bake Until Golden: Bake the Pop-Tarts until they are golden brown. Keep an eye on them to prevent over-baking, as this can result in a dry pastry.
Glaze or Icing:
- Cool Before Glazing: Allow the Pop-Tarts to cool completely before adding any glaze or icing. This ensures that the glaze sets properly.
- Customize the Glaze: Experiment with different glazes or icings. A simple powdered sugar and milk glaze works well, but you can also add vanilla extract or lemon zest for extra flavor.
- Sprinkle or Drizzle: Have fun with toppings! Sprinkle colored sugar, chopped nuts, or drizzle melted chocolate over the glaze for a personalized touch.
By following these tips, you’ll be on your way to creating delightful homemade Strawberry Pop-Tarts that are sure to impress. Enjoy your baking adventure
Q1: Can I use a different flavor of jelly? A1: Absolutely! Feel free to experiment with different fruit jams or preserves to suit your taste preferences. You can get creative and try combinations like raspberry, blueberry, or even a mixed berry filling.
Q2: Can I make my own frosting? A2: Yes, you can make your own frosting! A simple powdered sugar glaze with a splash of milk and a drop of vanilla extract works well. You can also explore chocolate ganache or cream cheese frosting for a delicious variation.
Q3: Can I use homemade pie crust instead of premade? A3: Certainly! If you have a favorite homemade pie crust recipe, feel free to use it. Just ensure that the crust is rolled out to the desired thickness for your pop-tarts.
Q4: How do I store these pop-tarts? A4: Store the pop-tarts in an airtight container in the refrigerator. They can be reheated in a toaster oven or microwave if you prefer them warm.
Q5: Can I freeze these pop-tarts? A5: Yes, you can freeze the unbaked pop-tarts for later use. Place them on a baking sheet in the freezer until solid, then transfer to a sealed container or a zip-top bag. When ready to bake, you can put them directly in the oven from the freezer, adding a couple of minutes to the baking time.
Q6: Can I involve my kids in making these pop-tarts? A6: Absolutely! This recipe is perfect for getting kids involved in the kitchen. They can help with cutting the dough, spreading the jelly, sealing the edges, and, of course, adding the fun frosting and sprinkles at the end.
Q7: Can I use store-bought frosting instead of making my own? A7: Yes, using store-bought frosting is a convenient option. Choose a flavor that complements the strawberry filling, or go for a classic vanilla or cream cheese frosting.
Q8: Can I make these pop-tarts ahead of time? A8: Yes, you can prepare the pop-tarts ahead of time and store them in the refrigerator. Add the frosting and sprinkles just before serving to maintain their freshness and appearance.
Q9: Can I reheat the pop-tarts in a toaster? A9: Yes, you can reheat the pop-tarts in a toaster oven. Use a low to medium setting to avoid burning, and keep a close eye on them as they heat up.
Q10: Are these pop-tarts suitable for a special occasion or party? A10: Absolutely! These homemade pop-tarts make a delightful treat for special occasions, parties, or even as a sweet surprise for family and friends. Customize them with themed sprinkles for extra festive flair.


