
Heavenly Apple Crisp Delight
Indulge in the comforting, homey flavors of this Easy Apple Crisp, a dessert that wraps you in warmth and nostalgia. Perfectly caramelized apples, crumbly cake topping, and a buttery finish make this dessert irresistible. The simplicity of this recipe allows even beginners to achieve a stunning result, while the familiar flavors will captivate seasoned bakers as well. Serve it warm with a scoop of vanilla ice cream and a dollop of whipped cream for an unforgettable treat.
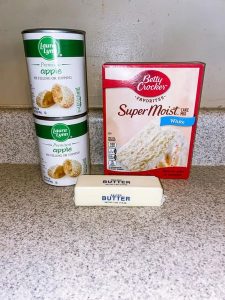
Ingredients Overview
- 2 cans of apple pie filling: This provides a sweet, luscious base for the crisp. The filling typically includes tender apple slices in a gooey cinnamon-spiced sauce, ensuring a perfect consistency without the need for peeling and slicing fresh apples.
- 1 box of white cake mix: Instead of mixing it according to package instructions, this recipe uses the dry mix directly. It adds a delightful crumbly texture, and its vanilla notes complement the apples beautifully.
- 1 stick (½ cup) of melted butter: This binds the cake mix together, creating a golden-brown crust that’s crisp on the outside and tender on the inside.
- 9×12-inch baking dish (ungreased): The perfect size to ensure even baking. There’s no need to grease the dish; the butter in the recipe will do the work.
Step-by-Step Cooking Instructions
- Preheat Your Oven
Set the oven to 350°F (175°C). This gives the perfect temperature for baking the crisp to a golden brown. - Prepare the Baking Dish
Use an ungreased 9×12-inch baking dish. There’s no need to add cooking spray, as the butter will prevent the crisp from sticking. - Layer the Apple Filling
Spread the apple pie filling evenly across the bottom of the dish. Ensure there are no empty spaces, as this will be the flavorful base of the dessert. - Add the Cake Mix
Sprinkle the dry white cake mix over the apples. Do not stir! This step ensures the crumbly texture is achieved during baking. - Drizzle the Melted Butter
Pour the melted butter over the top, making sure to cover as much of the cake mix as possible. The butter will seep into the mix and create a delightful, crispy topping. - Bake
Place the dish in the preheated oven and bake for 40-45 minutes. Look for a golden-brown top and bubbling apple filling around the edges. - Serve Warm
Scoop the apple crisp into bowls and top with a generous portion of vanilla ice cream and a dollop of whipped cream.
Storage and Reheating Tips
- Storage: Allow the apple crisp to cool completely before covering it tightly with aluminum foil or transferring it to an airtight container. It can be stored in the refrigerator for up to 4 days.
- Freezing: This dessert freezes well for up to 3 months. Wrap tightly in plastic wrap and foil before placing in the freezer.
- Reheating: For best results, reheat in the oven at 350°F for 15-20 minutes to regain the crispy texture. You can also use a microwave, but the topping may not be as crunchy.
Frequently Asked Questions
1. Can I use fresh apples instead of apple pie filling?
Yes, peel and slice 6-8 fresh apples, and toss with ½ cup sugar and 1 teaspoon cinnamon to replicate the sweetness of the pie filling.
2. What type of apples work best for this recipe?
Use Granny Smith or Honeycrisp apples for a balance of sweetness and tartness.
3. Can I make this recipe gluten-free?
Yes, simply substitute the white cake mix with a gluten-free cake mix.
4. Can I add nuts to the recipe?
Absolutely! Chopped pecans or walnuts sprinkled on top of the cake mix add a wonderful crunch.
5. What can I use instead of white cake mix?
Try using a yellow or spice cake mix for different flavor profiles.
6. Can I prepare the crisp ahead of time?
Yes, you can assemble it and store it covered in the refrigerator for up to 24 hours before baking.
7. What should I do if my topping isn’t browning?
Place the crisp under the broiler for 2-3 minutes to achieve a golden crust.
8. Can I reduce the sugar content?
Opt for a low-sugar apple pie filling and reduce the amount of cake mix slightly.
9. What if I don’t have a 9×12 dish?
Use a 9×9 dish, but increase the baking time by 5-10 minutes.
10. Can I add oatmeal to the topping?
Mix ½ cup of rolled oats with the cake mix for a heartier texture.
11. How do I know when the apple crisp is done?
The topping should be golden brown, and the apple filling should be bubbling around the edges.
12. Can I make a smaller batch?
Halve the ingredients and use a smaller baking dish.
13. What other toppings go well with apple crisp?
Try caramel sauce, chopped nuts, or a sprinkle of cinnamon sugar.
14. Can I use margarine instead of butter?
Yes, but the flavor won’t be as rich as with butter.
15. Can I add spices to the cake mix?
Mix in ½ teaspoon cinnamon or nutmeg for extra flavor.
16. What if I only have salted butter?
Go ahead and use it; the extra salt will enhance the flavor.
17. Can I use other pie fillings?
Yes, cherry or peach pie fillings work great.
18. Can I make this in a cast iron skillet?
Yes, a 10-12 inch skillet works well.
19. Can I double the recipe?
Yes, use a larger baking dish, such as 11×15.
20. Do I need to stir the butter into the cake mix?
No, do not mix. Simply drizzle the butter over the top.
20 Secrets for Culinary Perfection
1. Use Quality Butter:
High-quality butter enhances the richness of the topping.
2. Add a Pinch of Sea Salt:
Sprinkle a small amount of sea salt on the cake mix before baking for a flavor contrast.
3. Cinnamon Dusting:
Dust a bit of cinnamon over the apples before adding the cake mix.
4. Use a Combination of Apple Varieties:
Blend tart and sweet apples for more complex flavors.
5. Make Individual Servings:
Bake in ramekins for personal-sized desserts.
6. Caramel Drizzle:
Add a drizzle of caramel sauce before serving for extra sweetness.
7. Brown Sugar Crumble:
Mix in ¼ cup brown sugar with the cake mix for a richer taste.
8. Layer Butter with Cake Mix:
Dot small butter cubes on top of the cake mix to get even browning.
9. Add Dried Fruits:
Mix in raisins or cranberries with the apples for a chewy texture.
10. Butter Temperature Matters:
Use melted, not just softened butter to get the right consistency.
11. Chill the Topping Before Baking:
Put the assembled dish in the fridge for 15 minutes before baking to help the topping crisp up.
12. Use a Glass Dish:
Glass dishes allow you to see if the bottom is bubbling and ensure even cooking.
13. Add Lemon Zest:
Grate some lemon zest over the apple filling for brightness.
14. Enhance the Flavor with Alcohol:
Add a splash of bourbon or rum to the apples.
15. Don’t Skip the Ice Cream:
The cold, creamy contrast makes this dessert irresistible.
16. Use Real Vanilla:
Mix a little vanilla extract into the melted butter for added depth.
17. Toast the Nuts First:
If adding nuts, toast them first for extra crunch and flavor.
18. Add Some Texture to the Filling:
Mix ¼ cup chopped nuts with the apple filling for more texture.
19. Serve on Warm Plates:
Warm plates help keep the dessert hot longer.
20. Reheat the Next Day in the Oven:
Re-crisp the topping by reheating leftovers in the oven instead of the microwave.