
Cheesy Chicken Patty Sliders
Ingredients:
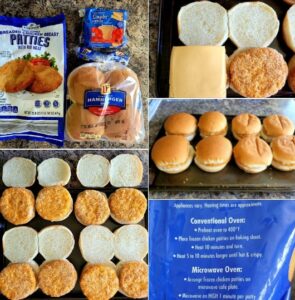
- 8 chicken patties (from ALDI, 8 pack, $3.99)
- 8 buns (from ALDI, 8 pack, $0.89)
- 8 slices of cheese singles (from ALDI, 16 pack, $1.65)
- Cooking spray
Total Cost: $5.53 (actually about $5.43)
Instructions:
- Prepare Chicken Patties:
- Cook the chicken patties according to the package instructions until they are golden brown and cooked through.
- Prepare Buns:
- Cut the buns in half and lightly spray the inner sides with cooking spray.
- Flash Freeze Buns:
- Place the sprayed buns in the freezer for about 10 minutes to flash freeze. This helps prevent them from sticking when stored.
- Assemble Sliders:
- Once the chicken patties are cooked, place one patty on the bottom half of each bun.
- Add Cheese:
- Top each chicken patty with a slice of cheese.
- Complete the Sandwich:
- Place the top half of the bun on the cheese, creating a sandwich.
- Wrap Individually:
- Individually wrap each sandwich in plastic wrap or place them in ziplock bags. This helps maintain freshness and makes it easy for the kids to grab one for lunch.
- Freeze for Later:
- Place all the individually wrapped sandwiches in a large freezer bag. This makes it convenient for storage and ensures the sandwiches remain fresh.
- Reheating:
- When the kids are ready to eat, they can simply grab a sandwich, remove the plastic wrap, and microwave it until heated through.
This simple and cost-effective Cheesy Chicken Patty Slider recipe provides a quick and delicious at-home lunch option for the kids during the holiday break. Enjoy
Here are some tips to enhance your Cheesy Chicken Patty Sliders:
- Seasoning the Chicken Patties:
- Add extra flavor to the chicken patties by seasoning them with your favorite spices before cooking. Garlic powder, onion powder, paprika, or even a pinch of cayenne can add a tasty kick.
- Customize with Condiments:
- Provide a variety of condiments like ketchup, mustard, mayonnaise, or barbecue sauce for the kids to customize their sliders according to their preferences.
- Vegetable Additions:
- Sneak in some veggies by adding lettuce, tomato slices, or pickles to the sliders. This not only adds freshness but also provides extra nutrients.
- Toast the Buns:
- Toasting the buns before assembling the sliders can add a nice crunch and enhance the overall texture of the sandwich.
- Mix Cheese Varieties:
- Experiment with different cheese varieties or mix them for added flavor. Try cheddar, pepper jack, or a blend of cheeses to create a unique taste.
- Freeze in Portions:
- If your kids have varying appetites, consider freezing the sliders in smaller portions. This way, they can grab just the right amount for their hunger.
- Label and Date:
- Label the freezer bag with the date of preparation to keep track of freshness. It also helps to write the heating instructions on the bag for easy reference.
- Serving with Sides:
- Serve the sliders with a side of fresh fruit, veggies, or a small salad to make it a more balanced meal.
- Try Different Breads:
- Experiment with different types of buns or bread, such as whole wheat, brioche, or pretzel buns, to add variety to the sliders.
- Include Dipping Sauces:
- Provide dipping sauces like ranch, honey mustard, or tzatziki for an extra burst of flavor.
- Make it a Family Activity:
- Get the kids involved in the assembly process. Let them choose their toppings and create their own personalized sliders.
- Portion Control:
- If you’re concerned about portion sizes, you can cut the chicken patties in half before assembling the sliders. This can be especially helpful for younger kids.
Enjoy making these Cheesy Chicken Patty Sliders a fun and customizable lunch option for the whole family!