
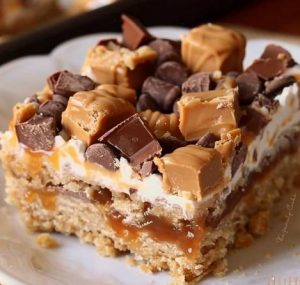
Decadent Butterfinger Caramel Crunch Bars: A Sweet Symphony of Flavors
Indulge in the irresistible combination of buttery graham cracker crust, rich caramel, and creamy peanut butter with these Butterfinger Caramel Crunch Bars. This recipe is perfect for those moments when you crave something truly indulgent yet simple to make. The crunchy Butterfinger bits add a delightful texture, while the smooth layers of caramel and chocolate bring everything together in perfect harmony. Ideal for gatherings, potlucks, or just a cozy treat at home, these bars are sure to become a favorite in your dessert repertoire.
Ingredients Overview
1 Cup Butter, Melted
- Provides a rich, buttery base for the graham cracker crust, ensuring it holds together and offers a deliciously decadent flavor.
2 Cups Graham Cracker Crumbs
- Forms the foundation of the bars, giving a delightful crunch and slightly sweet flavor.
1 Cup Powdered Sugar
- Adds sweetness to the crust and helps bind the ingredients together for a cohesive base.
1 Cup Creamy Peanut Butter
- Infuses the crust with a smooth, nutty flavor that pairs perfectly with the caramel and chocolate layers.
1 Package (10 oz) Butterfinger Baking Bits
- Adds a delightful crunch and signature Butterfinger flavor, making each bite irresistibly delicious.
1 Package (11 oz) Caramel Bits
- Creates a luscious, gooey layer that complements the crunchy and creamy elements of the bars.
2 Tablespoons Heavy Cream
- Ensures the caramel melts smoothly, creating a velvety texture for the caramel layer.
1 Cup Chocolate Chips
- Melts into a smooth, rich topping that finishes the bars with a perfect chocolatey touch.
Step-by-Step Cooking Instructions
Preheat the Oven:
1. Prepare Your Workspace
- Preheat: Set your oven to 350°F (175°C). Line a 9×13-inch baking dish with parchment paper, leaving an overhang on the sides for easy removal later.
Create the Crust:
2. Mix the Base
- Combine: In a medium bowl, mix together the melted butter, graham cracker crumbs, powdered sugar, and creamy peanut butter until well combined.
- Press: Firmly press the mixture evenly into the prepared baking dish, creating an even layer that will form the base of your bars.
Bake the Crust:
3. Bake and Cool
- Bake: Place the baking dish in the preheated oven and bake for 10 minutes. This helps to set the crust and develop a slight crunch.
- Cool: Remove from the oven and let the crust cool slightly to ensure it holds its shape when adding the next layers.
Add the Butterfinger Layer:
4. Sprinkle the Bits
- Sprinkle: Evenly distribute the Butterfinger baking bits over the cooled crust, ensuring each bite will have a bit of that delightful crunch.
Prepare the Caramel Layer:
5. Melt the Caramel
- Microwave: In a microwave-safe bowl, combine the caramel bits and heavy cream. Microwave in 30-second intervals, stirring between each interval, until the caramel is fully melted and smooth.
- Pour: Carefully pour the melted caramel over the Butterfinger bits, spreading it out to cover them completely.
Add the Chocolate Drizzle:
6. Melt the Chocolate
- Microwave: In a separate microwave-safe bowl, melt the chocolate chips in 30-second intervals, stirring between each, until smooth.
- Drizzle: Drizzle the melted chocolate over the caramel layer, creating a beautiful, glossy finish.
Set and Serve:
7. Chill and Cut
- Refrigerate: Place the baking dish in the refrigerator for at least 2 hours, or until the bars are fully set and firm.
- Cut: Once set, use the parchment paper overhang to lift the bars out of the dish. Cut into squares and serve.
Storage and Reheating Tips
Storage:
- Refrigerate: Store the bars in an airtight container in the refrigerator for up to a week. This helps maintain their texture and flavor.
- Freeze: For longer storage, freeze the bars in a single layer on a baking sheet. Once frozen, transfer them to a freezer-safe container or bag for up to 3 months.
Reheating:
- Room Temperature: Allow the bars to come to room temperature before serving for the best texture and flavor.
- Microwave: If you prefer a warm treat, microwave individual bars on a microwave-safe plate for 10-15 seconds, just until slightly warm.
Helpful Tips for Enhancing the Recipe
Use Quality Ingredients: High-quality butter, peanut butter, and chocolate make a noticeable difference in the final product.
Line the Pan Well: Use parchment paper with an overhang for easy removal and clean slices.
Don’t Overheat Caramel: Be cautious when melting the caramel bits to avoid burning. Stir frequently and microwave in short bursts.
Even Layering: Press the crust mixture evenly into the pan for a uniform base, and spread the caramel and chocolate layers smoothly for the best presentation.
Chill Thoroughly: Ensure the bars are fully chilled before cutting to achieve clean, even slices.
Cut with a Warm Knife: Dip your knife in hot water and wipe it dry before slicing for clean cuts through the layers.
Add a Sprinkle of Sea Salt: For a sophisticated twist, sprinkle a little sea salt over the chocolate layer before it sets.
Experiment with Mix-Ins: Add chopped nuts, shredded coconut, or a drizzle of white chocolate for added texture and flavor.
Use a Silicone Spatula: A silicone spatula makes spreading the layers easier and ensures you get every bit out of the bowl.
Serve Cold or Room Temperature: These bars are delicious both cold and at room temperature. Experiment to find your favorite way to enjoy them.
Popular Questions and Answers
Can I use a different type of candy instead of Butterfinger?
- Answer: Absolutely! Feel free to substitute with other crunchy candies like toffee bits or crushed peanut brittle.
What if I don’t have heavy cream?
- Answer: You can substitute with half-and-half or even whole milk, but the caramel might be slightly less rich and creamy.
Can I make these bars ahead of time?
- Answer: Yes, these bars can be made up to a week in advance if stored in the refrigerator, making them perfect for parties and gatherings.
What’s the best way to cut these bars neatly?
- Answer: Use a sharp knife dipped in hot water and wiped dry for clean, precise cuts. This helps prevent the layers from sticking to the knife.
Can I use natural peanut butter?
- Answer: Yes, but make sure to stir it well to incorporate the oils before mixing it with the other ingredients.
How do I prevent the chocolate from seizing when melting?
- Answer: Melt the chocolate slowly in 30-second intervals in the microwave, stirring frequently, or use a double boiler for more controlled heat.
Can I use salted butter?
- Answer: Yes, salted butter can add a nice balance to the sweetness, but you may want to adjust any additional salt in the recipe.
What can I use if I don’t have graham cracker crumbs?
- Answer: Crushed digestive biscuits, vanilla wafers, or even crushed pretzels can be used as a substitute for graham cracker crumbs.
Can these bars be made gluten-free?
- Answer: Yes, by using gluten-free graham cracker crumbs or a suitable alternative, you can make these bars gluten-free.
Is there a way to make these bars dairy-free?
- Answer: Substitute the butter with a dairy-free alternative and use dairy-free caramel bits and chocolate chips to make these bars dairy-free.
Secrets for Achieving Culinary Perfection
Patience is Key: Allow the bars to set fully in the refrigerator to achieve the best texture and cleanest cuts.
Balance the Sweetness: Taste your caramel and chocolate mixtures as you go to balance the sweetness. Adjust as needed with a pinch of salt.
Layer Evenly: Ensure each layer is spread evenly to create a visually appealing and balanced bar.
Temperature Control: Keep the kitchen cool when working with chocolate and caramel to prevent melting and ensure proper setting.
Quality Over Quantity: Invest in good quality baking bits and chocolate for the richest flavor.
Keep It Fresh: Store the bars in an airtight container to keep them fresh and prevent the crust from becoming soggy.
Don’t Rush the Chill: Refrigerate the bars for at least 2 hours, but overnight is even better for firm, well-set bars.
Creative Toppings: Experiment with different toppings like sea salt, chopped nuts, or a drizzle of white chocolate to personalize the bars.
Mindful Melting: Melt the caramel and chocolate slowly and gently to prevent burning and ensure a smooth, creamy texture.
Enjoy the Process: Baking should be a joyful, calming experience. Take your time, savor the process, and enjoy the delicious results with loved ones