
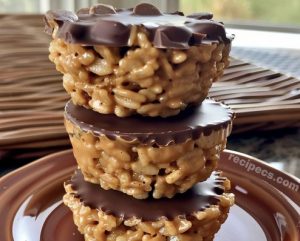
Peanut Butter Balls with Chocolate Rice Krispies
Discover a delightful treat that seamlessly blends the comforting crunch of Rice Krispies with the rich, velvety decadence of chocolate and the nutty goodness of peanut butter. Perfect for any occasion, these Peanut Butter Balls with Chocolate Rice Krispies are a quick and easy dessert that will leave you and your loved ones craving for more.
Ingredients Overview
Rice Krispies Cereal
Crunch factor: The 3 cups of Rice Krispies cereal provide the essential crunch that makes these treats irresistible.
Chocolate Chips
Velvety delight: With 1 1/2 cups of chocolate chips, you get a smooth, indulgent topping. Opt for vegan chocolate chips for a plant-based option.
Chunky Peanut Butter
Nutty goodness: The 1 cup of chunky peanut butter adds texture and a rich, hearty flavor.
Honey
Natural sweetness: Sweeten the mixture naturally with 6 tablespoons of honey, which also helps bind the ingredients.
Salt
A touch of magic: Just 1/8 teaspoon of salt enhances the flavors, balancing the sweetness and nuttiness perfectly.
Step-by-Step Cooking Instructions
Step 1: Prepare Your Liners
Kick things off by lining your muffin tin with either paper or silicone liners for an easy, mess-free release.
Step 2: Create the Peanut Butter Mixture
Heat up a saucepan on a gentle flame, bringing together the peanut butter, honey, and a whisper of salt. Stir this mix until it transforms into a smooth, pourable delight. Once achieved, remove from heat.
Step 3: Mix in the Rice Krispies
Gently fold in the Rice Krispies cereal until each piece is lovingly coated in your peanut butter mixture.
Step 4: Form the Base
Carefully spoon this blend into the prepared muffin tin, pressing gently to form the base of your cups.
Step 5: Melt the Chocolate
In a separate pan, melt down those chocolate chips until you have a smooth, glossy mixture. Spoon this chocolatey joy into each cup, spreading it to cover the peanut butter base.
Step 6: Chill and Set
Patience is a virtue as these beauties need to chill in the refrigerator for at least 1 hour, or until the chocolate has set to perfection.
Step 7: Enjoy!
Once set, remove from the refrigerator, peel away the liners, and dive into a world of crunchy, chocolatey, peanut buttery bliss.
Valuable Tips
Use Fresh Ingredients
For the best results, make sure your Rice Krispies and peanut butter are fresh. This ensures maximum crunch and flavor.
Melt Chocolate Carefully
When melting chocolate, do it slowly over low heat to avoid burning. Stir constantly for a smooth finish.
Press Firmly but Gently
When forming the base in the muffin tin, press firmly to compact the mixture but not too hard to crush the Rice Krispies.
Chill Thoroughly
Make sure to chill the treats for the full hour. This allows the chocolate to set firmly and makes removing the liners easier.
Storage and Reheating Tips
Storage
Store your Peanut Butter Balls in an airtight container in the refrigerator. They will stay fresh and delicious for up to a week.
Reheating
These treats are best enjoyed cold, straight from the fridge. If you prefer a softer texture, let them sit at room temperature for a few minutes before serving.
Frequently Asked Questions
Can I use smooth peanut butter instead of chunky?
Yes, you can. Smooth peanut butter will work just as well, although it will change the texture slightly.
Can I use another type of cereal?
While Rice Krispies are recommended for their texture, you can experiment with other cereals if you like.
Is there a substitute for honey?
Maple syrup or agave nectar can be used as a substitute for honey, especially if you prefer a vegan option.
How can I make this recipe gluten-free?
Ensure that the Rice Krispies cereal and other ingredients you use are certified gluten-free.
Can I add other mix-ins?
Yes, you can add mini marshmallows, chopped nuts, or dried fruit for extra flavor and texture.
What if I don’t have a muffin tin?
You can use a baking dish lined with parchment paper. Once set, cut into squares.
How long do these treats last?
When stored properly in an airtight container in the refrigerator, they last up to a week.
Can I freeze these treats?
Yes, you can freeze them for up to two months. Thaw in the refrigerator before serving.
How do I make the chocolate layer thicker?
Increase the amount of chocolate chips to your preference for a thicker layer.
Can I use white chocolate?
Absolutely! White chocolate can be used for a different flavor profile.
What if my mixture is too sticky?
If the peanut butter mixture is too sticky, chill it slightly before pressing into the muffin tin.
Can I use a microwave to melt the chocolate?
Yes, melt the chocolate in 30-second intervals, stirring between each, until smooth.
How can I prevent the chocolate from seizing?
Make sure no water comes into contact with the chocolate while melting it.
Can I add vanilla extract?
Yes, a teaspoon of vanilla extract can enhance the flavor of the peanut butter mixture.
What type of liners should I use?
Both paper and silicone liners work well. Silicone liners are reusable and provide easy release.
Can I make these without a stove?
Yes, you can use a microwave to heat the peanut butter mixture and melt the chocolate.
How can I make them more festive?
Decorate with sprinkles or drizzle with white chocolate for a festive touch.
Are there any nut-free alternatives?
For a nut-free version, use sunflower seed butter or soy nut butter.
Can kids help with this recipe?
Absolutely! This is a fun and easy recipe for kids to help with, especially pressing the mixture into the tins and adding the chocolate layer.
What should I do if the chocolate doesn’t set?
Ensure that your refrigerator is cold enough. If needed, pop the treats into the freezer for a quick set.
Secrets for Achieving Culinary Perfection
- Use High-Quality Chocolate
Premium chocolate chips make a noticeable difference in flavor and texture. - Toast the Rice Krispies
For extra flavor, lightly toast the Rice Krispies in a dry pan before mixing them in. - Add a Hint of Cinnamon
A pinch of cinnamon in the peanut butter mixture adds a warm, subtle spice. - Ensure Ingredients are at Room Temperature
Room temperature peanut butter and honey mix more smoothly. - Avoid Overheating
When melting chocolate, low and slow is the key to prevent burning. - Chill the Peanut Butter Mixture
If the mixture is too warm, it can make the Rice Krispies soggy. Cool it slightly before mixing. - Use a Cookie Scoop
For even-sized treats, use a cookie scoop to portion the mixture into the muffin tin. - Press with Parchment Paper
Use a small piece of parchment paper to press the mixture into the muffin tin without sticking. - Layer with Wax Paper
When storing, layer the treats with wax paper to prevent sticking. - Experiment with Nut Butters
Try almond butter or cashew butter for a different flavor profile. - Double the Chocolate Layer
For chocolate lovers, double the amount of chocolate chips for a thicker layer. - Add a Touch of Sea Salt
Sprinkle a few grains of sea salt on top of the chocolate layer before chilling for a sweet and salty contrast. - Use a Double Boiler
Melt chocolate in a double boiler to control the temperature and avoid seizing. - Mix Thoroughly
Ensure that the Rice Krispies are thoroughly coated for even distribution. - Let the Kids Decorate
Letting kids add their favorite toppings can make this treat even more fun and personalized. - Serve at Parties
These treats are perfect for parties. Present them in colorful liners for a festive touch. - Cut into Bars
For a different presentation, press the mixture into a baking dish and cut into bars once set. - Use Organic Ingredients
Opt for organic peanut butter and honey for a healthier version. - Drizzle with Extra Chocolate
For an elegant touch, drizzle melted white or dark chocolate over the top. - Serve with Ice Cream
For an indulgent dessert, serve the treats alongside a scoop of vanilla ice cream.
With these tips, FAQs, and secrets, you’re well on your way to making the perfect Peanut Butter Balls with Chocolate Rice Krispies. Enjoy the process and the delicious results