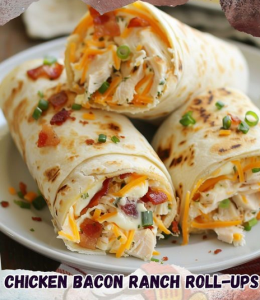
Chicken Bacon Ranch Roll-Ups: A Delightful Low-Carb Treat 🥓🍗🧀
Indulge in the savory blend of chicken, bacon, and ranch dressing wrapped in melty mozzarella cheese with these Chicken Bacon Ranch Roll-Ups. This easy-to-make, low-carb recipe is perfect for a quick lunch, a snack, or a crowd-pleasing appetizer. Let’s dive into the details and create a dish that will become a staple in your kitchen!
Ingredients Overview
Main Ingredients
- Mozzarella Cheese: Six slices of mozzarella create a creamy, melty wrap that holds everything together.
- Cooked Chicken: 1 1/2 cups of cooked, shredded, or grilled chicken provide a hearty and flavorful filling.
- Cooked Bacon: 1/4 cup of crumbled bacon (approximately 2-3 slices) adds a delightful crunch and smoky flavor.
- Ranch Dressing: 1 tablespoon of low-carb ranch dressing brings all the flavors together with its creamy tang.
- Green Onion: 1 teaspoon of finely sliced green onion adds a fresh, mild bite.
Step-by-Step Cooking Instructions
Step 1: Prepare the Filling
Combine Ingredients: In a bowl, mix together the shredded chicken, crumbled bacon, ranch dressing, and sliced green onions. Set aside this flavorful mixture.
Step 2: Preheat the Oven
Preheat: Set your oven to 350°F (175°C) and line a large baking sheet with a silicone baking mat for easy cleanup and perfect baking.
Step 3: Bake the Mozzarella Slices
Arrange and Bake: Place the mozzarella slices on the silicone baking mat. Bake for 5-7 minutes until the cheese is bubbling and the edges are starting to brown.
Step 4: Cool Slightly and Fill
Cool Slightly: Remove the cheese from the oven and let it cool for about a minute. It should be pliable but not too hot to handle. Spread the Filling: Spoon the chicken bacon ranch mixture along one edge of each mozzarella slice.
Step 5: Roll Up
Roll Tightly: Carefully roll up each cheese slice tightly, keeping the seam side down to secure the roll-up.
Cooking Tips for a Seamless Experience
Helpful Tip: Use a Silicone Baking Mat
A silicone baking mat ensures the cheese doesn’t stick and makes rolling the cheese easier.
Helpful Tip: Allow Cooling Time
Let the cheese cool slightly before rolling to avoid burns and ensure the cheese is pliable.
Helpful Tip: Customize Your Filling
Feel free to add other ingredients like diced bell peppers or jalapeños for an extra kick.
Storage and Reheating Tips
Storage:
- Refrigerate: Store leftovers in an airtight container in the refrigerator for up to 3 days.
Reheating:
- Oven: Reheat in a preheated 350°F oven for about 5 minutes, or until warmed through.
- Microwave: Reheat in the microwave on medium power for 1-2 minutes.
Frequently Asked Questions
1. Can I use pre-cooked chicken for this recipe?
- Answer: Yes, using pre-cooked chicken is a great time-saver.
2. Can I make these roll-ups ahead of time?
- Answer: Yes, you can prepare them ahead of time and reheat them when ready to serve.
3. What can I use instead of mozzarella cheese slices?
- Answer: You can use provolone or cheddar slices for a different flavor.
4. Is this recipe keto-friendly?
- Answer: Absolutely! This recipe is low-carb and keto-friendly.
5. Can I freeze these roll-ups?
- Answer: Freezing is not recommended as the texture of the cheese may change.
6. How can I make this recipe spicier?
- Answer: Add some diced jalapeños or a dash of hot sauce to the filling.
7. What if I don’t have a silicone baking mat?
- Answer: You can use parchment paper instead, but watch closely to prevent sticking.
8. Can I use turkey bacon?
- Answer: Yes, turkey bacon is a great alternative for a lighter version.
9. What dipping sauces go well with these roll-ups?
- Answer: Additional ranch dressing, blue cheese dressing, or spicy aioli are great options.
10. How many servings does this recipe make?
- Answer: This recipe serves 4-6 people, depending on portion sizes.
11. Can I add vegetables to the filling?
- Answer: Yes, finely chopped bell peppers or spinach work well.
12. What type of chicken is best for this recipe?
- Answer: Grilled or roasted chicken breasts are ideal.
13. Is there a dairy-free option?
- Answer: Use dairy-free cheese slices and ensure the ranch dressing is also dairy-free.
14. How can I ensure the roll-ups stay closed?
- Answer: Rolling tightly and placing seam side down will help keep them closed.
15. Can I use homemade ranch dressing?
- Answer: Yes, homemade ranch dressing will add a fresh touch.
16. Are there any gluten-free options?
- Answer: Ensure all ingredients, especially the ranch dressing, are gluten-free.
17. Can I add herbs to the filling?
- Answer: Fresh herbs like parsley or cilantro can enhance the flavor.
18. How long do they need to cool before rolling?
- Answer: About one minute, just until pliable but not too hot to handle.
19. Can I use shredded cheese instead of slices?
- Answer: Slices work best for rolling, but you could experiment with shredded cheese.
20. What can I serve with these roll-ups?
- Answer: A fresh salad or vegetable sticks make great accompaniments.
Top 10 Secrets for Culinary Perfection
- Use Fresh Ingredients: Fresh chicken, crispy bacon, and good-quality cheese make a huge difference.
- Proper Cooling: Let the cheese cool slightly but not too long to ensure it’s pliable for rolling.
- Season Well: Ensure the chicken is well-seasoned for maximum flavor.
- Roll Tightly: Rolling tightly helps keep the filling inside and makes for a neater presentation.
- Experiment with Fillings: Add different ingredients like chopped veggies or herbs for variety.
- Even Heating: Make sure the cheese is evenly heated to avoid uneven texture.
- Fresh Garnishes: Fresh green onions or herbs on top add a burst of color and flavor.
- Serve Immediately: These roll-ups are best enjoyed warm right out of the oven.
- Adjust for Diets: Adapt the recipe to be keto, gluten-free, or dairy-free as needed.
- Presentation: Slice the roll-ups diagonally for a beautiful presentation.
Enjoy making and savoring these Chicken Bacon Ranch Roll-Ups, perfect for any occasion and sure to please everyone at the table!


