
No-Bake Mini Banana Cream Pies
Imagine indulging in a dessert that’s creamy, refreshing, and just the right size for a sweet bite—without the hassle of turning on your oven. These No-Bake Mini Banana Cream Pies are the ultimate treat for banana lovers, combining layers of smooth banana pudding, ripe bananas, and fluffy whipped cream, all nestled in a buttery graham cracker crust. They’re perfect for summer gatherings, afternoon tea, or simply a night when you need something sweet but easy.
This recipe is a breeze to make and comes together in just a few simple steps, with no need to worry about complicated techniques. It’s designed to bring a little sunshine to your day, with minimal fuss and maximum deliciousness.
Ingredients Overview
Graham Cracker Crumbs (1 ½ cups)
The foundation of these mini pies, graham crackers give that crunchy, slightly sweet contrast to the creamy banana layers. Use finely crushed crumbs to create a smooth, even crust.
Granulated Sugar (⅓ cup)
A touch of sugar enhances the natural sweetness of the graham crackers and helps bind the crust.
Unsalted Butter (6 tablespoons, melted)
Melted butter binds the crust together and adds a rich, buttery flavor to every bite.
Instant Banana Cream Pudding Mix (1 package, 3.4 oz)
The star of this dessert, banana cream pudding brings that nostalgic flavor we all love. Using instant pudding makes this recipe quick and foolproof.
Cold Milk (1 ½ cups)
Whisked with the pudding mix, cold milk transforms it into a smooth, creamy filling in just minutes.
Heavy Whipping Cream (1 cup)
Whipped into luscious peaks, heavy cream adds a light and airy texture that perfectly complements the richness of the banana pudding.
Powdered Sugar (2 tablespoons)
Used to sweeten the whipped cream, powdered sugar dissolves easily and provides just the right amount of sweetness.
Vanilla Extract (1 teaspoon)
A splash of vanilla adds warmth and depth to the whipped cream, enhancing the flavors without overpowering them.
Ripe Bananas (2 large)
Sliced thinly, ripe bananas add fresh, natural sweetness and texture to the pies. Look for bananas that are yellow with small brown spots for the best flavor.
Optional Toppings: Chocolate Shavings or Caramel Drizzle
For that extra touch of indulgence, garnish the pies with a sprinkle of chocolate shavings or a drizzle of caramel. Both add a delicious contrast to the creamy banana layers.
Step-by-Step Cooking Instructions
1. Prepare the Crust:
In a medium bowl, combine the graham cracker crumbs, granulated sugar, and melted butter. Mix until the crumbs are fully coated and have the texture of wet sand. Press the mixture firmly into the bottoms of a 12-cup muffin tin or mini pie tins, creating an even layer for each pie. Place the crusts in the refrigerator for at least 20 minutes to set.
2. Make the Pudding Filling:
In a large bowl, whisk together the banana cream pudding mix and cold milk for about 2 minutes, until thick and smooth. Let the mixture sit for 5 minutes to allow it to fully set. The result will be a creamy, luscious pudding that’s ready to fill your pies.
3. Whip the Cream:
In a separate bowl, use an electric mixer to beat the heavy whipping cream, powdered sugar, and vanilla extract on medium-high speed until stiff peaks form. Be sure to reserve about half of the whipped cream for topping your mini pies later.
4. Assemble the Mini Pies:
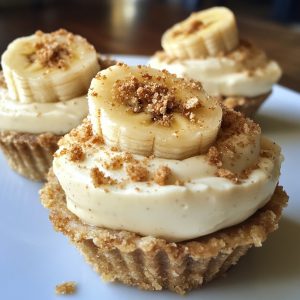
Remove the crusts from the refrigerator. Add a layer of banana slices to each crust. Spoon a generous layer of banana cream pudding over the bananas, filling each cup almost to the top. Add another thin layer of banana slices on top of the pudding for extra banana flavor. Finish by adding a dollop of the reserved whipped cream on top of each pie. For an extra special touch, garnish with chocolate shavings or a caramel drizzle if desired.
Helpful Tips for Success
Tip #1:
For the best crust, press the graham cracker mixture firmly into the tins to ensure it holds together. A spoon or the bottom of a glass works great for this.
Tip #2:
To prevent your bananas from browning, you can brush them with a little lemon juice before layering them in the pies.
Tip #3:
Make sure your heavy whipping cream is cold before whipping. Cold cream whips faster and results in fluffier peaks.
Tip #4:
If you want to get ahead, the crusts can be prepared a day in advance and stored in the fridge.
Storage and Reheating Tips
Storage:
Store your No-Bake Mini Banana Cream Pies in the refrigerator for up to 3 days. Keep them in an airtight container to prevent the whipped cream from absorbing any fridge odors. For best results, enjoy the pies within 1-2 days as the bananas may start to brown.
Reheating:
These pies are best served cold, so there’s no need for reheating! If you’re prepping them ahead of time, simply pull them from the fridge when you’re ready to serve, and they’ll be as fresh as when you made them.
Frequently Asked Questions
How do I prevent the crust from crumbling?
Ensure the crust mixture is well-combined with the melted butter and press it firmly into the tin.
Can I make this recipe ahead of time?
Yes! You can make the crust and pudding up to a day ahead. Just assemble the pies when you’re ready to serve.
Can I use a different type of pudding mix?
Absolutely. Vanilla or chocolate pudding are great alternatives if you’re not a fan of banana.
How do I keep the bananas from turning brown?
A quick brush of lemon juice will slow down the oxidation process, keeping your bananas fresh.
Can I freeze these mini pies?
It’s best not to freeze them since the texture of the bananas and pudding may change upon thawing.
Can I use store-bought whipped cream?
Yes, store-bought whipped cream can save time, but homemade whipped cream offers a fresher taste.
20 Secrets for Culinary Perfection
- Use freshly crushed graham crackers for the best flavor in the crust.
- Whip the cream in a chilled bowl for quicker and fluffier results.
- Slice the bananas just before assembling to ensure freshness.
- Add a splash of rum extract to the pudding for a fun twist.
- Let the pudding sit for at least 5 minutes to thicken completely before using.
- Use ripe but firm bananas to avoid a mushy texture in the pies.
- Double the crust mixture if you prefer a thicker crust.
- Add a sprinkle of sea salt to the crust for a balance of sweet and salty.
- Top with caramel or melted chocolate for a decadent finish.
- Serve these pies chilled to fully enjoy their refreshing creaminess.
- Crush graham crackers in a food processor for the smoothest texture.
- Use a piping bag to add whipped cream for a professional look.
- Use different pudding flavors to change up the dessert for various occasions.
- Chill the pudding for 30 minutes to allow it to firm up even more before assembly.
- Add mini chocolate chips between the layers for a surprise bite.
- Brush the bananas with lemon juice to keep them from browning.
- Top with candied nuts for an added crunch.
- Press the crust down firmly to ensure it holds when slicing.
- Serve with a side of ice cream for an even more indulgent dessert.
- Always use fresh whipped cream for the best results