
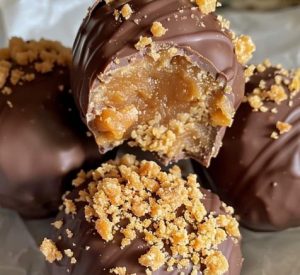
Butterfinger Balls: The Perfect Sweet Treat
Indulge in the delightful combination of creamy peanut butter, crunchy graham crackers, and the irresistible taste of Butterfinger bars, all enveloped in a smooth chocolate coating. These Butterfinger Balls are a perfect bite-sized treat for any occasion, offering a heavenly blend of textures and flavors that will leave you wanting more. Ideal for parties, gifts, or simply to satisfy your sweet tooth, this recipe is both easy and fun to make.
Ingredients Overview
Powdered Sugar: Provides the necessary sweetness and helps bind the mixture together. Graham Cracker Crumbs: Adds a delightful crunch and a hint of honey flavor. Butterfinger Bars: Crushed bits bring in the signature Butterfinger taste, enhancing the overall flavor profile. Butter: Melted butter helps combine the ingredients smoothly and adds a rich taste. Crunchy Peanut Butter: The crunchiness of the peanut butter complements the graham cracker crumbs and Butterfinger bits, creating a delightful texture. Chocolate Almond Bark: Used for coating, it provides a smooth and glossy finish to each ball. Feel free to use your preferred chocolate candy coating for variation.
Step-by-Step Cooking Instructions
Step 1: Mix the Ingredients In a large mixing bowl, combine 1 (16-oz) box of powdered sugar, 2½ cups of graham cracker crumbs, 5 (1.9-oz) crushed Butterfinger bars, 1¼ cups melted butter, and 1½ cups crunchy peanut butter. Stir until all ingredients are thoroughly combined.
Step 2: Form the Balls Roll the mixture into 1-inch balls using your hands. This step can be fun, and involving kids can make it a family activity. Place each ball on a parchment-lined baking sheet.
Step 3: Refrigerate the Balls Refrigerate the rolled balls for about 30 minutes. This helps them firm up and makes the next step easier.
Step 4: Melt the Chocolate While the balls are chilling, melt 1 (24-oz) package of chocolate almond bark or your preferred chocolate candy coating in a microwave-safe bowl. Heat in 30-second intervals, stirring between each until fully melted and smooth.
Step 5: Dip the Balls Using a fork or a dipping tool, dip each ball into the melted chocolate, ensuring it is fully coated. Place the dipped balls back on the parchment paper.
Step 6: Set the Chocolate Allow the chocolate to set completely. This can take about 15 minutes at room temperature or can be sped up by placing the balls in the refrigerator.
Step 7: Serve and Enjoy Once the chocolate has set, your Butterfinger Balls are ready to be enjoyed! Store any leftovers in an airtight container.
Valuable Tips
Helpful Tip: Use Room Temperature Peanut Butter
This makes mixing much easier and ensures a smoother texture.
Helpful Tip: Crush Butterfingers Ahead of Time
Use a food processor or place them in a zip-top bag and crush with a rolling pin for a fine consistency.
Helpful Tip: Uniform Balls
Use a cookie scoop to ensure all balls are the same size, which helps them chill and set evenly.
Helpful Tip: Double Dipping for Extra Crunch
For an extra-thick chocolate coating, dip the balls twice, allowing the first coat to set before dipping again.
Storage and Reheating Tips
Storage: Store Butterfinger Balls in an airtight container at room temperature for up to a week. For longer storage, keep them in the refrigerator for up to two weeks.
Reheating: These treats are best enjoyed at room temperature. If you refrigerate them, allow them to sit out for a few minutes before serving to soften the chocolate slightly.
Frequently Asked Questions
How long do Butterfinger Balls last?
Stored in an airtight container, they last up to a week at room temperature and two weeks in the refrigerator.
Can I use smooth peanut butter instead of crunchy?
Yes, smooth peanut butter can be used if you prefer a less crunchy texture.
What is chocolate almond bark?
Chocolate almond bark is a chocolate-flavored confection used for dipping and coating. It can be found in the baking aisle of most grocery stores.
Can I freeze Butterfinger Balls?
Yes, you can freeze them for up to three months. Thaw in the refrigerator before serving.
What can I use instead of Butterfinger bars?
You can substitute with any of your favorite candy bars for a different flavor profile.
Can I make these without graham cracker crumbs?
The graham cracker crumbs add texture, but you can substitute with crushed cookies or omit them if needed.
Is there a substitute for powdered sugar?
Powdered sugar is key for texture, but you can try using finely ground granulated sugar in a pinch.
Can I add nuts or other mix-ins?
Absolutely! Chopped nuts, mini chocolate chips, or coconut flakes make great additions.
How do I keep the chocolate coating smooth?
Ensure your chocolate is melted evenly and stir frequently to avoid lumps. Adding a small amount of vegetable oil can help achieve a smoother consistency.
What if my mixture is too dry?
If the mixture seems too dry, add a little more melted butter or peanut butter until it reaches a rollable consistency.
Can I make these dairy-free?
Yes, use dairy-free butter and chocolate to accommodate dietary restrictions.
Are Butterfinger Balls gluten-free?
To make them gluten-free, use gluten-free graham cracker crumbs and ensure your Butterfinger bars are gluten-free.
How many balls does this recipe make?
This recipe typically makes about 40-50 balls, depending on the size.
Can I use white chocolate for coating?
Yes, white chocolate or any preferred chocolate can be used for coating.
What’s the best way to crush Butterfinger bars?
Place them in a zip-top bag and use a rolling pin or mallet for easy crushing.
Can I make the balls smaller or larger?
Yes, adjust the size to your preference, but note that the chilling and dipping times may vary.
How do I prevent the balls from sticking to my hands when rolling?
Lightly dust your hands with powdered sugar or spray with a bit of non-stick spray.
What if I don’t have a microwave for melting chocolate?
Use a double boiler on the stove to melt the chocolate gently.
Can I add food coloring to the chocolate coating?
Yes, you can add oil-based food coloring to the melted chocolate for a festive touch.
Are there any variations for holidays or special occasions?
Decorate with sprinkles, colored sugar, or edible glitter to suit any occasion.
20 Secrets for Achieving Culinary Perfection
- Use High-Quality Ingredients: The better the ingredients, the better the final product.
- Chill the Mixture Thoroughly: This makes rolling and dipping much easier.
- Uniform Size Matters: Ensures even setting and a professional look.
- Double Dip for Extra Thickness: For a thicker chocolate coating, dip the balls twice.
- Temperature Control: Ensure your chocolate is not overheated to maintain a smooth consistency.
- Use a Cookie Scoop: For consistent-sized balls.
- Microwave in Intervals: Melt chocolate in short bursts to avoid burning.
- Proper Storage: Keep in an airtight container to maintain freshness.
- Decorate Creatively: Use festive decorations for a personalized touch.
- Use a Fork for Dipping: Allows excess chocolate to drip off easily.
- Add Mix-Ins: Customize with nuts, chocolate chips, or dried fruit.
- Room Temperature Peanut Butter: Easier mixing and smoother texture.
- Crush Candies Ahead of Time: Saves prep time and ensures even mixing.
- Avoid Humidity: High humidity can affect the setting of the chocolate.
- Non-Stick Parchment: Ensures the balls don’t stick after dipping.
- Test Melted Chocolate: Dip a spoon first to check consistency.
- Adjust Sweetness: Taste the mixture before rolling and adjust sugar if necessary.
- Gentle Mixing: Combine ingredients thoroughly but gently to maintain texture.
- Pre-Chilled Bowls: Use chilled bowls for mixing in warmer climates.
- Patient Setting: Allow enough time for the chocolate to set fully before serving.
Enjoy making and sharing these delicious Butterfinger Balls, and may they bring sweet moments to your day