
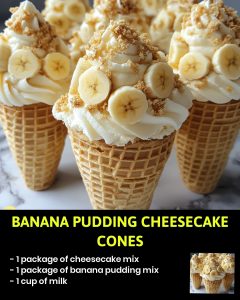
Banana Pudding Cheesecake Cones
Get ready to indulge in the perfect combination of two beloved desserts—banana pudding and cheesecake—in one sweet, handheld treat! These Banana Pudding Cheesecake Cones are easy to make and packed with creamy cheesecake filling, smooth banana pudding, and fresh banana slices, all tucked inside a crispy sugar cone. Topped with crunchy vanilla wafers, these cones offer a delightful mix of textures that are sure to satisfy your sweet tooth. They’re perfect for parties, picnics, or a simple dessert to enjoy anytime.
Ingredients:
- 1 package cheesecake mix (typically 8 oz)
- 1 package banana pudding mix (typically 3.4 oz)
- 1 cup milk (divided into two 1/2 cup servings)
- 1 cup crushed vanilla wafers
- 1 cup sliced bananas
- 6 sugar cones (or waffle cones)
Instructions:
- Prepare the cheesecake mixture: In a bowl, prepare the cheesecake mix according to the package instructions using 1/2 cup of milk.
- Prepare the banana pudding mixture: In another bowl, prepare the banana pudding mix according to package instructions, using the remaining 1/2 cup of milk.
- Layer the cones: Begin by layering the crushed vanilla wafers at the bottom of each sugar cone. Then, add a few slices of banana on top of the wafers.
- Fill with cheesecake mixture: Spoon or pipe the prepared cheesecake mixture into the cones over the banana slices.
- Top with banana pudding: Add a dollop of banana pudding on top of the cheesecake mixture, then sprinkle with more crushed vanilla wafers for a crunchy finish.
- Serve and enjoy! Serve immediately or refrigerate until ready to serve.
Storage Tips:
- Refrigeration: These Banana Pudding Cheesecake Cones are best enjoyed fresh, but if you have leftovers, store them in the refrigerator for up to 2 days. Cover them loosely with plastic wrap or place them in an airtight container to prevent the cones from getting too soggy.
- Assembly: If you plan on storing them for longer periods, consider assembling the cones in layers and keeping the pudding, cheesecake mixture, and cones separately. Assemble them just before serving for the best texture.
- Freezing: These cones are not ideal for freezing as the banana pudding and cheesecake mixture can change in texture. However, you can freeze the cheesecake and banana pudding separately if desired, then assemble the cones fresh.
Reheating Tips:
Since the Banana Pudding Cheesecake Cones are served chilled, there’s no need to reheat them. Simply pull them out of the fridge and enjoy them as a cold, refreshing treat.
20 Frequently Asked Questions (FAQ):
- Can I use homemade cheesecake or banana pudding instead of mixes?
- Yes! You can substitute with homemade cheesecake filling and banana pudding if preferred.
- Can I make these cones ahead of time?
- Yes, you can prepare the pudding and cheesecake mixtures a day in advance and assemble the cones when ready to serve.
- Can I use a different type of cone?
- Absolutely! Waffle cones can be used as a substitute for sugar cones, or you can even try using small bowls or cups.
- Can I add whipped cream on top?
- Yes, a dollop of whipped cream would be a great addition to the top of the cones for extra sweetness and creaminess.
- How do I keep the cones from getting soggy?
- Layer the crushed vanilla wafers and banana slices at the bottom to help absorb moisture, and serve them as soon as possible.
- Can I use a sugar-free pudding or cheesecake mix?
- Yes, if you’re looking for a lower-sugar option, you can use sugar-free versions of the pudding and cheesecake mix.
- Can I use banana-flavored yogurt instead of banana pudding mix?
- You can, but the consistency may differ slightly. Using banana pudding mix gives it the creamy, custardy texture typical of banana pudding.
- Can I make this dessert gluten-free?
- Yes, you can substitute gluten-free vanilla wafers or use a gluten-free cone to make it gluten-free.
- Can I use banana extract instead of banana pudding mix?
- While banana extract can add flavor, the pudding mix creates a smoother texture. If you use extract, you may want to make a thicker base.
- Can I add chocolate chips or drizzle chocolate over the top?
- Yes, a drizzle of melted chocolate or a sprinkle of mini chocolate chips would add a great flavor combination.
- Can I use a different type of fruit?
- While banana is traditional, you can swap it for other fruits like strawberries or blueberries for a fun variation.
- How do I make these more decadent?
- Add layers of caramel sauce, chocolate chips, or marshmallow fluff between the layers for an even richer treat.
- Can I use regular milk instead of whole milk?
- Yes, any type of milk will work, but whole milk will make the pudding and cheesecake mixtures creamier.
- Can I make these Banana Pudding Cheesecake Cones dairy-free?
- Yes, use dairy-free pudding, non-dairy cream cheese, and almond or oat milk as substitutes.
- How can I make the cones firmer?
- If the cones are too soft, you can pre-bake them briefly in the oven to make them a bit sturdier before adding the filling.
- Can I freeze the banana pudding cones for later?
- It’s best to avoid freezing the filled cones, as the texture of the cheesecake and banana pudding might change. Instead, freeze the pudding and filling components separately.
- How many cones does this recipe make?
- This recipe makes 6 cones, but it can be easily scaled up or down to fit your needs.
- Can I add caramelized bananas or banana chips?
- Yes, caramelized bananas or crispy banana chips would be a tasty addition for extra texture and flavor.
- Can I use a different type of cone, like a chocolate-dipped cone?
- Yes! A chocolate-dipped cone would add a delicious touch and extra flavor to your Banana Pudding Cheesecake Cones.
- Can I serve these at a party or event?
- These cones are a fun and portable treat that would be perfect for any event, party, or picnic!
20 Best Tips for Making Perfect Banana Pudding Cheesecake Cones:
- Use ripe bananas. The bananas should be ripe for the best sweetness and flavor in each cone.
- Chill the pudding and cheesecake mix. After preparing the pudding and cheesecake, let them chill for a few minutes to set before assembling the cones.
- Layer carefully. Start with a good base of crushed vanilla wafers to prevent sogginess and layer evenly.
- Don’t overfill the cones. Leave a little space at the top to prevent the filling from spilling over.
- Use fresh whipped cream. Add a dollop of freshly whipped cream for an extra creamy touch.
- Top with mini chocolate chips or sprinkles. For extra color and flavor, try topping the cones with mini chocolate chips or colorful sprinkles.
- Make it a DIY station. If serving at a party, create a DIY cone station with crushed cookies, fruits, and different pudding flavors for everyone to customize their own cones.
- Use a piping bag. For neat and precise filling, use a piping bag to pipe the cheesecake mixture into the cones.
- Toast the cones. Lightly toast the sugar cones in the oven for a few minutes to make them extra crispy.
- Add a layer of caramel. A drizzle of caramel between layers of pudding and cheesecake will add a sweet, decadent flavor.
- Gently press down the layers. Lightly press each layer to ensure it fits well inside the cone without overstuffing.
- Top with fresh bananas just before serving. Add fresh banana slices right before serving to keep them from turning brown.
- Opt for sugar cones with extra crunch. Use sugar cones instead of waffle cones for a firmer and crunchier texture that holds up better with the fillings.
- Use cold fillings for better texture. Chilled fillings will stay more firm and easy to layer inside the cones.
- Serve on a platter with garnish. Arrange the cones on a platter and garnish with extra banana slices, wafer crumbs, or mint leaves for a polished presentation.
- Avoid soggy cones. If making ahead, store the pudding mixture separately and assemble just before serving to avoid sogginess.
- Use a mini cone for smaller portions. You can also make mini versions of these cones if you want smaller, bite-sized treats.
- Freeze the cones before serving. For a fun twist, you can freeze the assembled cones for a cool, refreshing dessert.
- Opt for a sweetened whipped topping. For extra flavor, use sweetened whipped cream on top instead of plain.
- Use a mix of textures. Add some crunchy granola or nuts as an extra layer to complement the smooth pudding and cheesecake.
These Banana Pudding Cheesecake Cones are a unique, crowd-pleasing dessert that combines the flavors of two beloved treats in one simple and delicious cone. Whether served for a special occasion or as an everyday treat, they’re sure to be a hit!