
Red Velvet Cheesecake Balls Recipe
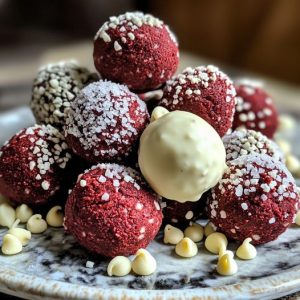
These Red Velvet Cheesecake Balls are the ultimate indulgence—a combination of smooth, tangy cheesecake wrapped in the decadence of rich red velvet cake, all coated in a luscious blend of white and semi-sweet chocolate. They’re perfect for holidays, special occasions, or as an anytime treat when you need a bit of sweetness. Each bite is a delightful balance of flavor and texture, with the softness of the cake and cream cheese pairing beautifully with the crisp outer chocolate shell. Let’s dive into this irresistible recipe that’s surprisingly easy to make and even easier to enjoy!
Ingredients Overview
Red Velvet Cake Mix: The foundation of these little treats, the red velvet cake mix brings in a rich, vibrant color and a mildly cocoa-flavored base. Follow the package instructions for a perfectly moist cake.
Cream Cheese: Softened cream cheese gives the cheesecake filling its signature tangy richness. Make sure it’s at room temperature for easy blending.
Powdered Sugar: Adds sweetness to the cream cheese filling without making it grainy, ensuring a smooth, luscious texture.
Vanilla Extract: A splash of vanilla enhances the overall flavor and rounds out the sweetness of the cream cheese mixture.
White Chocolate Chips: These will be melted to coat the balls, providing a sweet, smooth outer layer with a hint of vanilla.
Semi-Sweet Chocolate Chips: Offering a slightly more intense chocolate flavor, the semi-sweet chocolate provides balance against the sweetness of the white chocolate, creating a beautiful visual contrast when drizzled.
Step-by-Step Cooking Instructions
Step 1: Prepare the Red Velvet Cake
Follow the instructions on your red velvet cake mix to bake the cake. Once baked, let it cool completely before moving on. This is important, as warm cake will cause the cream cheese mixture to melt and become difficult to work with.
Step 2: Make the Cream Cheese Mixture
In a medium-sized bowl, combine softened cream cheese, powdered sugar, and vanilla extract. Mix until smooth and creamy. The texture should be soft but thick enough to hold the crumbled cake together.
Step 3: Crumble and Combine
Once the cake has cooled, crumble it finely into the cream cheese mixture. Use your hands or a spatula to gently fold the cake crumbs into the cream cheese mixture until fully combined. The mixture should be thick and moldable.
Step 4: Form the Balls
Scoop out small portions of the mixture, about 1 tablespoon each, and roll them into bite-sized balls. Place them on a baking sheet lined with parchment paper. This step can be a little messy, but the result is worth it!
Step 5: Chill the Balls
Refrigerate the balls for at least 1 hour. This chilling time allows them to firm up, making them easier to coat with chocolate.
Step 6: Melt the Chocolates
In separate bowls, melt the white chocolate chips and semi-sweet chocolate chips. You can do this in the microwave in 20-30 second intervals, stirring in between, or use a double boiler to gently melt the chocolate.
Step 7: Dip and Coat
Once the balls are firm, dip each one into the melted chocolate, ensuring it’s fully coated. Use a fork to gently lift the ball out, allowing excess chocolate to drip off before placing it back onto the parchment paper.
Step 8: Add the Drizzle
After dipping all the balls, drizzle any remaining melted chocolate over the top for a decorative finish. You can alternate between the white and semi-sweet chocolate for a beautiful contrast.
Step 9: Set and Serve
Refrigerate the balls again to let the chocolate coating fully set. Once they’re firm, they’re ready to enjoy! You can serve them chilled or at room temperature for a softer bite.
Storage and Reheating Tips
Storage:
- Store your Red Velvet Cheesecake Balls in an airtight container in the refrigerator for up to 5 days. They keep well and maintain their firmness when chilled.
Freezing:
- These cheesecake balls freeze beautifully! Place them on a baking sheet to freeze individually first, then transfer to a freezer-safe container or bag. They’ll keep for up to 3 months. Thaw in the fridge overnight before serving.
Reheating:
- These treats are best enjoyed cold or at room temperature, but if you prefer a softer texture, you can leave them at room temperature for about 10-15 minutes before serving.
Frequently Asked Questions
Q: Can I use homemade red velvet cake instead of a box mix?
A: Absolutely! Homemade red velvet cake will work perfectly, just be sure to bake it thoroughly and allow it to cool completely before crumbling.
Q: What if I don’t have white chocolate chips?
A: You can substitute with milk chocolate or dark chocolate chips. The flavor will change slightly, but the results will still be delicious.
Q: Can I use low-fat cream cheese?
A: Yes, but using full-fat cream cheese results in a richer, creamier texture. Low-fat cream cheese might make the balls less firm.
Q: How do I prevent the chocolate from clumping when melting?
A: Melt the chocolate slowly and stir frequently. Overheating chocolate can cause it to seize up, so microwave in short intervals or use a double boiler for better control.
Q: Can I add sprinkles or toppings?
A: Yes! Feel free to add sprinkles, crushed cookies, or nuts on top of the cheesecake balls while the chocolate is still wet.
Q: How long do the cheesecake balls take to set in the fridge?
A: About 1 hour in the refrigerator is enough to firm them up. If you’re short on time, place them in the freezer for 20-30 minutes.
Q: Can I make the cheesecake balls ahead of time?
A: Yes, you can prepare them up to 2 days in advance and store them in the refrigerator until you’re ready to serve.
Q: Can I substitute other cake flavors?
A: Yes! Try chocolate, vanilla, or even lemon cake for different flavor combinations.
Q: How can I make these dairy-free?
A: Use a dairy-free cream cheese substitute and dairy-free chocolate for a plant-based version of this recipe.
Q: What if my cheesecake balls are too soft to roll?
A: If the mixture is too soft, refrigerate it for 30 minutes before rolling into balls. This will help firm it up.
Q: Can I use candy melts instead of chocolate chips?
A: Yes, candy melts are a great alternative for coating, especially if you want to use different colors.
Q: How do I prevent the balls from sticking to the parchment paper?
A: Make sure the balls are chilled enough before dipping them in the chocolate. This prevents them from sticking and helps the chocolate set faster.
Q: Can I use a hand mixer to crumble the cake?
A: Yes, but be careful not to overmix. You want fine crumbs, not a mushy consistency.
Q: How can I create perfect round balls?
A: Use a small cookie scoop to portion out even amounts of the mixture, then gently roll them into smooth balls using your hands.
Q: What’s the best way to drizzle the chocolate?
A: Use a fork or a small spoon to lightly drizzle the chocolate in quick, back-and-forth motions for a professional-looking finish.
Q: Can I use dark chocolate chips instead of semi-sweet?
A: Yes! Dark chocolate will add a richer, more intense flavor that contrasts nicely with the sweetness of the red velvet.
Q: Are these cheesecake balls gluten-free?
A: Not with a regular cake mix, but you can make them gluten-free by using a gluten-free red velvet cake mix.
Q: How can I transport these for a party?
A: Place them in a single layer in an airtight container, separating layers with parchment paper. Keep them refrigerated until you’re ready to serve.
Q: Can I add food coloring to the chocolate?
A: Yes! Add oil-based food coloring to the melted chocolate for a fun, vibrant look.
Q: Can I use flavored extracts in the cream cheese filling?
A: Yes, you can add almond, lemon, or peppermint extract for a unique twist.
20 Secrets for Culinary Perfection
- Chill your cake before crumbling. It makes the crumbling process easier and less messy.
- Use a cookie scoop for uniformly sized balls that look professional.
- Avoid over-mixing the cream cheese mixture, or the texture may become too soft.
- Add a pinch of salt to the melted chocolate to balance the sweetness.
- Double dip for a thicker chocolate coating—dip once, let it set, and dip again.
- Line your baking sheet with parchment paper for easy cleanup and to prevent sticking.
- Don’t overheat the chocolate, as it can become grainy or seize.
- Stir chocolate between intervals when microwaving to ensure smooth melting.
- Use a double boiler to gently melt chocolate without risk of burning.
- Freeze balls briefly before dipping to help the chocolate set faster.
- Sprinkle toppings while chocolate is still wet so they stick properly.
- Add crushed cookies or nuts to the outer layer for extra texture.
- Use high-quality chocolate chips for a smoother and richer coating