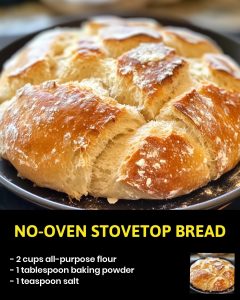
No-Oven Stovetop Bread
Description:
This No-Oven Stovetop Bread is an easy, quick, and delicious recipe perfect for those moments when you want freshly baked bread but don’t want to turn on the oven. Made with just a few simple ingredients like all-purpose flour, baking powder, and milk, this stovetop bread is soft on the inside with a beautifully golden, slightly crispy exterior. It’s perfect for pairing with soups, stews, or just a bit of butter for a satisfying snack. Plus, you don’t need any special equipment or yeast, making it ideal for beginners or anyone short on time!
Ingredients:
- 2 cups all-purpose flour
- 1 tablespoon baking powder
- 1 teaspoon salt
- 1 cup milk
- 2 tablespoons vegetable oil (or melted butter for extra flavor)
Instructions:
- Mix dry ingredients:
In a large mixing bowl, combine 2 cups of all-purpose flour, 1 tablespoon of baking powder, and 1 teaspoon of salt. Stir until the dry ingredients are well mixed. - Add wet ingredients:
Gradually pour in 1 cup of milk and 2 tablespoons of vegetable oil (or melted butter) into the dry ingredients. Stir until a soft dough begins to form. If the dough seems too sticky, add a little more flour, a tablespoon at a time. - Knead the dough:
Transfer the dough to a lightly floured surface and knead for about 5-7 minutes. The dough should be smooth and elastic. - Shape the dough:
Divide the dough into 4 equal portions. Roll each portion into a ball and flatten it into a round shape, about 1/2 to 1 inch thick. You can adjust the size depending on how big you want your bread. - Cook the bread:
Heat a skillet over medium heat. Lightly grease the skillet with oil or butter. Once the skillet is hot, place the dough rounds in the skillet and cook for 5-7 minutes on each side. The bread should be golden brown and cooked through. You can flip the bread halfway through the cooking process to ensure an even, crispy crust on both sides. - Serve:
Once cooked, remove the bread from the skillet and let it cool for a minute before serving. Serve warm with butter, honey, or your favorite toppings.
Storage and Reheating Tips:
- Storage:
Store any leftover stovetop bread in an airtight container at room temperature for up to 2-3 days. If you want to store it for a longer period, place it in the refrigerator for up to a week. - Freezing:
You can freeze this bread for up to 1-2 months. Wrap it tightly in plastic wrap and then aluminum foil before placing it in a freezer-safe bag or container. To thaw, let it sit at room temperature or reheat it in a skillet for a few minutes on each side. - Reheating:
To reheat, place the bread in a skillet over low heat for about 1-2 minutes on each side, or microwave it for 15-20 seconds. If you want to restore some of the crispiness, heat it in a dry skillet for a couple of minutes.
20 FAQs About No-Oven Stovetop Bread:
- Can I use whole wheat flour instead of all-purpose flour?
Yes, whole wheat flour will work, but it may make the bread denser. You may need to add a little more liquid. - Can I use almond milk or another dairy-free milk?
Yes, any dairy-free milk like almond, oat, or soy milk will work just fine in this recipe. - Can I use olive oil instead of vegetable oil?
Yes, olive oil will add a richer flavor, but the bread will have a slight olive oil taste. - Do I need yeast for this recipe?
No, this recipe uses baking powder as a leavening agent, so you don’t need yeast. - Can I add herbs or spices to the dough?
Absolutely! You can add herbs like rosemary, thyme, or garlic powder to give the bread extra flavor. - Can I use melted butter instead of oil?
Yes, using melted butter will add a rich flavor to the bread, but you can use oil if you prefer a lighter taste. - What if the dough is too sticky to handle?
Add a little more flour, one tablespoon at a time, until the dough is soft but not sticky. - Can I make this dough ahead of time?
Yes, you can prepare the dough, wrap it in plastic, and refrigerate it for up to 24 hours before cooking. - Can I make this bread in a non-stick pan?
Yes, a non-stick skillet works well for this recipe. Just make sure to lightly grease it. - How thick should I make the dough rounds?
The dough rounds should be about 1/2 inch to 1 inch thick for best results. - How can I make the bread softer?
To make the bread softer, try adding an extra tablespoon of oil or butter to the dough. - Can I double or triple this recipe?
Yes, you can easily double or triple the recipe to make more bread. Just divide the dough into more portions. - Can I use a cast-iron skillet?
Yes, a cast-iron skillet is perfect for this recipe because it retains heat well and gives the bread a great golden crust. - What if the bread is burning before it’s cooked through?
If this happens, lower the heat slightly and cook the bread longer on each side, flipping as needed. - Can I add sugar to the dough for a sweeter bread?
Yes, you can add 1-2 tablespoons of sugar if you want a sweeter bread. It pairs nicely with jams or honey. - How do I know when the bread is done cooking?
The bread should be golden brown on both sides and cooked through. You can test by gently pressing on the top—if it springs back, it’s done. - Can I make these bread rounds smaller?
Yes, you can make smaller rounds, but you’ll need to reduce the cooking time by a minute or two. - Can I cook this bread on a grill?
Yes, grilling these dough rounds works great for a smokier flavor, but make sure to keep an eye on them to prevent burning. - What can I serve this bread with?
This bread is perfect with soups, stews, butter, honey, or jam. It’s also great for making sandwiches. - Can I freeze the dough and cook later?
Yes, you can freeze the dough in balls or rounds. When ready to cook, let it thaw slightly before cooking on the stovetop.
20 Best Tips for Making the Perfect No-Oven Stovetop Bread:
- Use room temperature milk for the best texture in your dough. Cold milk can cause the dough to become too firm.
- Add a pinch of sugar to balance the flavors, especially if you’re serving the bread with savory dishes.
- Knead gently—over-kneading can make the bread tough. Just knead until the dough is smooth and elastic.
- Let the dough rest for 10-15 minutes if it feels too stiff after kneading. This allows the gluten to relax.
- Don’t overcrowd the skillet—cook in batches if necessary to give the bread space to cook evenly.
- Use a heavy-bottomed skillet for more even heat distribution and to prevent the bread from burning.
- Check the bread regularly—flip it once or twice to make sure both sides are golden brown.
- Add garlic powder or cheese to the dough for a savory twist.
- Keep the heat on medium—too high heat can burn the bread, while too low will result in undercooking.
- Grease the skillet lightly—use just enough oil or butter to coat the bottom of the pan to avoid greasy bread.
- Use a lid while cooking the bread if you want a slightly softer texture on top.
- Flour your hands if the dough is too sticky to shape and roll.
- Test for doneness by tapping the bottom of the bread—it should sound hollow when fully cooked.
- Make the bread thicker for a softer, fluffier texture, or thinner for a crispier result.
- Serve the bread warm for the best taste and texture.
- Sprinkle a little salt on top before cooking for a bit of extra flavor.
- Cut the dough portions evenly so that they cook at the same rate.
- Use a spatula to gently flip the bread to avoid breaking it.
- Add chopped herbs or scallions to the dough for an herby, fresh flavor.
- Brush with melted butter after cooking for extra richness and a golden finish.
Enjoy your fresh, easy-to-make No-Oven Stovetop Bread—perfect for any meal or as a quick snack!


