
No-Bake Homemade Crunch Bars 🍫
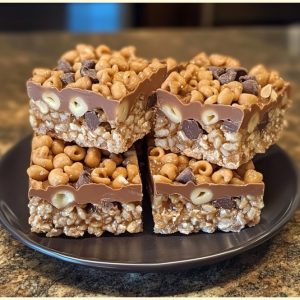
Imagine a treat that’s both satisfyingly crunchy and melt-in-your-mouth creamy—without ever needing to turn on your oven. These No-Bake Homemade Crunch Bars are an effortless solution for those moments when you crave something sweet but want to keep things simple. With rich chocolate, creamy peanut butter, and the satisfying crisp of rice cereal, these bars will be a go-to snack for any time of the day. Whether it’s a sweet addition to your lunchbox or a post-dinner treat, these bars are sure to hit the spot.
Ingredients Overview
- Crispy Rice Cereal (1 ½ cups): The foundation of this treat, providing that signature crunch that makes each bite irresistibly satisfying.
- Milk Chocolate Chips (1 cup): Creamy and indulgent, the milk chocolate blends perfectly with the peanut butter for a smooth, rich base.
- Smooth Peanut Butter (½ cup): A velvety ingredient that adds creaminess and depth of flavor, while also helping bind the ingredients together.
- Honey (¼ cup): This natural sweetener brings a subtle floral note to the bars, balancing the richness of the chocolate and peanut butter.
- Chopped Nuts (¼ cup, optional): If you love a little extra texture, nuts like almonds or peanuts add a nutty crunch that complements the creamy ingredients.
Step-by-Step Cooking Instructions
Step 1: Mix the Dry Ingredients
Combine cereal and nuts: In a large bowl, mix together the crispy rice cereal and chopped nuts (if using). This dry mixture will be the crunchy base of your bars.
Helpful Tip: If you’re adding nuts, try lightly toasting them for a few minutes in a pan to bring out their natural oils and enhance their flavor.
Step 2: Melt the Chocolate Mixture
Microwave the chocolate and peanut butter: In a microwave-safe bowl, combine the milk chocolate chips, peanut butter, and honey. Microwave in 30-second intervals, stirring in between each session, until everything is melted and smooth. This will create the rich, velvety mixture that binds the bars together.
Helpful Tip: Be careful not to overheat the chocolate mixture—short bursts in the microwave prevent burning. You can also melt the ingredients using a double boiler for more controlled heating.
Step 3: Combine and Mix
Pour and stir: Pour the melted chocolate mixture over the crispy rice cereal and nuts. Stir gently until the cereal is fully coated in the luscious chocolate-peanut butter mixture.
Helpful Tip: Use a spatula to fold the mixture gently, ensuring the cereal stays crispy and doesn’t get crushed.
Step 4: Press Into the Pan
Press and refrigerate: Grease a 9×9 inch pan with butter or non-stick spray. Press the mixture evenly into the pan using a spatula or the back of a spoon. Place the pan in the refrigerator for at least 1 hour, or until the bars are fully set.
Helpful Tip: For even easier cleanup, line the pan with parchment paper before pressing in the mixture. This makes it simple to lift out the bars once set.
Step 5: Slice and Serve
Cut and enjoy: Once the bars are set, remove them from the fridge and slice into squares. Serve and enjoy these crispy, chocolaty treats!
Helpful Tip: If you prefer a firmer bar, leave the bars in the fridge longer. For a softer texture, try letting them sit at room temperature for a few minutes before slicing.
Storage and Reheating Tips
- Storage: Keep your crunch bars stored in an airtight container in the fridge. They will stay fresh and crunchy for up to 7 days.
- Freezing: If you want to make a big batch and save some for later, freeze the bars in an airtight container with layers of parchment paper between them. They’ll keep well for up to 2 months.
- Reheating: These bars don’t need reheating, but if you want to soften them slightly before serving, let them sit at room temperature for about 10 minutes.
20 Frequently Asked Questions
1. Can I use dark chocolate instead of milk chocolate?
Yes! Dark chocolate adds a deeper, slightly bitter flavor that pairs beautifully with the sweetness of the honey and peanut butter.
2. Is there a substitute for peanut butter?
You can use almond butter, cashew butter, or even sunflower seed butter for a nut-free option.
3. Can I make these bars without honey?
Yes, you can substitute maple syrup or agave nectar if you prefer.
4. What if I don’t have crispy rice cereal?
You can use puffed rice cereal or even crushed cornflakes for a similar texture.
5. Can I make these bars vegan?
Absolutely! Use dairy-free chocolate chips and a plant-based butter alternative.
6. Do I have to refrigerate the bars?
Yes, refrigerating helps the bars set and ensures they hold together properly.
7. Can I add dried fruit to the recipe?
Definitely! Dried cranberries, raisins, or even chopped apricots would add a nice chewy contrast.
8. Are these bars gluten-free?
Check the packaging of your crispy rice cereal and other ingredients to ensure they are gluten-free.
9. Can I double the recipe?
Yes, simply double the ingredients and use a larger pan, like a 9×13 inch pan.
10. How do I prevent the bars from sticking to the pan?
Use parchment paper or grease the pan well with butter or non-stick spray.
11. Can I make this recipe without a microwave?
Yes, you can melt the chocolate, peanut butter, and honey on the stovetop using a double boiler.
12. Will these bars melt if left out at room temperature?
They may soften slightly, so it’s best to store them in the fridge until ready to serve.
13. Can I use crunchy peanut butter?
Yes! Crunchy peanut butter adds an extra layer of texture to the bars.
14. What kind of nuts work best for this recipe?
Almonds, peanuts, and walnuts all work wonderfully in these bars.
15. How long do the bars need to chill?
At least one hour, but for firmer bars, 2-3 hours is ideal.
16. Can I make these without the chopped nuts?
Absolutely! The nuts are optional, so feel free to omit them if you prefer.
17. Can I add coconut flakes?
Yes, shredded coconut can be a delicious addition to these bars.
18. What size pan should I use for thicker bars?
A smaller pan, such as an 8×8 inch pan, will result in thicker bars.
19. Can I use white chocolate?
Yes, white chocolate will create a sweeter and creamier bar, but be mindful of its higher sugar content.
20. How do I keep the bars crispy?
Keep them refrigerated in an airtight container to maintain their crunch.
20 Secrets for Culinary Perfection
- Use high-quality chocolate for the richest flavor.
- Toast your nuts before adding them to the mixture to deepen their flavor.
- Freeze the bowl and utensils for a few minutes before mixing to keep the chocolate mixture from softening too quickly.
- Add a pinch of sea salt to the melted chocolate mixture for an extra flavor boost.
- Let the bars sit at room temperature for 10 minutes before slicing for cleaner cuts.
- Use a serrated knife to get even, smooth slices.
- Add a drizzle of melted white chocolate on top for extra flair.
- For a protein-packed twist, mix in a scoop of your favorite protein powder.
- Experiment with flavored peanut butter like chocolate or honey-roasted for added flavor.
- Layer melted dark and white chocolate for a visually stunning treat.
- Stir in mini marshmallows for a Rocky Road variation.
- Mix in pretzel bits for a salty-sweet combination.
- Add a dash of cinnamon for a warm, spicy undertone.
- Top the bars with crushed cookies for extra texture and flavor.
- Mix in dried fruits like raisins or cranberries for a chewy contrast.
- Use parchment paper to press the mixture evenly into the pan.
- Let the bars chill overnight for the best results.
- Use silicone molds to create fun shapes for your bars.
- Sprinkle coarse sea salt on top for an irresistible salty-sweet combo.
- Cut the bars into bite-sized squares for easy snacking or sharing.
Enjoy the perfect blend of crunchy, creamy, and sweet with these No-Bake Homemade Crunch Bars—a treat that’s as fun to make as it is to eat