
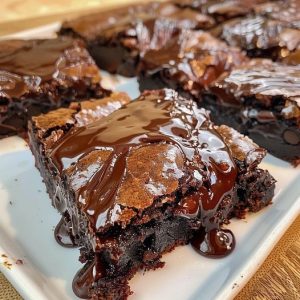
Decadent Brownies
Indulge in the rich, fudgy goodness of these decadent brownies, perfect for any occasion. This recipe combines the luxurious flavors of high-quality chocolate and browned butter, creating a dessert that’s both comforting and gourmet. Whether you’re making these for a family gathering, a special event, or simply to treat yourself, these brownies are sure to impress.
Ingredients Overview
1 1/2 sticks salted pure butter: The key to these brownies’ rich flavor. Browning the butter adds a nutty, caramelized depth.
4 oz bar 70% chocolate, chopped: High-quality dark chocolate is essential for a rich, intense chocolate flavor.
3 large eggs: Provides structure and moisture, ensuring a dense and fudgy texture.
1/2 cup white sugar: Balances the bitterness of the dark chocolate and adds sweetness.
1/2 cup dark brown sugar: Adds a molasses-like depth and enhances the fudgy texture.
1 tablespoon pure vanilla extract: Enhances the overall flavor and adds a warm, aromatic note.
1/2 cup Dutch process cocoa powder: Adds a deep, rich chocolate flavor and dark color.
1/2 cup all-purpose flour: Provides structure to the brownies.
1/2 teaspoon salt: Balances the sweetness and enhances the chocolate flavor.
1 cup dark chocolate chips: Adds extra bursts of chocolate in every bite.
Step-by-Step Cooking Instructions
Preheat the Oven:
- Set the Stage: Preheat your oven to 350°F (175°C). Grease and line an 8×8 inch pan with parchment paper, then set aside. This ensures easy removal and clean edges.
Brown the Butter: 2. Transform the Butter: Place the butter into a small saucepan over medium-low heat. Stir frequently for 5-6 minutes until the butter is browned. This happens once the butter foams and turns a light brown. Once browned, remove from heat and pour over the chopped chocolate. Stir until the chocolate melts completely. Set aside to cool slightly.
Mix Dry Ingredients: 3. Combine the Dry Elements: In a small bowl, sift the cocoa powder, flour, and salt together. Mixing ensures even distribution and prevents clumps in the batter. Set aside.
Prepare Wet Ingredients: 4. Create the Base: In a large mixing bowl, whisk together the eggs, sugars, and vanilla until well combined and frothy. This step incorporates air, which helps achieve the desired texture. 5. Incorporate the Chocolate: Slowly mix in the buttery-chocolate mixture until fully combined. The mixture should be smooth and glossy. 6. Blend in Dry Ingredients: Stir in the flour mixture until just combined. Overmixing can result in tougher brownies, so mix gently. 7. Fold in Chocolate Chips: Gently fold in the chocolate chips, ensuring they are evenly distributed throughout the batter.
Bake the Brownies: 8. Fill the Pan: Pour the batter into the prepared pan and smooth the top with a spatula. 9. First Bake: Bake for 15 minutes, then remove the pan and drop it gently against a hard surface 5 times. This helps create the iconic crinkly-brownie top. 10. Final Bake: Return the pan to the oven and bake for another 13 minutes for a more lava-like center or 15-18 minutes for a firmer center. 11. Cool and Serve: Once baked, let the brownies cool in the pan on a cooling rack until room temperature. Cut into squares and serve.
Valuable Tips
Use Quality Ingredients: High-quality chocolate and butter make a significant difference in the flavor and texture of your brownies.
Don’t Overmix: Overmixing the batter can lead to tough brownies. Mix until just combined.
Adjust Baking Time: For fudgier brownies, bake for a shorter time. For cakier brownies, bake a bit longer.
Cool Completely: Allowing the brownies to cool completely before cutting helps them set and makes slicing easier.
Storage and Reheating Tips
Storage: Store brownies in an airtight container at room temperature for up to 4 days. For longer storage, refrigerate them for up to a week.
Freezing: Wrap individual brownies in plastic wrap, then place them in a freezer-safe bag or container. Freeze for up to 3 months. Thaw at room temperature before serving.
Reheating: To enjoy warm brownies, microwave individual pieces for 10-15 seconds or reheat in a preheated oven at 350°F (175°C) for 5-7 minutes.
Frequently Asked Questions
Q1: Can I use unsalted butter instead of salted? A1: Yes, you can use unsalted butter. Just add an extra pinch of salt to the dry ingredients.
Q2: Can I substitute the dark chocolate with milk chocolate? A2: Yes, but the brownies will be sweeter and less intense in chocolate flavor.
Q3: Can I use regular cocoa powder instead of Dutch process? A3: Yes, but Dutch process cocoa powder provides a deeper color and richer flavor.
Q4: Can I add nuts to the batter? A4: Absolutely! Chopped walnuts or pecans make a great addition.
Q5: How do I know when the brownies are done? A5: Insert a toothpick into the center. If it comes out with a few moist crumbs, they are done.
Q6: Can I double the recipe? A6: Yes, simply double the ingredients and use a 9×13 inch pan. Adjust baking time as needed.
Q7: Can I use a different sized pan? A7: Yes, but the baking time will vary. A larger pan will result in thinner brownies and a shorter baking time.
Q8: Why did my brownies turn out cakey? A8: Overmixing or overbaking can cause cakey brownies. Mix until just combined and watch the baking time.
Q9: How can I make the brownies more fudgy? A9: Reduce the baking time slightly and ensure you don’t overmix the batter.
Q10: Can I add a frosting or glaze? A10: Yes, a chocolate ganache or cream cheese frosting would be delicious.
Q11: Why did my brownies sink in the middle? A11: This can happen if the batter is overmixed or if the oven temperature is too high.
Q12: Can I use a sugar substitute? A12: Yes, but the texture and taste may vary. Try using a baking-specific sugar substitute.
Q13: What if I don’t have parchment paper? A13: You can grease the pan with butter and dust it with cocoa powder to prevent sticking.
Q14: Can I add a swirl of peanut butter or caramel? A14: Yes, swirl in peanut butter or caramel before baking for a delicious variation.
Q15: How can I make these brownies gluten-free? A15: Substitute the all-purpose flour with a gluten-free flour blend.
Q16: Can I add espresso powder? A16: Yes, adding a teaspoon of espresso powder enhances the chocolate flavor.
Q17: Can I use a hand mixer? A17: Yes, but mix on low speed to avoid overmixing.
Q18: How can I get perfectly cut squares? A18: Use a plastic knife or a knife dipped in hot water and wiped dry between cuts.
Q19: Why didn’t my brownies get the crinkly top? A19: The dropping method helps create the crinkly top, as does properly beating the eggs and sugars.
Q20: Can I serve these warm with ice cream? A20: Absolutely! Warm brownies with a scoop of vanilla ice cream are a match made in heaven.
20 Secrets for Achieving Culinary Perfection
- Use Quality Chocolate: Opt for high-quality chocolate for the best flavor.
- Brown the Butter: This step adds a nutty, caramelized flavor.
- Sift Dry Ingredients: Ensures even distribution and prevents clumps.
- Don’t Overmix: Mix until just combined for tender, fudgy brownies.
- Cool the Butter-Chocolate Mixture: Prevents scrambling the eggs.
- Use Room Temperature Eggs: They mix more easily and provide a better texture.
- Measure Accurately: Use a kitchen scale for precise measurements.
- Preheat the Oven: Ensures even baking from the start.
- Grease and Line the Pan: Makes removing brownies easier and prevents sticking.
- Drop the Pan: Creates the iconic crinkly top.
- Adjust Baking Time: Tailor the baking time to your desired texture.
- Let Cool Completely: Allows the brownies to set properly.
- Cut with a Plastic Knife: Prevents sticking and creates clean edges.
- Use a Hot Knife: Dipping the knife in hot water makes cutting easier.
- Add Mix-ins: Nuts, chocolate chunks, or swirls of caramel can add texture and flavor.
- Experiment with Flavors: Add a touch of espresso powder or cinnamon for a twist.
- Store Properly: Keeps brownies fresh and delicious.
- Reheat Gently: Warm in the microwave for a fresh-from-the-oven experience.
- Serve with Ice Cream: Enhances the indulgence.
- Enjoy the Process: Baking is an act of love, so savor every moment!
Enjoy these luscious brownies, crafted with care and designed to delight your taste buds. Happy baking