
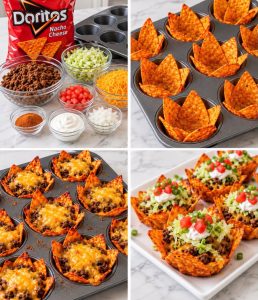
Cheesy Doritos Taco Cups – Easy, Crunchy, Cheesy Taco Bites
If you love tacos, nacho cheese Doritos, and gooey melted cheddar, these Cheesy Doritos Taco Cups are about to become your new favorite party snack! Made with crunchy Doritos, seasoned ground beef, plenty of shredded cheese, and all your favorite taco toppings, these bite-sized treats deliver big taco flavor in a fun, easy-to-serve package.
The best part? You only need a handful of everyday ingredients and a muffin tin to make them. Each cup is filled with savory taco-seasoned beef, topped with melted cheddar, and finished with crisp lettuce, juicy tomatoes, diced onions, and a dollop of cool sour cream.
They’re perfect for game days, family gatherings, birthday parties, potlucks, or a fun weeknight dinner when you want something a little different. Serve them as an appetizer, snack, or part of a build-your-own taco night, and watch them disappear!
Why You’ll Love These Cheesy Doritos Taco Cups
- Quick and easy: With just 15 minutes of prep and a short baking time, these taco cups are ready in about half an hour.
- Big taco flavor: Taco-seasoned beef, nacho cheese Doritos, and cheddar create a delicious combination.
- Perfectly portioned: The muffin tin makes individual servings that are easy to grab and enjoy.
- Customizable toppings: Add jalapeños, salsa, guacamole, black olives, or your favorite taco fixings.
- Great for entertaining: They’re a fun alternative to traditional tacos and work beautifully as party appetizers.
- Family-friendly: Let everyone customize their own cups with their favorite toppings.
Recipe Overview
- Prep Time: 15 minutes
- Cook Time: 10–12 minutes
- Total Time: Approximately 25–27 minutes
- Servings: 12 taco cups
- Course: Appetizer, Snack, or Main Dish
- Cuisine: Tex-Mex-inspired
- Cooking Method: Stovetop and Oven
- Difficulty: Easy
Ingredients for Cheesy Doritos Taco Cups
For the Taco Cups
1 bag Nacho Cheese Doritos
These chips provide the signature cheesy flavor and crunchy base. Choose large, sturdy chips when possible because they hold their shape better in the muffin tin.
1 pound ground beef
Ground beef makes a savory, satisfying filling. An 80/20 or 85/15 blend works well, although leaner beef can also be used.
1 packet taco seasoning
A store-bought taco seasoning packet makes the filling quick and flavorful. You can substitute your favorite homemade taco seasoning if preferred.
⅓ cup water
Water helps distribute the seasoning evenly and creates a flavorful coating for the beef.
1½ cups shredded cheddar cheese
Cheddar melts over the beef, creating a delicious cheesy layer that ties the filling together. Freshly shredded cheddar is an excellent option.
For the Fresh Toppings
1 cup shredded lettuce
Lettuce adds a refreshing crunch that contrasts with the warm beef and melted cheese.
½ cup diced tomatoes
Tomatoes bring freshness, color, and a little juicy sweetness.
¼ cup finely diced onion
Onion adds a crisp, savory bite. Red or white onion can be used instead of yellow onion.
½ cup sour cream
A dollop of sour cream adds cool, creamy tanginess to every taco cup.
2 green onions, chopped (optional)
Green onions add a fresh, mild onion flavor and a colorful finishing touch.
Cooking spray
A light coating helps prevent sticking and makes the muffin tin easier to clean.
Equipment You’ll Need
- A 12-cup muffin tin
- A large skillet
- A wooden spoon or spatula
- A colander or spoon for draining excess grease
- Measuring cups
- A cutting board and sharp knife
- A spoon for filling and topping the cups
How to Make Cheesy Doritos Taco Cups
Step 1: Preheat the Oven
Preheat your oven to 350°F (175°C).
Lightly coat a 12-cup muffin tin with cooking spray, making sure to cover the bottom and sides of each cup. This helps keep the Doritos from sticking and makes serving easier.
Step 2: Brown the Ground Beef
Place a large skillet over medium heat. Add the ground beef and cook, breaking it into small crumbles with a spatula.
Continue cooking until the beef is thoroughly browned and reaches an internal temperature of 160°F (71°C). Drain excess grease if necessary.
Breaking the meat into small pieces is important because large chunks can make the taco cups difficult to fill and eat.
Step 3: Add the Taco Seasoning
Sprinkle the taco seasoning over the cooked beef. Pour in ⅓ cup of water and stir well to combine.
Allow the mixture to simmer for 3–5 minutes, stirring occasionally, until the seasoning is evenly distributed and most of the liquid has thickened.
Remove the skillet from the heat. Let the beef cool slightly so it’s easier to handle while assembling the cups.
Step 4: Create the Doritos Cups
Arrange approximately 5–6 large Doritos chips around the sides of each muffin cup, overlapping them slightly to form a bowl shape.
Choose chips with intact edges whenever possible. Their overlapping shape helps create a sturdy little shell for the taco filling.
Don’t worry if the chips don’t form perfect cups. The goal is to create enough of a bowl shape to hold the beef and cheese.
Helpful tip: Doritos can break easily, so handle them gently. If a chip cracks, use another sturdy chip to cover the gap.
Step 5: Fill with Seasoned Beef
Spoon the taco-seasoned ground beef into the center of each Doritos cup.
Distribute the beef evenly among the 12 cups, leaving enough room for the cheese and toppings. Avoid overfilling, as too much meat can cause the cups to become messy or difficult to serve.
Step 6: Add the Cheddar Cheese
Sprinkle shredded cheddar cheese generously over each portion of beef.
The cheese helps bind the filling together and adds a rich, melty layer to every bite.
For extra cheesy taco cups, use a little more cheddar, or combine cheddar with Monterey Jack.
Step 7: Bake Until the Cheese Melts
Place the muffin tin in the preheated oven and bake for 5–8 minutes, checking frequently.
The cheese should be melted, and the chips should be warm. Because Doritos are already cooked, the goal is to heat the filling and melt the cheese rather than bake the chips for a long time.
Watch carefully to prevent the chips from becoming too dark or burning.
Step 8: Add the Fresh Toppings
Remove the muffin tin from the oven and allow the cups to cool for 2–3 minutes.
Top each taco cup with shredded lettuce, diced tomatoes, and finely diced onion.
For the best texture, add the fresh toppings just before serving. This keeps the lettuce crisp and prevents the tomatoes from making the chips soggy.
Step 9: Finish with Sour Cream and Green Onions
Add a small dollop of sour cream to each taco cup. Sprinkle chopped green onions over the top, if desired.
Serve immediately while the cheese is warm and the Doritos are still crunchy.
Expert Tips for Perfect Doritos Taco Cups
- Use large chips: Bigger Doritos make it easier to form a bowl shape.
- Choose sturdy chips: Save broken pieces for another use and use intact chips for the sides.
- Don’t overfill the cups: A modest amount of beef leaves room for cheese and toppings.
- Drain excess grease: Too much grease can make the chips soft and oily.
- Simmer the seasoning properly: Let excess water cook off so the beef isn’t watery.
- Watch the oven closely: The chips can burn quickly if left too long.
- Add cold toppings last: Lettuce, tomatoes, and sour cream are best added after baking.
- Serve promptly: These taco cups are at their crunchiest shortly after assembly.
- Use freshly shredded cheese: It often melts smoothly and evenly.
- Keep toppings separate for parties: Let guests add their own lettuce, tomatoes, sour cream, and salsa.
Variations and Substitutions
1. Spicy Doritos Taco Cups
Use Spicy Nacho Doritos, add diced jalapeños, or sprinkle crushed red pepper flakes into the beef mixture for extra heat.
2. Cool Ranch Taco Cups
Swap Nacho Cheese Doritos for Cool Ranch Doritos to give the cups a tangy ranch flavor that pairs wonderfully with seasoned beef and cheddar.
3. Chicken Doritos Taco Cups
Replace the ground beef with cooked, shredded chicken. Toss the chicken with taco seasoning and a little water or broth, then warm it before assembling.
4. Ground Turkey Taco Cups
Ground turkey makes a delicious alternative to beef. Cook it thoroughly, then add taco seasoning and water just as you would with ground beef.
5. Extra-Cheesy Taco Cups
Use a blend of cheddar and Monterey Jack, or sprinkle a little extra cheese over the cups during the final minutes of baking.
6. Black Bean Taco Cups
Replace some or all of the meat with seasoned black beans for a meatless variation. Drain and rinse canned beans before warming them with taco seasoning.
7. Loaded Nacho Taco Cups
Add a little guacamole, sliced black olives, salsa, and jalapeños after baking. Keep wet toppings modest to preserve the crunch.
8. Mexican Street Corn Style
Add a spoonful of prepared street-corn-style topping made with corn, lime, cilantro, and a little cheese. Serve it on top just before eating.
9. BBQ Taco Cups
Use a small amount of barbecue sauce in the cooked beef and finish with cheddar and green onions for a sweet-and-savory twist.
10. Mini Party Taco Cups
For smaller portions, use a mini muffin tin and smaller Doritos pieces. Reduce the baking time and check frequently, as mini cups heat quickly.
What to Serve with Cheesy Doritos Taco Cups
These cups are delicious on their own, but pairing them with simple sides turns them into a complete meal.
- Mexican rice: A flavorful, filling side that complements the seasoned beef.
- Cilantro-lime rice: Fresh lime and cilantro balance the cheesy filling.
- Black beans: Add extra protein and fiber to your meal.
- Corn salad: Sweet corn, lime, and fresh herbs bring a bright contrast.
- Guacamole and salsa: Classic taco-night favorites for dipping or topping.
- Fresh pico de gallo: Tomatoes, onion, cilantro, and lime add a refreshing bite.
- Refried beans: A hearty, traditional Tex-Mex-inspired side.
- Simple green salad: A light salad balances the richness of the cheese and beef.
- Mexican street corn: A fun choice for parties and cookouts.
- Tortilla chips and queso: Perfect for a crowd that loves cheesy appetizers.
Make-Ahead Instructions
You can prepare most of the components ahead of time, which makes these taco cups especially convenient for parties.
- Cook and season the ground beef up to 2 days ahead.
- Refrigerate the beef promptly in a shallow, airtight container.
- Shred the cheddar and store it separately in the refrigerator.
- Chop the onion and green onions ahead of time and refrigerate them in covered containers.
- Shred the lettuce and dice the tomatoes closer to serving time for the freshest texture.
- Assemble the Doritos cups shortly before baking so the chips don’t absorb moisture from the filling.
When ready to serve, reheat the beef until it reaches 165°F (74°C), assemble the cups, add the cheese, and bake until hot and melted. Finish with the fresh toppings.
How to Store Leftovers
These taco cups are best eaten immediately because the Doritos soften as they absorb moisture from the meat and toppings.
If you have leftovers:
- Remove any lettuce, tomatoes, and sour cream if possible.
- Place the cooked beef and assembled cups in separate airtight containers.
- Refrigerate promptly, within 2 hours of cooking.
- Use refrigerated cooked beef within 3–4 days.
- For the best crunch, store unused Doritos separately and assemble fresh cups when possible.
Fully assembled leftovers can still be eaten, but the chips will likely be softer.
Can You Freeze Doritos Taco Cups?
Freezing fully assembled taco cups isn’t recommended because the chips lose their crisp texture, and the fresh toppings don’t freeze well.
Instead, freeze the seasoned ground beef separately.
- Allow the cooked beef to cool promptly.
- Transfer it to a freezer-safe airtight container or freezer bag.
- Label and date the container.
- Freeze for up to 2–3 months for best quality.
- Thaw overnight in the refrigerator before reheating.
Reheat the beef to 165°F (74°C), then assemble fresh Doritos cups with cheese and toppings.
How to Reheat Cheesy Doritos Taco Cups
Oven Method
- Preheat the oven to 325°F (165°C).
- Place the cups on a baking sheet or in an oven-safe dish.
- Heat until the filling reaches 165°F (74°C).
- Add fresh lettuce, tomatoes, and sour cream after reheating.
The chips may not return to their original crunch, but the oven generally gives a better texture than the microwave.
Air Fryer Method
- Preheat the air fryer to approximately 325°F (165°C).
- Place a few taco cups in the basket in a single layer.
- Heat briefly, checking frequently to prevent the chips from burning.
- Confirm the filling reaches 165°F (74°C).
- Add fresh toppings after reheating.
Cooking times depend on the air fryer and the size of the cups, so check them often.
Microwave Method
- Place the cups on a microwave-safe plate.
- Heat in short intervals until the filling reaches 165°F (74°C).
- Add fresh toppings after heating.
The microwave is convenient, but it will soften the Doritos more than the oven or air fryer.
Frequently Asked Questions
1. Can I make Doritos taco cups ahead of time?
Yes. Prepare the seasoned beef, cheese, and toppings ahead of time, but assemble the chips shortly before baking to help keep them crunchy.
2. Why are my Doritos taco cups soggy?
Excess grease, watery beef, juicy tomatoes, and sitting too long after assembly can soften the chips. Drain the beef, simmer away excess liquid, and add fresh toppings just before serving.
3. Can I use a different flavor of Doritos?
Absolutely! Cool Ranch, Spicy Nacho, and other flavors can all work. Choose chips sturdy enough to form the cups.
4. How many Doritos do I need per cup?
The recipe suggests approximately 5–6 large chips per muffin cup. The exact number depends on their size and how you arrange them.
5. Do I need to crush the Doritos?
No. Use whole chips to form the sides of the cups. Broken pieces can fill small gaps, but whole chips generally create a sturdier shape.
6. Can I use ground turkey instead of beef?
Yes. Ground turkey works well with taco seasoning and provides a slightly lighter alternative. Cook it thoroughly before assembling the cups.
7. Can I use shredded chicken?
Yes. Cooked, shredded chicken is a great substitute. Toss it with taco seasoning and a little broth or water to distribute the flavor.
8. What cheese works best?
Cheddar is a classic choice, but Monterey Jack, Colby Jack, or a Mexican-style cheese blend also works well.
9. Can I make these taco cups spicy?
Yes. Use spicy Doritos, add jalapeños, or mix chili powder and crushed red pepper into the beef.
10. Can I make a vegetarian version?
Yes. Replace the beef with seasoned black beans, pinto beans, or a plant-based ground meat alternative.
11. Can I make these without a muffin tin?
A muffin tin makes the cups easier to shape, but you can arrange the chips in small oven-safe ramekins or use sturdy oven-safe molds that hold their shape.
12. Can I use homemade taco seasoning?
Yes. Homemade seasoning lets you adjust the salt, spice, and other flavors to your preference.
13. How do I keep the chips from breaking?
Handle the chips gently, select larger intact pieces, and overlap them carefully. Don’t press too hard when arranging them in the muffin tin.
14. Can I add beans or corn to the beef?
Yes. Black beans or corn make tasty additions. Drain canned ingredients well and avoid adding too much moisture to the filling.
15. When should I add the lettuce and tomatoes?
Add them after baking, just before serving. This helps the lettuce remain crisp and keeps the tomatoes from releasing too much moisture into the cups.
16. Can I use pre-cooked taco meat?
Yes. Reheat the meat to 165°F (74°C) before assembling the cups, then bake briefly to melt the cheese.
17. Are Doritos taco cups gluten-free?
Do not assume they are. Check the packaging of your Doritos, taco seasoning, and other ingredients for current allergen and gluten information.
18. How long do leftovers last?
Refrigerated cooked beef and leftovers generally keep for 3–4 days when stored promptly in airtight containers. For the best texture, store the beef separately from the chips and fresh toppings.
19. Can I freeze the finished taco cups?
It’s possible, but not recommended for the best quality. The chips become soft after freezing and thawing. Freeze the seasoned beef separately instead.
20. What is the best way to serve these at a party?
Serve the warm cups on a platter with lettuce, tomatoes, sour cream, salsa, guacamole, and jalapeños on the side. This allows guests to customize their toppings and helps keep the chips crunchy.
20 Tips and Secrets for the Best Cheesy Doritos Taco Cups
- Choose large, intact Doritos. Bigger chips make sturdier cups and are easier to arrange.
- Grease the muffin tin lightly. This makes removing the cups easier without adding excess oil.
- Use medium heat for the beef. It helps brown the meat evenly without burning it.
- Break the beef into small crumbles. Smaller pieces fit neatly inside the chips.
- Drain excess grease. Too much fat can soften the Doritos.
- Let the seasoning simmer. Three to five minutes helps the flavors blend.
- Avoid watery taco meat. Simmer until the liquid thickens before filling the cups.
- Overlap the chips. This creates a bowl shape that can support the filling.
- Don’t force broken chips into place. Replace fragile pieces with larger chips whenever possible.
- Distribute the beef evenly. Equal portions help the cups bake and serve consistently.
- Leave room for the cheese. Avoid packing the cups too tightly.
- Shred your own cheese if possible. Freshly shredded cheese often melts more smoothly.
- Watch the baking time closely. The chips can darken quickly.
- Keep the baking brief. The beef is already cooked, so the main goal is melting the cheese and warming the cups.
- Cool for a few minutes before topping. This makes the cups easier to handle.
- Add lettuce at the last minute. This preserves its fresh crunch.
- Drain juicy tomatoes if needed. Removing excess liquid helps prevent soggy chips.
- Use sour cream sparingly. A small dollop adds flavor without overwhelming the cups.
- Set up a topping bar. Guests can customize each cup, making these perfect for parties.
- Serve immediately. Freshly assembled taco cups have the best contrast between crunchy chips, savory beef, and creamy cheese.
Perfect Occasions to Serve Cheesy Doritos Taco Cups
These crunchy, cheesy bites are ideal for:
- Game-day parties and football gatherings
- Birthday parties and casual celebrations
- Family movie nights
- Potlucks and informal get-togethers
- Taco Tuesday dinners
- After-school snacks
- Holiday appetizer spreads
- Weekend family lunches
- Casual backyard gatherings
- Any occasion that calls for an easy, crowd-pleasing finger food
For larger gatherings, cook the beef in advance and assemble the cups in batches. This lets you serve them warm and crunchy instead of letting them sit for too long.
Final Thoughts
These Cheesy Doritos Taco Cups combine everything you love about tacos and nachos in one fun, bite-sized recipe. The crunchy nacho cheese chips, savory seasoned beef, melted cheddar, and fresh toppings create a delicious balance of textures and flavors.
They’re easy enough for a weeknight dinner, customizable for picky eaters, and fun to serve at parties. Best of all, you can prepare the beef ahead of time and assemble the cups right before serving for maximum crunch.
Serve them with salsa, guacamole, or your favorite taco-night sides, and get ready for everyone to reach for seconds!
Save this recipe for your next party or taco night—because crunchy Doritos, seasoned beef, and melted cheese are always a winning combination!