
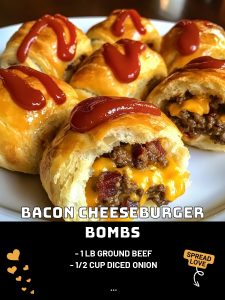
Bacon Cheeseburger Bombs: A Comfort Food Classic with a Twist
If you’re looking for a crowd-pleaser that’s both indulgent and fun to eat, these Bacon Cheeseburger Bombs are exactly what you need! Imagine the juiciness of a classic cheeseburger wrapped in a warm, flaky biscuit, with bits of crispy bacon adding a delightful crunch in every bite. Perfect for game nights, casual gatherings, or a comforting weeknight dinner, these bite-sized delights are guaranteed to be a hit with family and friends alike. The best part? They’re incredibly easy to make and customize, allowing you to experiment with your favorite burger toppings and sauces.
Ingredients Overview
Ground Beef (1 lb): The heart of your cheeseburger bomb, providing that classic, juicy burger flavor. Opt for lean ground beef to keep the filling from becoming too greasy.
Diced Onion (1/2 cup): Adds a hint of sweetness and depth to the beef filling. Finely dicing the onion ensures it blends seamlessly with the ground beef.
Garlic Powder (1 tsp): Enhances the savory flavor of the filling, giving it a subtle garlicky kick that complements the beef perfectly.
Salt (1 tsp) & Black Pepper (1/2 tsp): Basic seasonings to bring out the natural flavors of the meat and onions.
Refrigerated Biscuit Dough (1 tube): The dough forms the perfect crispy and buttery shell around the filling, making these bombs truly irresistible.
Cheddar Cheese (4 slices): The melty, gooey center of each bomb. Cheddar provides a sharp, tangy flavor that pairs wonderfully with the savory beef.
Bacon (8 slices, cooked and chopped): Adds a smoky, crispy element to each bite, making these bombs reminiscent of a classic bacon cheeseburger.
Ketchup (1/4 cup) & Mustard (1/4 cup): Traditional burger condiments that are perfect for dipping, enhancing the overall cheeseburger experience.
Step-by-Step Cooking Instructions
1. Preheat the Oven:
Preheat your oven to 375°F (190°C). This ensures your bombs bake evenly to a perfect golden brown.
2. Prepare the Beef Filling:
In a skillet over medium heat, cook the ground beef, diced onion, garlic powder, salt, and black pepper. Stir frequently, breaking up the beef with a wooden spoon, until the meat is browned and cooked through, about 5-7 minutes. Drain any excess grease to avoid a soggy filling.
3. Flatten the Biscuit Dough:
Flatten each piece of refrigerated biscuit dough into a circle about 4 inches in diameter. This will create the perfect base to hold your delicious filling.
4. Assemble the Bombs:
Place a slice of cheddar cheese in the center of each flattened dough piece. Top with a generous spoonful of the beef mixture and a sprinkle of chopped bacon. Fold the edges of the biscuit dough around the filling, pinching to seal and form a ball. Make sure the filling is fully enclosed to prevent leaks during baking.
5. Bake to Perfection:
Place the filled dough balls seam-side down on a baking sheet lined with parchment paper. Bake in the preheated oven for 15-20 minutes, or until the biscuits are golden brown and cooked through.
6. Serve and Enjoy:
Remove from the oven and allow to cool for a few minutes. Serve with ketchup and mustard on the side for dipping. Enjoy the savory, cheesy, and crispy goodness in every bite!
Valuable Tips for the Perfect Bacon Cheeseburger Bombs
Tip 1: Use Cold Dough for Easy Handling
Keeping the biscuit dough cold will make it easier to work with and prevent it from becoming too sticky.
Tip 2: Don’t Overstuff
Be mindful not to overfill the dough pieces, as this can cause them to burst open during baking.
Tip 3: Pre-Cook Your Bacon
Make sure your bacon is fully cooked and crispy before adding it to the filling. This ensures a delightful crunch and prevents the bombs from becoming greasy.
Tip 4: Experiment with Cheese
Feel free to swap out the cheddar for your favorite cheese – mozzarella, pepper jack, or Swiss are all great options!
Tip 5: Add Some Greens
For a bit of freshness, add a few baby spinach leaves or a small slice of tomato inside each bomb before sealing.
Storage and Reheating Tips
Refrigerating: Place any leftover bombs in an airtight container and refrigerate for up to 3 days.
Freezing: To freeze, arrange the baked bombs in a single layer on a baking sheet and freeze until solid. Then, transfer to a freezer-safe bag or container for up to 2 months.
Reheating: Reheat in a preheated oven at 350°F (175°C) for 10-12 minutes if refrigerated, or 20-25 minutes if frozen. This helps retain their crispy exterior.
Frequently Asked Questions
1. Can I use ground turkey instead of beef?
Absolutely! Ground turkey is a leaner alternative and works just as well with the seasonings and cheese.
2. What type of cheese melts best in this recipe?
Cheddar is great for its meltability and sharp flavor, but mozzarella, Colby Jack, or American cheese are also good choices.
3. How do I prevent the bombs from bursting open during baking?
Make sure to fully enclose the filling with the dough and pinch the seams tightly. Also, avoid overfilling the dough.
4. Can I make these ahead of time?
Yes, you can assemble the bombs ahead of time and refrigerate them for up to 24 hours before baking.
5. What can I serve with Bacon Cheeseburger Bombs?
These are great with a simple side salad, fries, or vegetable sticks with ranch dip.
6. How do I make these gluten-free?
Use a gluten-free biscuit dough and ensure all other ingredients (like the ketchup and mustard) are gluten-free.
7. Can I add vegetables to the filling?
Yes, finely diced mushrooms, bell peppers, or zucchini can be added for extra flavor and nutrition.
8. What’s the best way to cook the bacon?
Cooking bacon in the oven or in an air fryer will yield crispy pieces without the mess of stovetop cooking.
9. Can I use crescent roll dough instead of biscuit dough?
Yes, crescent roll dough can be used for a lighter, flakier texture.
10. What if I don’t have a rolling pin to flatten the dough?
A clean bottle or even your hands can flatten the dough sufficiently.
11. How can I make the bombs spicier?
Add a few dashes of hot sauce or a pinch of crushed red pepper flakes to the beef mixture.
12. Can I use store-bought precooked bacon?
Yes, precooked bacon can save time; just make sure it’s crispy.
13. Can these be cooked in an air fryer?
Yes, air fry at 350°F for 10-12 minutes, or until golden and cooked through.
14. Is it okay to use homemade biscuit dough?
Definitely! Homemade dough adds a personal touch and can be seasoned to your liking.
15. What’s the ideal size for each bomb?
Aim for about 2 inches in diameter to ensure even cooking.
16. Can I use a cheese blend?
A blend like Mexican or Italian can add a fun twist to the flavor profile.
17. How can I make these lower in fat?
Use lean ground meat, low-fat cheese, and skip the bacon for a lighter version.
18. Can I add herbs to the dough?
Absolutely! Chopped chives or parsley mixed into the dough would be delicious.
19. How do I prevent the bottoms from burning?
Using parchment paper or a silicone baking mat can help prevent burning.
20. What’s a fun variation of this recipe?
Try a Philly cheesesteak version with sautéed onions, peppers, and provolone cheese!
20 Secrets for Achieving Culinary Perfection with Bacon Cheeseburger Bombs
Season the Beef Well: Don’t skimp on the salt and pepper – the beef mixture needs to be flavorful.
Cook the Beef Mixture Completely: Make sure the beef is fully browned and the onions are softened for a perfect filling.
Use Fresh Spices: Freshly ground pepper and quality garlic powder can make a big difference.
Chill the Dough if It’s Too Soft: If the dough becomes too warm, chill it in the fridge for a few minutes.
Cook Bacon Until Crisp: Crispy bacon adds texture and flavor – don’t settle for soft bacon!
Drain Excess Fat: Remove any excess grease from the beef mixture to avoid a soggy filling.
Don’t Overwork the Dough: Overworking the dough can make it tough. Handle it just enough to shape the bombs.
Add Cheese Directly to the Meat Mixture for Extra Gooeyness: Mix some cheese into the beef for a gooier center.
Pre-Cook Any Added Vegetables: If adding veggies like mushrooms or peppers, sauté them first to remove excess moisture.
Bake on the Middle Rack: This ensures even baking and prevents the bottoms from burning