Grandma’s Classic Corn Pudding Recipe
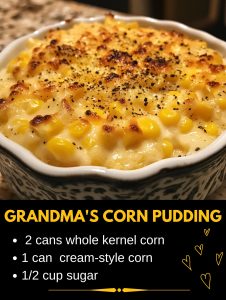
Bring a touch of nostalgia to your table with this classic corn pudding recipe, inspired by Grandma’s time-honored tradition. This dish is the epitome of comfort food: sweet, savory, and incredibly creamy. With a rich texture and hints of sweetness, it’s perfect for family gatherings, potlucks, or as a delightful side dish during the holidays.
Ingredients Overview
Each ingredient contributes to creating a luscious and creamy texture with a perfect balance of sweetness and savory flavors:
2 cans (15.25 oz each) whole kernel corn, drained: Adds texture to the pudding with whole corn kernels for a bit of bite.
1 can (14 oz) cream-style corn: Provides a creamy base that binds the pudding together, enhancing the corn flavor.
1/2 cup sugar: Adds just the right amount of sweetness to contrast the savory corn.
1/4 cup butter, melted: Offers richness and adds a buttery flavor to the dish.
2 eggs, beaten: Helps to bind the ingredients and gives the pudding structure.
1/2 cup milk: Adds creaminess and smoothness to the pudding.
3 tbsp cornstarch: Acts as a thickening agent, ensuring a custard-like texture.
1/2 tsp salt: Balances the sweetness and enhances the flavors of the dish.
1/4 tsp black pepper: Provides a subtle hint of spice, complementing the sweetness of the corn.
Step-by-Step Cooking Instructions
Step 1: Preheat the Oven
Preheat your oven to 350°F. Grease a 9×13-inch baking dish generously with butter or non-stick cooking spray to prevent the pudding from sticking.
Step 2: Prepare the Mixture
In a large mixing bowl, combine the whole kernel corn, cream-style corn, sugar, melted butter, eggs, milk, cornstarch, salt, and black pepper. Stir until the ingredients are well mixed. The mixture should appear slightly creamy and thick.
Step 3: Pour the Mixture into the Baking Dish
Carefully pour the corn mixture into the prepared baking dish. Use a spatula to smooth the top for even baking.
Step 4: Bake
Place the baking dish in the preheated oven and bake for 1 hour, or until the pudding is set and the top is golden brown. The center should be firm but slightly jiggly, and a knife inserted into the center should come out mostly clean.
Step 5: Cool Slightly and Serve
Allow the pudding to cool for about 10 minutes before serving. This will help it set further and make it easier to cut into squares.
Helpful Tips for a Seamless Cooking Experience
Use Fresh Corn for a Twist: If you have access to fresh corn, cut the kernels off the cob and use them in place of canned corn for a more authentic taste.
Room Temperature Ingredients Work Best: Let the eggs and milk sit at room temperature for about 30 minutes before using. This helps everything blend together more smoothly.
Don’t Overbake: Keep an eye on the pudding as it bakes. Overbaking can make it dry. It’s done when the center is just set and slightly jiggly.
Add a Topping for Extra Flavor: Sprinkle some cheddar cheese on top during the last 15 minutes of baking for a cheesy crust.
Storage and Reheating Tips
Storing: Once cooled, cover the dish with plastic wrap or foil and store in the refrigerator for up to 5 days.
Freezing: Corn pudding can be frozen for up to 3 months. Wrap individual portions in plastic wrap, then place them in a freezer-safe container.
Reheating: To reheat, cover with foil and bake in a 350°F oven for 15-20 minutes or until heated through. If microwaving, heat individual portions for 1-2 minutes on high.
20 Frequently Asked Questions
1. Can I make this corn pudding ahead of time?
Yes, you can prepare the mixture a day ahead, cover it, and store it in the refrigerator. Just bake it when you’re ready.
2. Can I use fresh or frozen corn instead of canned?
Yes, both fresh and frozen corn can be used. If using frozen corn, thaw and drain it before adding.
3. What is cream-style corn?
Cream-style corn is a canned product where the corn is partially pureed with the liquid. It adds creaminess to the dish.
4. Can I make this recipe dairy-free?
Yes, substitute the milk with almond milk or coconut milk, and use a dairy-free butter alternative.
5. How can I make it less sweet?
Reduce the sugar to 1/4 cup or even omit it for a more savory dish.
6. Can I add other ingredients to this recipe?
Definitely! Consider mixing in diced jalapeños, bacon bits, or chopped bell peppers for added flavor.
7. Can I bake it in a different-sized dish?
Yes, but adjust the baking time. Smaller dishes will need more time, and larger ones will need less time.
8. What kind of milk works best?
Whole milk adds richness, but you can use 2% or even evaporated milk for a creamier texture.
9. How do I know when the corn pudding is done?
The top should be golden brown, and a knife inserted into the center should come out mostly clean.
10. Is cornstarch necessary?
Yes, it thickens the pudding and gives it the classic custard-like texture.
11. Can I serve this dish cold?
While it’s traditionally served warm, some enjoy it cold or at room temperature.
12. How do I keep the pudding moist when reheating?
Cover the dish with foil when reheating to retain moisture.
13. Can I substitute cornstarch with flour?
Yes, use 2 tablespoons of all-purpose flour in place of cornstarch.
14. Is this dish gluten-free?
Yes, as written, the recipe is gluten-free.
15. What can I pair this with?
Corn pudding pairs well with roast chicken, ham, or barbecue dishes.
16. Can I double the recipe?
Yes, but use a larger dish or two 9×13-inch pans, and extend the baking time by about 15-20 minutes.
17. Can I add cheese to the pudding?
Yes, fold in 1/2 cup of shredded cheese for a cheesy twist.
18. How do I avoid lumps in the cornstarch?
Mix the cornstarch with a bit of cold milk before adding to the mixture to prevent clumping.
19. What should I do if the pudding seems too runny?
Bake for an additional 5-10 minutes, or let it sit for 10 minutes after baking to firm up.
20. Can I make this spicy?
Yes, add some cayenne pepper or crushed red pepper flakes for a kick.
20 Secrets for Culinary Perfection
Use high-quality butter for a richer flavor.
Opt for organic corn if possible, for a more natural taste.
Incorporate a splash of heavy cream for extra creaminess.
Add a dash of nutmeg to elevate the flavor subtly.
Let the melted butter cool slightly before mixing in.
Beat the eggs until frothy for a lighter texture.
Combine wet ingredients separately before adding to the dry mix.
Use a whisk for thorough mixing, especially when combining cornstarch.
Include diced onions for a savory twist.
Add some chopped fresh herbs like thyme for an aromatic touch.
Brush the top with melted butter halfway through baking.
Let the pudding sit for 10 minutes after baking for the best texture.
Sprinkle breadcrumbs on top for added crunch.
Experiment with different cheeses, such as gouda or parmesan.
Avoid overmixing to keep the pudding tender.
Use a glass baking dish for even cooking.
Rest the batter for 10 minutes before baking to meld flavors.
For a smoky flavor, add a touch of smoked paprika.
Avoid reducing the fat content too much; it ensures a rich texture.
Serve with a garnish of chopped chives or green onions for color and freshness.
Grandma’s corn pudding is a versatile and beloved dish that’s easy to customize while staying true to its comforting roots. Enjoy making this recipe your own!


