
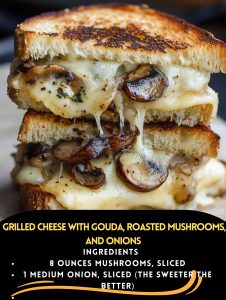
Grilled Cheese with Gouda, Roasted Mushrooms, and Onions
Indulge in the rich, savory comfort of a Grilled Cheese with Gouda, Roasted Mushrooms, and Onions—an elevated twist on a timeless classic. The combination of earthy roasted mushrooms, sweet caramelized onions, and creamy, melty gouda brings together a medley of textures and flavors that are simply irresistible. Whether you’re serving this gourmet grilled cheese for a quick lunch, a cozy dinner, or as a snack, it promises to soothe and satisfy. The aroma alone will draw everyone to the kitchen!
Ingredients Overview
- Mushrooms (8 ounces, sliced): Mushrooms are the perfect earthy base, adding deep umami flavors to the sandwich. Opt for baby bellas or creminis for a richer taste, though button mushrooms work too.
- Onion (1 medium, sliced): A sweeter variety like Vidalia or yellow onion is ideal for adding a caramel-like sweetness that balances the sharpness of the gouda.
- Olive Oil (2 tablespoons): This helps the mushrooms and onions roast evenly, bringing out their natural flavors.
- Salt & Pepper (to taste): Essential for seasoning, these simple ingredients enhance all the other flavors.
- Butter (4 tablespoons): Butter provides that golden, crispy crust we all crave in a grilled cheese.
- Bread (4 slices): Choose a sturdy, flavorful bread like sourdough, rye, or a whole-grain loaf that can stand up to the filling without becoming soggy.
- Gouda Cheese (1 cup, shredded): Gouda is a wonderfully creamy and slightly nutty cheese that melts beautifully, holding the sandwich together and elevating its flavor.
Step-by-Step Cooking Instructions
Step 1: Preheat the Oven
Preheat your oven to 400°F (200°C) to get it ready for roasting the mushrooms and onions. Roasting will intensify their natural flavors and bring out a sweet, caramelized finish that’s perfect for the sandwich.
Step 2: Roast the Mushrooms and Onions
On a baking sheet, toss the sliced mushrooms and onions with 2 tablespoons of olive oil, and season generously with salt and pepper. Spread them out evenly to ensure they roast properly. Roast in the preheated oven for about 20 minutes, stirring halfway through, until they are golden and slightly crisp on the edges.
Step 3: Prepare the Butter
While the veggies are roasting, melt 4 tablespoons of butter in a large skillet over medium heat. This melted butter is key for creating that perfect crispy, golden crust on the bread.
Step 4: Assemble the Sandwiches
Once your mushrooms and onions are roasted, it’s time to build your sandwiches. Layer shredded gouda on one slice of bread, followed by a portion of the roasted mushrooms and onions. Add a bit more gouda on top before finishing with the second slice of bread. Lightly press the sandwich together to secure all that goodness inside.
Step 5: Brown the Sandwiches
Once your butter is melted and the skillet is hot, carefully place your assembled sandwich into the pan. Quickly flip the sandwich to coat both sides in butter—this ensures the bread browns evenly. Cook each side for 2-3 minutes until the bread is golden brown, and the cheese has melted into a gooey, irresistible filling.
Step 6: Serve
Remove the sandwiches from the skillet and let them cool for just a minute before slicing them in half. Serve immediately with a side of soup or salad for the perfect meal.
Helpful Tips for the Perfect Grilled Cheese
Tip: Always Use Shredded Cheese
Shredding the cheese helps it melt more evenly and quickly, ensuring every bite is creamy and luscious.
Tip: Choose the Right Bread
Opt for a sturdy bread like sourdough that can hold up to the hearty fillings without becoming too soft.
Tip: Low and Slow Cooking
Don’t rush the grilling process. Cooking on medium-low heat allows the bread to brown perfectly without burning while giving the cheese enough time to melt.
Storage and Reheating Tips
If you find yourself with leftovers (though that’s rare with such a delicious sandwich!), you can store them for later enjoyment.
- Storage: Wrap the cooled sandwich in foil or plastic wrap and store in an airtight container in the refrigerator for up to 2 days.
- Reheating: To reheat, place the sandwich in a skillet over medium heat and cook for about 3-4 minutes per side until heated through. This helps retain the crispy exterior while warming the interior. Avoid microwaving, as it can make the bread soggy.
Frequently Asked Questions
1. Can I use a different type of cheese?
Yes! While gouda is delicious, you can experiment with cheeses like cheddar, fontina, or mozzarella for different flavors.
2. Can I make this sandwich vegan?
Yes! Substitute the butter with a vegan alternative, use a plant-based cheese, and roast the veggies in oil.
3. Can I use gluten-free bread?
Absolutely! Just be sure to choose a gluten-free bread that holds up well when grilled.
4. Can I make the roasted mushrooms and onions ahead of time?
Yes, you can roast them up to 2 days ahead and store in the fridge until ready to assemble the sandwiches.
5. How can I prevent the bread from getting soggy?
Use sturdy bread and make sure not to overload it with too much filling. Toasting the bread on both sides helps as well.
6. What’s the best bread for grilled cheese?
Sourdough, ciabatta, or a thick-cut rustic loaf works great for holding up to the filling and achieving a crispy crust.
7. How do I make sure the cheese melts evenly?
Grate the cheese and layer it evenly throughout the sandwich. Cooking the sandwich on medium-low heat helps ensure even melting.
8. Can I add more vegetables to this sandwich?
Yes! Spinach, roasted peppers, or tomatoes would complement the flavors beautifully.
9. What’s the best type of mushroom to use?
Baby bella or cremini mushrooms add a rich, earthy flavor, but white button mushrooms also work well.
10. Can I freeze these sandwiches?
You can, but grilled cheese is best fresh. If you do freeze them, reheat in a skillet rather than a microwave to maintain the crispy texture.
20 Secrets for Culinary Perfection
- Shred Your Cheese: Always shred your own cheese instead of using pre-shredded for a creamier melt.
- Roast the Veggies: Roasting the mushrooms and onions caramelizes their natural sugars and enhances the depth of flavor.
- Use Unsalted Butter: Unsalted butter allows you to control the saltiness of the sandwich.
- Choose the Right Heat: Cook your grilled cheese on medium-low to ensure even browning without burning the bread.
- Use a Cast-Iron Skillet: It distributes heat evenly and helps achieve a perfectly crispy crust.
- Layer Cheese on Both Sides: Place cheese on both sides of the bread for extra melty goodness that holds the sandwich together.
- Don’t Overstuff: Less is more—overloading the sandwich can make it hard to grill evenly.
- Press Lightly: Gently press down on the sandwich while it cooks to help it hold its shape.
- Use Day-Old Bread: Slightly stale bread crisps up better when grilled.
- Add a Pinch of Sugar: If your onions aren’t sweet enough, a small pinch of sugar can help caramelize them.
- Opt for Room-Temperature Butter: Spreading room-temp butter on the bread ensures even coverage.
- Use a Lid: Covering the pan for the first minute or two can help the cheese melt faster without overcooking the bread.
- Experiment with Different Cheeses: Try mixing cheeses for complex flavor combinations.
- Add a Dash of Hot Sauce: A few drops of hot sauce in the filling can elevate the flavors.
- Serve with Dips: A side of tomato soup or marinara sauce is a classic pairing for grilled cheese.
- Toast Both Sides of the Bread: Quickly toasting the inside of the bread in the skillet before assembling can add an extra layer of crunch.
- Try Compound Butters: Infuse your butter with garlic or herbs for added flavor.
- Flip Carefully: Use a wide spatula and flip slowly to avoid spilling the filling.
- Sprinkle Parmesan on the Bread: For an extra-crispy crust, sprinkle a bit of Parmesan cheese on the buttered bread before grilling.
- Rest the Sandwich: Let it rest for a minute after grilling to allow the cheese to set slightly, making it easier to cut and eat