
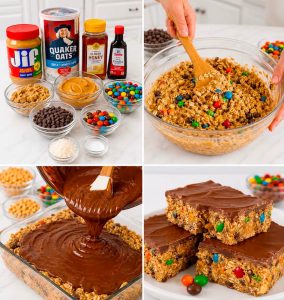
No-Bake Monster Cookie Bars – Easy Peanut Butter Chocolate Treat
If you love classic monster cookies, you’re going to adore these No-Bake Monster Cookie Bars! They’re packed with creamy peanut butter, chewy oats, mini chocolate chips, colorful M&M’s, and a rich chocolate-peanut butter topping. Best of all, there’s no oven required!
These easy no-bake bars have all the fun flavors of monster cookies in a simple, sliceable dessert. They’re perfect for lunchbox treats, after-school snacks, bake sales, potlucks, holiday dessert trays, or whenever you’re craving something sweet and chocolatey.
With just a handful of pantry staples and a little chilling time, you’ll have a batch of irresistible peanut butter oatmeal bars ready to enjoy.
Recipe Information
- Prep Time: 15 minutes
- Chill Time: 2 hours
- Cook Time: 0 minutes
- Total Time: About 2 hours 15 minutes
- Servings: 16 bars
- Dish Size: 8×8-inch or 9×9-inch pan
- Difficulty: Easy
- Method: No-bake
Ingredients
For the Cookie Bars
- 3 cups quick oats
- 1½ cups creamy peanut butter
- ½ cup honey
- ½ cup packed brown sugar
- 1 teaspoon vanilla extract
- ½ teaspoon salt
- ½ cup mini chocolate chips
- ¾ cup mini M&M’s
- ¼ cup shredded coconut (optional)
For the Chocolate Topping
- 1½ cups chocolate chips
- 2 tablespoons creamy peanut butter
Instructions
1. Prepare the Pan
Line an 8×8-inch or 9×9-inch baking dish with parchment paper, leaving a little overhang on the sides. This makes it much easier to lift the bars out later. You can lightly grease the pan if you prefer.
2. Mix the Peanut Butter Base
In a large mixing bowl, combine the creamy peanut butter, honey, brown sugar, and vanilla extract. Stir until the mixture is smooth and the brown sugar is evenly incorporated.
If your peanut butter is especially thick, gently warm it for a few seconds to make mixing easier.
3. Add the Oats
Add the quick oats and salt to the peanut butter mixture. Stir thoroughly until all the oats are coated and the mixture becomes thick and sticky.
4. Fold in the Goodies
Gently fold in the mini chocolate chips, mini M&M’s, and shredded coconut if using.
If the mixture feels warm, let it cool slightly before adding the chocolate chips so they don’t melt into the peanut butter base.
5. Press Into the Pan
Transfer the mixture to your prepared baking dish. Use a spatula, the back of a spoon, or clean hands to press it firmly into an even layer.
Take your time with this step. Pressing the mixture tightly helps the bars hold together when sliced.
6. Make the Chocolate Topping
Place the chocolate chips and 2 tablespoons of peanut butter in a microwave-safe bowl.
Microwave in 20–30-second intervals, stirring well after each interval, until the chocolate is completely melted and smooth. Be careful not to overheat it.
7. Add the Chocolate Layer
Pour the melted chocolate mixture over the oat base. Spread it evenly with a spatula, making sure to reach the edges.
For a fun finishing touch, sprinkle a few extra mini M&M’s or mini chocolate chips over the top before the chocolate sets.
8. Chill Until Firm
Place the pan in the refrigerator for at least 2 hours, or until the bars are completely firm.
For cleaner slices, you can chill them a little longer. If you want to make cutting easier, let the pan sit at room temperature for 5–10 minutes before slicing.
9. Slice and Serve
Use the parchment paper overhang to lift the bars out of the pan. Place them on a cutting board and slice into 16 squares or your preferred size.
Enjoy these delicious No-Bake Monster Cookie Bars chilled or slightly softened at room temperature!
Tips for Perfect Monster Cookie Bars
- Press the oat mixture very firmly into the pan so the bars don’t crumble.
- Use creamy peanut butter for a smooth, consistent texture.
- Make sure the chocolate topping isn’t overheated.
- Let the bars chill completely before cutting.
- Use a sharp knife and wipe it clean between slices for neat edges.
Serving Suggestions
These colorful peanut butter cookie bars are delicious all on their own, but they’re also wonderful served with:
- A cold glass of milk.
- Hot coffee or a latte.
- A mug of hot chocolate.
- Vanilla ice cream.
- Fresh strawberries or banana slices.
- A dessert platter with brownies and cookies.
They’re especially fun for birthday parties, school treats, holiday gatherings, and casual family get-togethers.
Easy Variations
Use Different Chocolate: Try milk chocolate, semi-sweet, or dark chocolate chips for the topping.
Add More Crunch: Stir in chopped peanuts, almonds, or roasted cashews.
Make Them Festive: Use seasonal M&M’s for Christmas, Halloween, Valentine’s Day, or Easter.
Try Almond Butter: Substitute creamy almond butter for peanut butter if desired, keeping in mind that the flavor and texture will change.
Skip the Coconut: The shredded coconut is completely optional. Leave it out without changing the other ingredients.
Add More Chocolate: Sprinkle extra mini chocolate chips over the topping before chilling.
Storage Instructions
Store the bars in an airtight container in the refrigerator for up to 1 week. Separate layers with parchment paper to prevent sticking.
Because the bars contain peanut butter and honey, keeping them chilled helps them stay firm and makes them easier to handle.
For longer storage, freeze the bars in a freezer-safe container for up to 2 months for best quality. Separate individual bars with parchment paper so you can remove just what you need.
Thaw frozen bars in the refrigerator or let them sit at room temperature briefly before serving.
Reheating and Serving After Chilling
These are no-bake treats, so they don’t need reheating.
If the bars are very firm straight from the refrigerator, let them sit at room temperature for about 5–10 minutes before serving. This softens the peanut butter base and makes the chocolate topping easier to bite into.
Avoid microwaving the whole bar, as the chocolate topping can melt quickly.
Make-Ahead Instructions
These bars are perfect for making ahead! Prepare them the day before your event, chill until firm, and keep them covered in the refrigerator.
You can also slice them in advance and store the individual squares in an airtight container. For parties, arrange them on a serving platter shortly before guests arrive.
20 Tips & Secrets for the Best No-Bake Monster Cookie Bars
- Choose Quick Oats: Quick oats create a softer, more cohesive bar than traditional rolled oats.
- Use Creamy Peanut Butter: It blends smoothly and helps bind all the ingredients together.
- Measure Carefully: Too many oats can make the bars dry and crumbly.
- Warm Thick Peanut Butter: A few seconds in the microwave can make it easier to stir.
- Don’t Skip the Salt: It balances the sweetness of the honey, brown sugar, and chocolate.
- Pack the Brown Sugar: Firmly packed brown sugar gives the bars their delicious sweetness.
- Cool Before Adding Chocolate Chips: If the peanut butter mixture is warm, the mini chocolate chips may melt.
- Press Firmly: Compacting the mixture is one of the most important secrets to bars that hold together.
- Use Parchment Paper: Leave extra paper over the edges to make removing the bars simple.
- Avoid Overheating Chocolate: Melt it slowly in short microwave intervals.
- Stir Frequently: Stirring between microwave intervals helps the chocolate melt evenly.
- Add Extra M&M’s: Sprinkle a few on top for a colorful, bakery-style finish.
- Try Different Chocolate: Dark chocolate makes a delicious contrast to the sweet peanut butter base.
- Chill Long Enough: Give the bars at least 2 hours in the refrigerator to become firm.
- Warm Your Knife: Run a sharp knife under warm water, then dry it before slicing.
- Clean Between Cuts: Wiping the knife keeps the chocolate topping looking neat.
- Customize the Mix-Ins: Chopped nuts, pretzel pieces, or extra chocolate chips are delicious additions.
- Keep Coconut Optional: The recipe works beautifully with or without shredded coconut.
- Freeze Individual Portions: Wrap or separate bars so you can grab one whenever a craving strikes.
- Use Seasonal Candy: Swap regular M&M’s for holiday colors to make these bars festive all year long.
20 Frequently Asked Questions
1. Do No-Bake Monster Cookie Bars need to be baked?
No! These bars are completely no-bake. Simply mix, press into a pan, add the chocolate topping, and refrigerate until firm.
2. Can I use old-fashioned rolled oats instead of quick oats?
Yes. Rolled oats will give the bars a heartier, chewier texture. For a softer consistency, pulse them briefly in a food processor before using.
3. Can I use crunchy peanut butter?
Absolutely! Crunchy peanut butter adds extra texture and little bits of peanut throughout the bars.
4. Can I substitute the honey?
You can try using an equal amount of maple syrup, although the flavor and firmness may be slightly different.
5. Why are my bars falling apart?
They may need more chilling time, or the mixture may not have been pressed firmly enough. Make sure the oats are thoroughly coated with the peanut butter mixture.
6. Why is my oat mixture too dry?
Different peanut butter brands and oat varieties absorb moisture differently. If the mixture seems too dry to hold together, add a little extra peanut butter or honey, one tablespoon at a time.
7. Can I leave out the shredded coconut?
Yes! Coconut is optional and can be omitted without any other changes.
8. Can I use regular-sized chocolate chips?
Yes, although mini chocolate chips distribute more evenly throughout the bars. Regular chocolate chips work perfectly well.
9. What kind of M&M’s should I use?
Mini M&M’s are ideal because they’re small and easy to mix into the oat base. Regular M&M’s can also be used if lightly chopped.
10. Can I use a different size baking pan?
Yes. An 8×8-inch pan creates thicker bars, while a 9×9-inch pan makes slightly thinner bars.
11. How long do these bars need to chill?
Allow at least 2 hours in the refrigerator, or until the chocolate topping and oat base are firm.
12. Can I make these bars without the chocolate topping?
Yes! The peanut butter oatmeal mixture is delicious on its own. You can also drizzle melted chocolate over the top instead of spreading a full layer.
13. Can I use natural peanut butter?
You can, but natural peanut butter can be runnier or more separated than conventional creamy peanut butter. Stir it very well before measuring, and adjust the oats or peanut butter slightly if needed.
14. How do I get clean slices?
Chill the bars completely, lift them out using the parchment paper, and cut with a sharp knife. Wiping the knife between cuts helps keep the chocolate layer neat.
15. Can I freeze No-Bake Monster Cookie Bars?
Yes! Freeze them in an airtight, freezer-safe container for up to 2 months for best quality. Separate the layers with parchment paper.
16. How should I store leftover bars?
Keep them in an airtight container in the refrigerator for up to 1 week.
17. Can I make these bars ahead of time?
Definitely! They’re a great make-ahead dessert. Prepare them the day before and keep them refrigerated until you’re ready to serve.
18. Are these bars gluten-free?
They can be made gluten-free by using oats that are specifically labeled certified gluten-free and checking that all other ingredients are gluten-free.
19. Can I make these bars nut-free?
You can experiment with a suitable seed butter, such as sunflower seed butter, instead of peanut butter. Check all ingredient labels for cross-contact and allergy concerns.
20. Can I serve these bars at room temperature?
Yes. They’re delicious slightly softened, but they hold their shape best when chilled. Don’t leave them out for extended periods, especially in a warm room.
Final Thoughts
These No-Bake Monster Cookie Bars are everything a sweet treat should be: chewy, chocolatey, colorful, and loaded with peanut butter goodness! With no oven required and simple ingredients, they’re an easy dessert you’ll want to make again and again.
Make a batch for your family, share them at your next gathering, or keep a few in the freezer for whenever you need a quick sweet treat. One bite, and you’ll understand why these bars are such a favorite!
Save this recipe and enjoy a little monster cookie magic whenever the craving hits! 🍪