
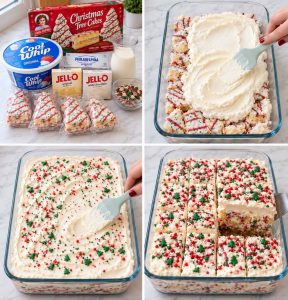
Little Debbie Christmas Tree Cake Dessert – Easy No-Bake Christmas Treat
Looking for a festive Christmas dessert that’s creamy, sweet, easy to make, and guaranteed to bring holiday cheer to your dessert table? This Little Debbie Christmas Tree Cake Dessert is the perfect treat for Christmas parties, family gatherings, potlucks, and cozy holiday celebrations!
Made with Little Debbie Christmas Tree Cakes, creamy cheesecake-style filling, vanilla pudding, white chocolate pudding, fluffy Cool Whip, and colorful Christmas sprinkles, this no-bake dessert combines all the flavors of a classic holiday snack cake with the irresistible texture of a creamy pudding dessert.
The best part? There’s no oven required! Simply layer the Christmas tree cakes in a baking dish, prepare the rich and fluffy filling, spread it over the cakes, decorate with festive sprinkles, and let everything chill in the refrigerator.
After a few hours, the cake pieces soften slightly while the creamy filling firms up into a delicious, sliceable dessert. Every bite delivers sweet vanilla cake, smooth pudding, creamy cheesecake flavor, and a fun Christmas crunch from the sprinkles.
Whether you’re hosting Christmas dinner, preparing treats for a holiday potluck, or looking for an easy dessert to make with the family, this Little Debbie Christmas Tree Cake Dessert is sure to become a seasonal favorite.
Why You’ll Love This Christmas Tree Cake Dessert
- No baking required: Perfect when your oven is already busy with holiday cooking.
- Packed with Christmas flavor: Little Debbie Christmas Tree Cakes bring a festive vanilla cake flavor and decorative holiday icing.
- Rich and creamy: Cream cheese, two pudding flavors, and Cool Whip create a light yet indulgent filling.
- Easy to prepare: Simple ingredients and straightforward steps make this recipe beginner-friendly.
- Perfect for parties: A 9×13-inch dish makes it easy to serve a crowd.
- Beautiful holiday presentation: Red, green, and white sprinkles make every serving look festive.
- Make-ahead friendly: Chill the dessert before your gathering so it’s ready when you need it.
Recipe at a Glance
- Prep time: 20 minutes
- Chilling time: 2–4 hours minimum
- Cook time: 0 minutes
- Total time: Approximately 2 hours 20 minutes to 4 hours 20 minutes
- Servings: 12–15
- Course: Dessert
- Cuisine: American
- Method: No-bake, refrigerator dessert
- Difficulty: Easy
Ingredients You’ll Need
1. Little Debbie Christmas Tree Cakes — 10 Cakes
These seasonal snack cakes are the star of the recipe. Their soft vanilla cake layers, creamy filling, and festive icing create a delicious base for the dessert.
Cutting the cakes into bite-sized pieces allows them to fit neatly into the baking dish and ensures you get some cake in every serving.
Tip: Use the classic vanilla Christmas Tree Cakes for a traditional flavor. If you’re using a different variety, expect the final dessert to taste slightly different.
2. Cream Cheese — 8 Ounces, Softened
Cream cheese gives the filling its rich, cheesecake-like flavor and smooth consistency.
Full-fat cream cheese creates the creamiest result, but a lower-fat block-style option may also work. Let it soften at room temperature before mixing so it blends easily without lumps.
3. Instant Vanilla Pudding Mix — One 3.4-Ounce Box
Vanilla pudding adds sweetness, creamy texture, and classic vanilla flavor. It also helps the filling thicken as the dessert chills.
Make sure you use instant pudding rather than cook-and-serve pudding.
4. Instant White Chocolate Pudding Mix — One 3.4-Ounce Box
White chocolate pudding gives the filling a sweeter, richer flavor that pairs beautifully with the vanilla cakes and cream cheese.
Together, the two pudding flavors create a deliciously creamy holiday filling.
5. Cold Milk — 2 Cups
Cold milk helps the instant pudding mixes thicken properly.
Whole milk produces a richer filling, while 2% milk can also work. Follow the recipe’s measured amount rather than the larger quantity that may be printed on the pudding boxes, because this dessert combines the pudding with cream cheese and whipped topping.
6. Cool Whip — One 8-Ounce Container, Thawed
Cool Whip adds a light, fluffy texture that balances the rich cream cheese and pudding mixture.
Thaw it in the refrigerator before folding it into the filling. Avoid stirring too vigorously, as this can deflate the mixture.
7. Powdered Sugar — ½ Cup, Optional
Powdered sugar provides extra sweetness and blends smoothly into the cream cheese.
Since the snack cakes, pudding mixes, and whipped topping are already sweet, this ingredient is optional. Taste the filling before adding the full amount if you prefer a less-sweet dessert.
8. Christmas Sprinkles — Red, Green, and White
Holiday sprinkles give the dessert its festive finishing touch. Use a combination of colors, tiny sugar shapes, or Christmas-themed decorations.
Add the sprinkles just before serving if you want their colors and textures to stay especially vibrant.
Equipment Needed
- One 9×13-inch baking dish
- A large mixing bowl
- A medium mixing bowl
- An electric hand mixer or stand mixer
- A whisk
- A rubber spatula
- A sharp knife and cutting board
- Plastic wrap or a fitted dish cover
- A refrigerator
How to Make Little Debbie Christmas Tree Cake Dessert
Step 1: Prepare the Christmas Tree Cakes
Unwrap all 10 Little Debbie Christmas Tree Cakes and place them on a cutting board.
Cut each cake into bite-sized pieces using a sharp knife. The pieces don’t need to be perfectly uniform, but smaller chunks make it easier to distribute the cakes throughout the dish.
Arrange the pieces in an even layer across the bottom of a 9×13-inch baking dish.
Spread them out so there are cake pieces in every corner. This ensures that each serving contains a delicious layer of Christmas tree cake.
Step 2: Beat the Cream Cheese
Place the softened cream cheese in a large mixing bowl.
Using an electric mixer, beat the cream cheese for approximately 1–2 minutes, until smooth and fluffy. Scrape down the sides of the bowl as needed.
If you’re using powdered sugar, add it now and continue mixing until fully incorporated.
Helpful tip: Softened cream cheese is essential for a smooth filling. Cold cream cheese can leave small lumps that are difficult to remove once the pudding is added.
Step 3: Prepare the Pudding Mixture
In a separate bowl, combine the instant vanilla pudding mix, instant white chocolate pudding mix, and 2 cups of cold milk.
Whisk continuously for approximately 2 minutes, or until the mixture begins to thicken.
Let it stand briefly if necessary, but don’t leave it sitting for too long before combining it with the cream cheese.
The pudding should be thick enough to coat a spoon while remaining smooth and easy to mix.
Step 4: Combine the Cream Cheese and Pudding
Gradually add the prepared pudding mixture to the beaten cream cheese.
Mix on low speed until the ingredients are completely combined and the filling is smooth.
Scrape the sides and bottom of the bowl to ensure there are no pockets of plain cream cheese remaining.
The mixture should look creamy, thick, and evenly blended.
Step 5: Fold in the Cool Whip
Add the thawed Cool Whip to the pudding and cream cheese mixture.
Using a rubber spatula, gently fold it in with broad, sweeping motions. Continue until the filling is evenly combined and fluffy.
Avoid beating the Cool Whip with the electric mixer, because vigorous mixing can make the filling less airy.
Step 6: Spread the Filling Over the Cakes
Pour or spoon the creamy filling over the chopped Christmas Tree Cakes in the baking dish.
Use a spatula to spread it evenly from edge to edge, covering all the cake pieces.
Smooth the top so the dessert has a neat finish. Make sure the filling reaches the corners of the dish.
Step 7: Decorate with Christmas Sprinkles
Sprinkle the top generously with red, green, and white Christmas sprinkles.
For an extra-festive presentation, create alternating bands of red and green sprinkles, or scatter the colors evenly across the surface.
You can also add small Christmas-themed sugar decorations if desired.
Step 8: Refrigerate Until Set
Cover the baking dish tightly with plastic wrap or a lid.
Refrigerate for at least 2–4 hours, allowing the filling to firm up and the cake pieces to soften slightly.
For cleaner slices and a more developed texture, chilling overnight is an excellent option.
Keep the dessert refrigerated until you’re ready to serve.
Step 9: Slice and Serve
Once chilled, cut the dessert into squares using a sharp knife.
For neat slices, wipe the knife clean between cuts. Use a spatula to lift each serving from the dish.
Serve cold and enjoy the layers of soft Christmas tree cake, creamy white chocolate-vanilla filling, and festive sprinkles!
Expert Tips for the Best Christmas Tree Cake Dessert
- Soften the cream cheese completely. This prevents lumps and creates a silky filling.
- Use cold milk. Instant pudding thickens best when prepared with cold milk.
- Choose instant pudding. Cook-and-serve pudding won’t work the same way in this no-bake recipe.
- Don’t add too much milk. The filling needs to remain thick enough to set.
- Fold in the whipped topping gently. This preserves its airy texture.
- Spread the cakes evenly. An even cake layer means every serving gets plenty of cake.
- Taste before adding powdered sugar. The dessert is naturally sweet from the cakes and pudding.
- Chill long enough. A proper chilling period helps the dessert firm up for easier serving.
- Cover while refrigerating. This protects the dessert from absorbing other refrigerator odors.
- Add delicate decorations later. Some sprinkles can bleed color or soften when exposed to moisture for a long time.
Delicious Variations and Substitutions
Chocolate Christmas Tree Cake Dessert
For a chocolate-inspired version, use chocolate pudding in place of the vanilla pudding. The result will be richer and more chocolate-forward.
Extra Cheesecake-Style Dessert
Add a little vanilla extract to the cream cheese mixture for extra flavor. You can also use a small amount of additional cream cheese if you prefer a tangier filling, although the texture and proportions may change.
Peppermint Christmas Dessert
Add a tiny amount of peppermint extract to the filling and decorate with crushed peppermint candies just before serving.
Start with a small amount of extract because peppermint flavor can quickly become overpowering.
Strawberry Christmas Dessert
Use strawberry pudding instead of white chocolate pudding for a fruity twist. Red and white sprinkles make a beautiful topping.
Chocolate Drizzle Version
Drizzle a little melted white or dark chocolate over the chilled dessert before serving. Allow the chocolate to set briefly in the refrigerator.
Extra-Crunchy Holiday Topping
Add crushed vanilla sandwich cookies or festive sugar cookies immediately before serving for a little extra crunch.
Christmas Tree Cake Trifle
Instead of using a baking dish, layer the chopped cakes and creamy filling in a large glass trifle bowl or individual dessert cups.
This variation looks beautiful on a holiday dessert table because the layers are visible.
Individual Dessert Cups
Divide the cake pieces among small serving cups, then spoon or pipe the filling over them. Finish with Christmas sprinkles.
Individual portions are especially convenient for parties and potlucks.
Lower-Sweetness Version
Skip the powdered sugar and use a plain whipped topping. The dessert will still be sweet thanks to the snack cakes and pudding mixes.
Gluten-Free Considerations
The original Little Debbie snack cakes contain wheat ingredients. A gluten-free adaptation would require suitable gluten-free cake pieces and checking every pudding, topping, and decoration label for gluten-containing ingredients. The texture may differ from the original recipe.
What to Serve with Christmas Tree Cake Dessert
This creamy dessert pairs well with a variety of holiday favorites.
- Hot coffee: Balances the sweetness with a slightly bitter flavor.
- Hot chocolate: Makes a cozy combination for a Christmas gathering.
- Black tea: A simple drink that complements the creamy filling.
- Fresh strawberries: Add freshness and a little natural tartness.
- Raspberries: Their tangy flavor cuts through the sweetness.
- Fresh fruit salad: A refreshing side for a large holiday meal.
- Sugar cookies: Perfect for a festive dessert spread.
- Peppermint bark: Adds a contrasting chocolate-and-peppermint flavor.
- Brownies: Ideal for a holiday dessert table with several sweet options.
- Vanilla coffee: Complements the dessert’s cake and pudding flavors.
Make-Ahead Instructions
This is an excellent make-ahead dessert because it needs several hours to chill before serving.
For the best results:
- Prepare the dessert according to the instructions.
- Cover the dish tightly.
- Refrigerate for at least 4 hours, or preferably overnight.
- Add extra decorative sprinkles shortly before serving if you want them to remain bright and crisp.
- Keep the dessert refrigerated until dessert time.
Making it the night before a party saves time on the day of your gathering and allows the filling to firm up nicely.
How to Store Leftover Christmas Tree Cake Dessert
Because this dessert contains cream cheese, milk-based pudding, and whipped topping, it must be refrigerated.
- Refrigeration: Store covered in the refrigerator at 40°F (4°C) or below.
- Best quality: Enjoy within 3–4 days.
- Serving: Remove only the portions you plan to serve and return the remaining dish to the refrigerator promptly.
- Food safety: Do not leave the dessert at room temperature for more than 2 hours, or more than 1 hour if the temperature is above 90°F (32°C).
The cake pieces will continue to soften as the dessert sits, making the texture more pudding-like over time.
Can You Freeze Little Debbie Christmas Tree Cake Dessert?
Freezing is possible, but it may change the texture.
Cream cheese, pudding, and whipped topping can become less smooth after thawing, and the cake pieces may soften further. For the best texture, refrigeration is recommended.
If you want to freeze it:
- Place the dessert in a freezer-safe, airtight container.
- Freeze in individual portions if possible.
- For best quality, use within about 1 month.
- Thaw overnight in the refrigerator.
- Stirring or refreezing the thawed dessert is not recommended because it can affect the texture.
Never thaw the dessert on the counter. Keep it refrigerated while thawing and serve it cold.
Common Mistakes to Avoid
1. Using Cold Cream Cheese
Cold cream cheese doesn’t blend smoothly and can leave lumps in the filling. Let it soften before mixing.
2. Using the Wrong Pudding
Instant pudding is designed to thicken with cold milk. Cook-and-serve pudding requires a different preparation method and may not produce the desired filling.
3. Adding Too Much Milk
Too much milk can leave the dessert loose and difficult to slice. Measure the 2 cups carefully.
4. Overmixing the Cool Whip
Beating the whipped topping aggressively can reduce the filling’s fluffy texture. Fold it in gently with a spatula.
5. Skipping the Chilling Time
The dessert needs time to firm up. Serving it immediately can result in a soft filling and messy portions.
6. Adding Too Much Powdered Sugar
The snack cakes and pudding are already sweet. Start without the optional sugar and add it only if desired.
7. Leaving the Dessert Uncovered
An uncovered dish can absorb refrigerator odors and develop a dry surface. Cover it tightly while chilling.
8. Cutting It Before It Sets
Give the dessert at least 2–4 hours in the refrigerator. Overnight chilling usually produces the neatest slices.
20 Frequently Asked Questions
1. What is Little Debbie Christmas Tree Cake Dessert?
It’s a no-bake layered dessert made with chopped Little Debbie Christmas Tree Cakes and a creamy filling of cream cheese, instant pudding, milk, and whipped topping.
2. Does this recipe require baking?
No. The dessert is assembled in a baking dish and refrigerated until firm. The oven isn’t needed.
3. How many servings does this recipe make?
A 9×13-inch dish typically yields 12–15 servings, depending on how large you cut the squares.
4. Can I make this dessert the night before Christmas?
Yes! Preparing it the night before is an excellent option. The overnight chilling period helps the filling set and makes serving easier.
5. Can I use only vanilla pudding?
Yes, but the flavor will be less rich and won’t have the white chocolate note. Use both pudding flavors for the intended result.
6. Can I substitute another pudding flavor?
Absolutely. Chocolate, cheesecake, or strawberry instant pudding can create delicious variations, though the final flavor will change.
7. Do I have to use powdered sugar?
No. It’s optional. The cakes and pudding mixes already provide plenty of sweetness for most tastes.
8. Can I use homemade whipped cream instead of Cool Whip?
Yes, but use a stabilized whipped cream if possible, because the dessert needs to hold its shape after chilling. The texture and firmness may differ from the original recipe.
9. How do I prevent lumps in the cream cheese filling?
Start with fully softened cream cheese and beat it until smooth before gradually mixing in the prepared pudding.
10. Why is my filling too runny?
Possible reasons include too much milk, incorrect pudding type, insufficient mixing time for the pudding to thicken, or not enough chilling time. Measure the milk accurately and refrigerate the dessert for several hours.
11. Can I use low-fat cream cheese?
Yes. Block-style reduced-fat cream cheese may work, although the filling may be slightly less rich. Avoid very watery products that are not designed for baking or dessert fillings.
12. Can I use a different size baking dish?
Yes. A smaller, deeper dish will produce thicker layers and may need longer chilling. A larger dish will make thinner layers.
13. How long does this dessert need to chill?
At least 2–4 hours is recommended. Chilling overnight generally gives the best texture for slicing.
14. Can I make individual servings?
Yes. Layer the cake pieces and filling in dessert cups or small jars, then decorate each portion with Christmas sprinkles.
15. When should I add the Christmas sprinkles?
You can add them before chilling, as described in the recipe. For decorations that might bleed or soften, add some extra sprinkles shortly before serving.
16. How long will leftovers last?
For best quality, enjoy refrigerated leftovers within 3–4 days. Keep the dish covered and refrigerated at 40°F (4°C) or below.
17. Can I freeze this dessert?
Yes, but freezing may affect the smoothness of the filling and soften the cakes. Refrigeration is the preferred storage method.
18. Can I make this dessert without cream cheese?
You can experiment with a thicker pudding-and-whipped-topping filling, but the dessert will lose some of its cheesecake-like richness and may set differently.
19. Is this dessert good for a Christmas potluck?
Absolutely! It’s colorful, easy to portion, and simple to transport in a covered baking dish. Keep it chilled during transport and serving.
20. What makes this dessert so popular?
It combines a nostalgic seasonal snack cake with a creamy, no-bake filling and festive decorations. It’s easy to make, visually appealing, and perfect for holiday celebrations.
20 Tips and Secrets for the Perfect Christmas Tree Cake Dessert
- Soften the cream cheese first. This is the key to a smooth, lump-free filling.
- Use cold milk. Instant pudding thickens properly when prepared with cold milk.
- Measure the milk accurately. The filling needs to be thick enough to hold its shape.
- Choose instant pudding. Cook-and-serve pudding isn’t a direct substitute.
- Beat the cream cheese before adding anything else. Starting with a smooth base makes the entire filling easier to mix.
- Add the pudding gradually. This helps the cream cheese and pudding combine evenly.
- Scrape the bowl frequently. Cream cheese can cling to the sides and bottom of the mixing bowl.
- Fold in the Cool Whip gently. A light hand helps preserve the fluffy texture.
- Cut the cakes into even pieces. Consistent pieces make the base easier to spread and portion.
- Spread the cakes to the edges. This helps every serving contain some cake.
- Use a spatula to level the filling. A smooth surface looks especially attractive under the Christmas sprinkles.
- Don’t automatically add the powdered sugar. Taste the filling first to avoid making it overly sweet.
- Choose colorful sprinkles. Red, green, and white create a classic Christmas look.
- Save a few sprinkles for serving. A fresh finishing touch can brighten the dessert.
- Cover the dish tightly. This protects the filling from drying out and absorbing odors.
- Chill overnight for cleaner slices. The extra time helps the filling become firmer.
- Wipe your knife between cuts. This produces neater squares with cleaner edges.
- Use a flat serving spatula. It helps lift the soft dessert without breaking the layers.
- Keep it cold at parties. Serve small portions at a time and refrigerate the rest.
- Personalize the presentation. Add festive candy decorations, a light white-chocolate drizzle, or individual dessert cups to make the dessert your own.
When to Serve Little Debbie Christmas Tree Cake Dessert
This festive dessert is perfect for a variety of holiday occasions:
- Christmas Eve dinner
- Christmas Day dessert
- Holiday potlucks
- Office Christmas parties
- Family gatherings
- Cookie exchanges and dessert tables
- School or community celebrations, where permitted
- Holiday movie nights
- Winter birthday parties
- Festive Sunday dinners
For a beautiful dessert table, serve it alongside Christmas cookies, brownies, fudge, and fresh fruit. The red, green, and white sprinkles will instantly add a festive touch.
Final Thoughts
This Little Debbie Christmas Tree Cake Dessert is a simple, festive way to turn a beloved seasonal snack cake into a creamy holiday treat. With soft cake pieces, a fluffy vanilla and white chocolate pudding filling, rich cream cheese, and colorful Christmas sprinkles, it’s a dessert that looks special without requiring hours in the kitchen.
It’s easy enough for beginner bakers, convenient for make-ahead entertaining, and perfect for sharing with family and friends throughout the holiday season.
Remember to soften the cream cheese, measure the milk carefully, fold the whipped topping gently, and allow plenty of time for chilling. Those small details help create the best texture and make serving much easier.
Make this Little Debbie Christmas Tree Cake Dessert for your next holiday gathering, save the recipe for Christmas, and enjoy a creamy, colorful treat that brings a little extra sweetness to the season!