
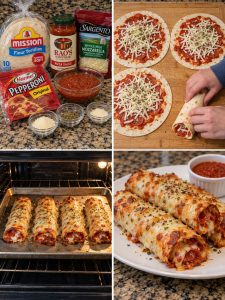
Crispy Pepperoni Pizza Roll-Ups – Golden, Cheesy, Pizza-Filled Tortilla Rolls
If you love pepperoni pizza and crispy, cheesy snacks, these Crispy Pepperoni Pizza Roll-Ups are about to become a new favorite! 🍕 Made with soft flour tortillas, flavorful pizza sauce, gooey mozzarella cheese, and savory pepperoni, these easy roll-ups bake until beautifully golden on the outside while the cheesy filling melts into every delicious bite.
They’re everything you love about pepperoni pizza in a fun, easy-to-hold shape. A quick brush of garlic-herb butter and a sprinkle of Parmesan give the tortillas a flavorful, crispy finish, while warm pizza sauce on the side makes every bite even better.
The best part? You don’t need to prepare pizza dough or wait for it to rise. These roll-ups use simple ingredients and take just minutes to assemble, making them perfect for busy afternoons, after-school snacks, movie nights, game-day parties, or casual family dinners.
Serve them whole for a fun handheld snack or slice them into bite-sized pinwheels for a party platter. However you serve them, these Crispy Pepperoni Pizza Roll-Ups are guaranteed to bring big pizza flavor to the table!
Recipe Overview
- Prep Time: 10 minutes
- Cook Time: 15–18 minutes
- Total Time: Approximately 30 minutes
- Servings: 4 large roll-ups
- Course: Appetizer, Snack, Lunch
- Cuisine: American-Italian inspired
- Difficulty: Easy
Ingredients
For the Pizza Roll-Ups
- 4 large flour tortillas: The easy shortcut that creates a convenient, rollable pizza shell. Choose soft tortillas that are flexible enough to roll without cracking.
- 1 cup pizza sauce, plus extra for dipping: Adds classic tomato, garlic, and herb flavor. Use a thick sauce to help prevent the tortillas from becoming soggy.
- 1½ cups shredded mozzarella cheese: Creates the gooey, stretchy filling that makes these roll-ups irresistible.
- 24–30 slices pepperoni: Brings the savory, slightly spicy flavor of traditional pepperoni pizza.
- 1 teaspoon Italian seasoning: Adds a delicious blend of Italian-style herbs.
- ½ teaspoon garlic powder: Gives the filling and topping a savory garlic flavor.
For the Crispy Parmesan Topping
- 2 tablespoons grated Parmesan cheese: Adds a salty, nutty finish and extra cheesy flavor.
- 1 tablespoon melted butter or olive oil: Helps the tortillas turn golden and crisp while adding flavor.
- A little extra Italian seasoning, optional: Sprinkled over the tops for extra aroma and color.
For Serving
- Warm pizza sauce: Perfect for dipping.
- Extra grated Parmesan: Optional for a cheesy finishing touch.
- Chopped fresh parsley or basil: Optional for freshness and a pop of color.
Step-by-Step Instructions
Step 1: Preheat the Oven
Preheat your oven to 400°F (200°C). Line a baking sheet with parchment paper to prevent sticking and make cleanup easier.
If your tortillas have been refrigerated, allow them to sit at room temperature briefly so they become more flexible and easier to roll.
Step 2: Prepare the Tortillas
Place one flour tortilla on a clean, flat surface.
Spread a thin, even layer of pizza sauce over the tortilla, leaving a small border around the edges. Avoid using too much sauce because excess moisture can make the tortilla soft and cause the filling to leak during baking.
Repeat with the remaining tortillas.
Step 3: Add the Cheese and Pepperoni
Sprinkle mozzarella cheese evenly over the sauce on each tortilla.
Arrange the pepperoni slices over the cheese, distributing them so every bite contains plenty of savory pepperoni. Depending on the size of your slices, you may want to cut some into smaller pieces.
Sprinkle a little Italian seasoning and garlic powder over the filling.
Helpful tip: Keep the filling in a relatively thin, even layer. Overfilling can make the tortillas difficult to roll tightly and may cause the cheese to escape during baking.
Step 4: Roll the Tortillas Tightly
Starting at one edge, roll each tortilla into a snug log. Tuck the sides inward as you roll to help keep the cheese and pepperoni contained.
Place each roll on the prepared baking sheet with the seam facing down. This helps prevent the rolls from opening while they bake.
If a tortilla feels stiff or begins to crack, warm it for a few seconds in the microwave to make it more flexible.
Step 5: Brush with Butter or Olive Oil
In a small bowl, prepare the melted butter or olive oil.
Use a pastry brush to coat the tops and sides of the tortilla rolls lightly. Sprinkle grated Parmesan cheese over the rolls, followed by a little extra Italian seasoning if desired.
This simple topping helps create a golden, flavorful exterior with a delicious garlic-herb aroma.
Step 6: Bake Until Golden and Crispy
Arrange the rolls seam-side down with a little space between each one.
Bake for 15–18 minutes, or until the tortillas are golden brown and crisp and the mozzarella is melted.
Begin checking around the 15-minute mark because ovens and tortilla thicknesses can vary. If the rolls need more color, bake for a few additional minutes.
For extra crispness, you can carefully turn the rolls halfway through baking, although this is optional.
Step 7: Rest and Slice
Remove the baking sheet from the oven and allow the roll-ups to rest for 2–3 minutes.
This short resting time helps the melted cheese settle slightly, making the rolls easier to handle.
Serve them whole for a hearty snack, or slice each roll into smaller pieces for a party platter. Use a sharp knife and gentle pressure to keep the filling inside.
Step 8: Serve with Pizza Sauce
Warm the extra pizza sauce in a small bowl and serve it alongside the crispy roll-ups.
Finish with a sprinkle of Parmesan or fresh basil if desired.
Enjoy them while they’re warm, golden, and filled with gooey mozzarella and savory pepperoni!
Tips for the Best Crispy Pepperoni Pizza Roll-Ups
- Use thick pizza sauce. Thin sauce adds too much moisture and can make the tortillas soggy.
- Spread the sauce sparingly. A thin layer provides plenty of flavor without soaking the tortilla.
- Use flexible tortillas. Soft tortillas roll more easily and are less likely to crack.
- Don’t overfill. Too much cheese and pepperoni can cause the rolls to split.
- Roll tightly. A snug roll helps the filling stay in place.
- Place the seam underneath. This helps keep the roll-ups closed during baking.
- Brush lightly with butter or oil. A thin coating encourages browning without making the tortillas greasy.
- Use freshly shredded mozzarella if possible. It often melts smoothly and gives the filling a stretchy texture.
- Don’t skip the Parmesan. It adds a savory, golden finish.
- Leave space between the rolls. Proper airflow helps them crisp evenly.
- Watch the final minutes. Tortillas can brown quickly once they begin to crisp.
- Let them rest before slicing. This helps the cheese settle and reduces filling leakage.
- Warm the dipping sauce. Warm pizza sauce complements the crispy exterior and melted cheese.
- Serve promptly. The rolls are at their crispiest shortly after baking.
What to Serve with Pepperoni Pizza Roll-Ups
These roll-ups are delicious on their own, but they also pair well with plenty of simple sides and dips.
Dipping Sauces
- Warm marinara sauce
- Extra pizza sauce
- Garlic butter
- Ranch dressing
- Creamy garlic dip
- Spicy tomato sauce
- Pesto for an herby twist
Fresh and Light Sides
- Garden salad: Fresh greens and a tangy dressing balance the cheesy filling.
- Caesar salad: A classic pairing for pizza-inspired snacks.
- Cucumber and carrot sticks: Add a refreshing crunch.
- Cherry tomatoes: Their freshness complements the tomato sauce.
- Fruit platter: Grapes, apple slices, and melon provide a sweet contrast.
Comfort-Food Pairings
- Tomato soup: Makes a cozy lunch or light dinner.
- Crispy potato wedges: Turn the roll-ups into a more substantial meal.
- Garlic bread: Perfect for anyone who wants extra buttery, garlicky flavor.
- Chicken tenders: Great for a family snack spread.
- Mozzarella sticks: An indulgent addition to a party appetizer platter.
Variations and Substitutions
1. Extra-Cheesy Pizza Roll-Ups
Add a little provolone, Monterey Jack, or cheddar along with the mozzarella. Keep the total filling amount moderate so the rolls stay closed.
2. Spicy Pepperoni Roll-Ups
Use spicy pepperoni, sprinkle red pepper flakes over the filling, or add a little hot sauce to the pizza sauce.
3. Supreme Pizza Roll-Ups
Add finely diced bell peppers, mushrooms, and black olives. Cook the vegetables first and drain away excess moisture before adding them.
4. Sausage Pizza Roll-Ups
Replace some or all of the pepperoni with cooked, crumbled Italian sausage. Let the sausage cool slightly and drain excess grease before assembling.
5. Ham and Cheese Pizza Roll-Ups
Use chopped ham instead of pepperoni. Pair it with mozzarella and a little cheddar for a milder flavor.
6. Bacon Pepperoni Roll-Ups
Add a small amount of crispy, crumbled bacon to the filling for an extra smoky, savory bite.
7. Chicken Pizza Roll-Ups
Use finely shredded cooked chicken with mozzarella and pizza sauce. A little Italian seasoning helps bring the flavors together.
8. Vegetarian Pizza Roll-Ups
Skip the pepperoni and add cooked mushrooms, spinach, bell peppers, or black olives. Make sure the vegetables are well drained before assembling.
9. Pesto Pizza Roll-Ups
Replace part of the pizza sauce with a thin layer of pesto. Add mozzarella and pepperoni or use a vegetarian filling.
10. Garlic Parmesan Roll-Ups
Use mozzarella with a little extra Parmesan and increase the garlic powder slightly. These are delicious with marinara or garlic butter for dipping.
11. Cheddar Pepperoni Roll-Ups
Replace some of the mozzarella with sharp cheddar for a bolder cheese flavor.
12. Whole-Wheat Tortilla Version
Use large whole-wheat flour tortillas for a heartier flavor. Choose soft tortillas that roll easily.
13. Mini Pizza Pinwheels
Use smaller tortillas, or cut the finished rolls into bite-sized slices before serving. If slicing before baking, secure the pieces carefully and watch the cooking time, as smaller portions may crisp more quickly.
14. Air Fryer Pizza Roll-Ups
Prepare the tortillas as directed and place them seam-side down in the air fryer basket. Cook at approximately 375°F (190°C) for 6–10 minutes, checking frequently. Exact timing depends on the appliance and roll size.
15. Buffalo Chicken Pizza Roll-Ups
Use cooked shredded chicken tossed with a small amount of buffalo sauce, mozzarella, and a light sprinkle of garlic powder. Serve with ranch dressing.
Storage and Reheating
How to Store Leftovers
Allow the roll-ups to cool slightly before storing them in an airtight container. Refrigerate within two hours of cooking and use within 3–4 days.
For the best texture, keep the dipping sauce in a separate container. The tortillas will soften somewhat during refrigeration, but reheating can restore some of their crispness.
How to Reheat
Oven: Preheat to 350°F (175°C). Place the roll-ups on a baking sheet and heat for approximately 5–10 minutes, or until hot throughout and crisp again.
Air fryer: Reheat at 325–350°F (160–175°C) for about 3–5 minutes, checking frequently to prevent over-browning.
Microwave: Heat in short intervals until warmed through. This is convenient, but the tortillas will be softer rather than crispy.
Because the filling contains cheese and pepperoni, reheat leftovers until hot throughout. If using a food thermometer, aim for 165°F (74°C) when reheating leftovers.
Can You Freeze Pizza Roll-Ups?
Yes, although the texture may change slightly after thawing.
For best results, bake the roll-ups, let them cool completely, and freeze them in a single layer before transferring them to a freezer-safe bag or container. Separate layers with parchment paper to prevent sticking.
Freeze for up to 2 months for best quality. Reheat from frozen in a 350°F (175°C) oven until hot throughout and crisp, adding extra time as needed.
Can You Make Them Ahead?
Yes. You can assemble the rolls shortly before baking and refrigerate them briefly on a covered baking sheet. Bake them when you’re ready to serve.
You can also prepare the dipping sauce and measure out the seasonings in advance. For the crispiest result, bake the roll-ups close to serving time rather than letting them sit after cooking.
20 Frequently Asked Questions
1. What are Crispy Pepperoni Pizza Roll-Ups?
They’re flour tortillas filled with pizza sauce, mozzarella, pepperoni, and Italian seasoning, rolled tightly, brushed with butter or oil, and baked until crisp.
2. Can I use corn tortillas instead of flour tortillas?
Large flour tortillas are recommended because they’re more flexible and easier to roll. Corn tortillas are more likely to crack and may require a different preparation method.
3. What size tortillas work best?
Large burrito-size or similarly sized flour tortillas provide plenty of room for the filling and are easier to roll tightly.
4. Can I use marinara sauce instead of pizza sauce?
Yes. Thick marinara works well. If your sauce is watery, use less or simmer it briefly to thicken it.
5. How do I prevent the tortillas from getting soggy?
Use a thin layer of thick sauce, avoid excess filling, and bake until the tortillas are golden and crisp.
6. Why are my roll-ups opening in the oven?
They may not have been rolled tightly enough or placed seam-side down. Avoid overfilling and position the seam underneath on the baking sheet.
7. Can I use a different cheese?
Yes. Provolone, Monterey Jack, cheddar, or a pizza cheese blend can be used with or instead of mozzarella.
8. Can I make these without pepperoni?
Absolutely. Try cooked sausage, ham, chicken, bacon, or vegetables.
9. Are these roll-ups spicy?
Regular pepperoni usually adds mild spice, but the heat level depends on the brand. Use spicy pepperoni or red pepper flakes for more heat.
10. Can I make them vegetarian?
Yes. Leave out the pepperoni and use cooked vegetables such as mushrooms, spinach, peppers, or olives.
11. Can I prepare them ahead of time?
Yes. Assemble them shortly before baking and refrigerate briefly until ready to cook. Bake just before serving for the best texture.
12. Can I freeze them?
Yes. Freeze the baked and cooled roll-ups in a freezer-safe container for up to 2 months for best quality, then reheat until hot throughout.
13. How do I make them extra crispy?
Brush the outside lightly with butter or olive oil, leave space between the rolls, and bake until golden. An air fryer can also help restore crispness when reheating.
14. Can I cook them in an air fryer?
Yes. Cook in a single layer at around 375°F (190°C) for approximately 6–10 minutes, checking frequently because air fryers vary.
15. Can I add vegetables?
Yes. Finely diced peppers, mushrooms, and spinach work well. Cook watery vegetables first and drain them to prevent soggy tortillas.
16. Do I need to brush the rolls with butter?
No. Olive oil works well, too. The coating helps the tortillas brown and crisp, but you can use a light layer or omit it if preferred.
17. What dipping sauce goes best with them?
Warm pizza sauce or marinara is a classic choice. Ranch, garlic butter, and creamy garlic dip are also delicious.
18. How do I know when they’re done?
The tortillas should be golden and crisp, with the cheese melted inside. If the outside browns before the filling is hot, lower the oven temperature slightly and continue baking as needed.
19. Can I serve these as a main dish?
Yes. Serve two roll-ups per person with a salad, soup, or vegetable side for a simple lunch or casual dinner.
20. Can I slice them into party appetizers?
Definitely. Let the baked rolls rest for 2–3 minutes, then use a sharp knife to slice them into bite-sized pieces. Serve with small bowls of warm dipping sauce.
20 Tips and Secrets for Perfect Pizza Roll-Ups
- Choose soft tortillas. Fresh, flexible tortillas are less likely to crack during rolling.
- Warm stiff tortillas briefly. A few seconds in the microwave can make them easier to handle.
- Use thick sauce. Thick pizza sauce helps protect the tortillas from excess moisture.
- Spread sauce evenly. A thin coating is enough to deliver plenty of flavor.
- Leave a small border. Keeping the filling away from the edges makes the rolls easier to seal.
- Shred mozzarella finely. Smaller shreds distribute more evenly and melt quickly.
- Arrange pepperoni in a single layer. This helps create consistent flavor in every bite.
- Don’t overfill the tortillas. Too much filling makes the rolls difficult to close.
- Roll firmly but gently. A snug roll keeps the ingredients in place without tearing the tortilla.
- Place the seam underneath. This is one of the easiest ways to keep the rolls closed.
- Brush the exterior lightly. Too much butter or oil can make the tortillas greasy.
- Use Parmesan for extra flavor. A little grated Parmesan adds a savory finish.
- Preheat the oven completely. Starting with a hot oven encourages crisping.
- Line the baking sheet. Parchment helps prevent sticking and simplifies cleanup.
- Leave space between rolls. Proper airflow promotes even browning.
- Check the rolls early. Tortillas can crisp quickly near the end of baking.
- Rest before slicing. A short rest helps keep the cheese inside.
- Use a serrated or sharp knife. Gentle slicing helps avoid squashing the rolls.
- Warm the dipping sauce separately. This makes serving easier and more enjoyable.
- Make extra for parties. These handheld snacks are easy to share and can disappear quickly!
Perfect Occasions to Serve Crispy Pepperoni Pizza Roll-Ups
- Game-day parties: Serve with pizza sauce, ranch, and other dipping sauces.
- Movie nights: A fun alternative to ordering pizza.
- After-school snacks: Easy to prepare and satisfying when hunger strikes.
- Birthday parties: Slice into smaller pieces for a kid-friendly appetizer platter.
- Family lunches: Pair with a salad or tomato soup for a quick meal.
- Sleepovers: Let everyone choose their favorite fillings.
- Potlucks: Bring them as a shareable finger food and serve the sauce separately.
- Casual gatherings: Arrange them on a platter with vegetables and dips.
- Weekend treats: Make a batch when you want a homemade pizza-inspired snack without preparing dough.
- Game nights: Serve alongside other easy-to-eat snacks for a relaxed evening.
Final Thoughts
Crispy Pepperoni Pizza Roll-Ups are a simple, delicious way to enjoy classic pizza flavors without making traditional pizza dough. With soft flour tortillas, rich pizza sauce, gooey mozzarella, savory pepperoni, and a golden Parmesan topping, they’re full of flavor and easy to customize.
They’re quick enough for everyday snacking and fun enough for parties, family gatherings, and game nights. Keep the sauce layer thin, roll the tortillas tightly, and bake until golden for the best results.
Serve them warm with extra pizza sauce for dipping, and enjoy a crispy, cheesy snack that everyone will want to reach for again!