
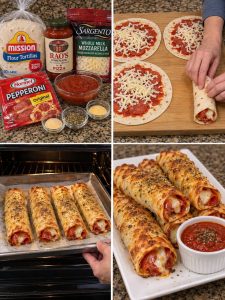
Crispy Pepperoni Pizza Roll-Ups – Easy Cheesy Pizza Tortilla Rolls
If you love pizza and crave something crispy, cheesy, and incredibly easy to make, these Crispy Pepperoni Pizza Roll-Ups are about to become a new favorite! Made with soft flour tortillas, tangy pizza sauce, gooey mozzarella, savory pepperoni, and Italian seasonings, these delicious rolls deliver all the flavors of classic pepperoni pizza in a fun, handheld snack.
Each tortilla is rolled up with a generous layer of pizza fillings, brushed with melted butter, sprinkled with Parmesan, and baked until golden and crispy. When you slice them open, you’ll find warm, melty cheese and flavorful pepperoni tucked inside every bite.
They’re perfect for after-school snacks, quick lunches, game-day appetizers, movie nights, or an easy family dinner when you want something everyone will love without making homemade pizza dough.
Best of all, you can bake them in the oven or pop them into the air fryer for an extra-crispy finish!
Recipe Overview
- Prep time: 10 minutes
- Cook time: 12–15 minutes
- Total time: Approximately 22–25 minutes
- Servings: 6 tortillas, about 3–6 servings depending on appetite
- Course: Appetizer, snack, lunch, or dinner
- Cuisine: American-inspired Italian
- Difficulty: Easy
- Cooking method: Oven or air fryer
Ingredients
For the pizza roll-ups
- 6 medium flour tortillas: These form the crispy outer shell. Flour tortillas are flexible and easy to roll without tearing.
- 1 cup pizza sauce or marinara sauce: Adds the classic tomato flavor that makes these rolls taste like pizza.
- 1½ cups shredded mozzarella cheese: Creates that irresistible stretchy, gooey cheese filling.
- 1 cup sliced pepperoni, chopped: Adds savory, slightly spicy pizza flavor in every bite.
- ½ teaspoon Italian seasoning: Gives the filling a fragrant blend of herbs.
- ¼ teaspoon garlic powder: Adds a subtle savory flavor.
- 2 tablespoons grated Parmesan cheese: Creates a salty, cheesy topping with extra flavor.
- 1 tablespoon melted butter: Helps the tortillas turn golden and crispy.
Optional add-ins
Customize your pizza roll-ups with any of these delicious additions:
- Sliced black olives
- Finely chopped bell peppers
- Finely chopped mushrooms, cooked to remove excess moisture
- Cooked Italian sausage, crumbled
- Cooked bacon pieces
- Red pepper flakes
- A little shredded cheddar or provolone
- Fresh basil, added after baking
For serving
- Extra pizza sauce or marinara sauce for dipping
- Ranch dressing
- Garlic Parmesan dipping sauce
- Warm marinara with red pepper flakes
Detailed Instructions
Step 1: Preheat the oven
Preheat your oven to 400°F (200°C).
Line a baking sheet with parchment paper or lightly grease it to help prevent sticking.
If your tortillas are cold or stiff, warm them in the microwave for about 10–15 seconds, or just until they become flexible. This makes rolling easier and helps prevent cracks.
Step 2: Prepare the tortillas
Lay the six tortillas flat on a clean work surface.
Spread a thin layer of pizza sauce over each tortilla, leaving approximately ½ inch around the edges. Avoid adding too much sauce because excess moisture can make the tortillas soggy and cause the filling to leak.
Sprinkle the mozzarella evenly over the sauce, followed by the chopped pepperoni.
Add the Italian seasoning and garlic powder. If you’re using optional toppings, distribute them sparingly so the tortillas remain easy to roll.
Pro tip: Keep the filling slightly away from the edges. This makes the rolls easier to seal and reduces cheese leakage during baking.
Step 3: Roll the tortillas tightly
Starting at one edge, roll each tortilla firmly into a log.
Fold the sides inward slightly as you roll, similar to wrapping a burrito. Keep the filling tucked inside and avoid squeezing so tightly that the sauce and cheese spill out.
Place each roll seam-side down on the prepared baking sheet. Leave a little space between them so hot air can circulate.
Step 4: Add the buttery Parmesan topping
Brush the tops and sides of the tortilla rolls with melted butter.
Sprinkle the grated Parmesan evenly over the rolls.
The butter helps the tortillas develop a golden, crispy exterior, while the Parmesan adds a delicious salty finish.
For an extra-flavorful crust, mix a pinch of garlic powder and Italian seasoning into the melted butter before brushing.
Step 5: Bake until golden and crispy
Place the baking sheet in the preheated oven and bake for 12–15 minutes, or until the tortillas are crisp and golden and the mozzarella has melted.
Cooking time may vary depending on the thickness of your tortillas and the amount of filling.
Begin checking around the 10-minute mark if your oven tends to run hot. If the rolls need more color, give them another minute or two, watching closely.
Allow the rolls to rest for 2–3 minutes after baking. This gives the melted cheese a chance to settle slightly, making the rolls easier to slice.
Step 6: Slice and serve
Transfer the rolls to a cutting board.
Using a sharp knife, slice each roll into bite-sized pinwheels or leave them whole for a more substantial snack.
Arrange them on a serving platter and serve warm with extra pizza sauce for dipping.
For a finishing touch, sprinkle with extra Parmesan, dried oregano, or freshly chopped basil.
Enjoy them while the tortillas are crisp and the cheese is warm and gooey!
Air Fryer Instructions
Want an even crispier finish? The air fryer is a fantastic option.
- Preheat your air fryer to 375°F (190°C) if your model recommends preheating.
- Prepare and roll the tortillas as directed.
- Brush the rolls lightly with melted butter and sprinkle with Parmesan.
- Arrange them in a single layer in the air fryer basket, leaving space between each roll.
- Air fry for 7–9 minutes, turning halfway through, until crisp and golden.
- Rest for 2–3 minutes before slicing and serving.
Air fryers vary, so begin checking early. If you’re making multiple batches, avoid overcrowding the basket so the rolls crisp evenly.
Expert Tips for Perfect Pizza Roll-Ups
- Warm the tortillas first. Flexible tortillas roll more easily and are less likely to split.
- Use a thin layer of sauce. Too much sauce can make the center wet and the outside less crispy.
- Shred your own mozzarella. It often melts more smoothly than pre-shredded cheese.
- Chop the pepperoni. Smaller pieces distribute more evenly and make the rolls easier to slice.
- Keep the filling modest. Overfilling makes the tortillas harder to seal.
- Roll seam-side down. This helps prevent the rolls from opening while baking.
- Don’t skip the butter. A light coating promotes golden color and crispness.
- Cook watery vegetables first. Mushrooms and other moisture-heavy toppings can soften the tortillas.
- Let the rolls rest briefly. A short rest helps the cheese settle before slicing.
- Serve the dipping sauce separately. This keeps the tortilla shells crisp until you’re ready to eat.
Delicious Variations and Substitutions
1. Supreme Pizza Roll-Ups
Add finely diced bell peppers, olives, mushrooms, and cooked sausage for all the flavors of a supreme pizza.
2. Three-Cheese Pizza Rolls
Combine mozzarella, cheddar, and Parmesan for a richer, extra-cheesy filling.
3. Meat Lovers’ Pizza Roll-Ups
Add chopped pepperoni, cooked sausage, and cooked bacon. Drain excess fat before using.
4. Hawaiian Pizza Roll-Ups
Add small pieces of ham and well-drained pineapple for a sweet-and-savory twist.
5. Spicy Pepperoni Rolls
Add red pepper flakes, spicy pepperoni, or finely chopped jalapeños.
6. Garlic Parmesan Pizza Roll-Ups
Mix garlic powder, Italian seasoning, and Parmesan into the melted butter for a flavorful crust.
7. Vegetarian Pizza Roll-Ups
Skip the pepperoni and add finely chopped bell peppers, olives, spinach, and mushrooms. Cook moisture-heavy vegetables first.
8. Chicken Pizza Roll-Ups
Use cooked, finely chopped chicken with mozzarella and pizza sauce. Add a pinch of Italian seasoning for extra flavor.
9. BBQ Chicken Pizza Roll-Ups
Replace the pizza sauce with barbecue sauce and add cooked chicken, mozzarella, and a little red onion.
10. Pesto Pizza Roll-Ups
Spread a thin layer of pesto over each tortilla and fill with mozzarella, chopped tomatoes that have been drained, and cooked chicken if desired.
11. Cheesy Ranch Pizza Roll-Ups
Add a small drizzle of ranch dressing to the filling and use mozzarella with a little cheddar. Avoid adding too much dressing, which can make the rolls soggy.
12. Breakfast Pizza Roll-Ups
Fill tortillas with scrambled eggs, cooked sausage, and cheddar. Skip the marinara or use only a thin layer, and make sure the egg mixture is fully cooked before rolling.
13. Mini Pizza Pinwheels
Roll the tortillas, chill briefly to firm them up, and slice into smaller rounds. Arrange them cut-side up on a baking sheet and bake until the cheese melts and the edges become crisp.
14. Whole-Wheat Pizza Roll-Ups
Use whole-wheat tortillas for a heartier flavor. Warm them well before rolling because some varieties can be less flexible.
15. Low-Carb-Inspired Version
Use low-carb tortillas and reduce the filling slightly. Check the package instructions because different tortilla brands crisp at different rates.
What to Serve with Pizza Roll-Ups
These rolls are delicious on their own, but pairing them with a few simple sides turns them into a complete meal.
- Fresh garden salad
- Caesar salad
- Garlic bread
- Roasted vegetables
- Crispy potato wedges
- Sweet potato fries
- Fresh fruit
- Creamy coleslaw
- Tomato soup
- Mozzarella sticks
- Pickle spears
- A platter of raw carrots, celery, and bell peppers
For lunch: Serve three or four rolls with fresh fruit and a small salad.
For dinner: Pair the rolls with roasted vegetables or a hearty salad.
For parties: Slice the rolls into bite-sized pinwheels and serve them with warm marinara and ranch dipping sauces.
For game day: Add wings, chips, and a variety of dips for a crowd-pleasing spread.
Make-Ahead Instructions
You can prepare these pizza roll-ups ahead of time to make busy evenings easier.
- Warm the tortillas and fill them with sauce, cheese, pepperoni, and seasonings.
- Roll them tightly and place them seam-side down in a covered container.
- Refrigerate promptly and bake within 24 hours for the best texture.
- Brush with butter and add Parmesan just before baking.
- Bake as directed, adding a little extra time if the rolls are cold from the refrigerator. Make sure the centers are thoroughly hot before serving.
For the crispiest results, bake them shortly before serving rather than fully baking them hours in advance.
Storage and Reheating
How to store leftovers
Allow the pizza rolls to cool slightly, then place them in an airtight container and refrigerate within two hours.
Store for 3–4 days in the refrigerator. Keep dipping sauces in separate containers.
How to reheat in the oven
Preheat the oven to 350°F (175°C). Place the rolls on a baking sheet and heat for approximately 5–8 minutes, or until hot and crisp. Larger rolls may need a little longer.
How to reheat in the air fryer
Air fry at 350°F (175°C) for about 3–5 minutes, checking frequently until the rolls are heated through and the exterior is crisp again.
How to reheat in the microwave
Place a few rolls on a microwave-safe plate and heat in 20–30-second intervals until hot. The microwave is convenient, but the tortillas will be softer rather than crispy.
For the best texture, finish microwaved rolls in a hot skillet or air fryer for a short time.
Can you freeze pizza roll-ups?
Yes. For the best quality, freeze the fully baked and cooled rolls in a single layer until firm, then transfer them to a freezer-safe container or bag.
Freeze for up to 2 months for best quality. Reheat from frozen in a 350°F (175°C) oven or air fryer until heated through and crisp. Timing depends on the size of the rolls and your appliance.
20 Frequently Asked Questions
1. Can I use corn tortillas instead of flour tortillas?
Flour tortillas are recommended because they’re more flexible and easier to roll. Corn tortillas tend to crack unless carefully warmed and are generally less suitable for this recipe.
2. What size tortillas work best?
Medium, approximately 8-inch flour tortillas, are a good choice. Smaller tortillas make snack-sized rolls, while larger tortillas produce bigger portions.
3. Can I use store-bought pizza sauce?
Absolutely! Store-bought pizza sauce or marinara makes this recipe quick and convenient.
4. How do I stop the rolls from opening?
Roll them tightly, avoid overfilling, and place them seam-side down on the baking sheet. You can also secure a stubborn roll with a toothpick during baking, removing it before serving.
5. Why are my pizza roll-ups soggy?
The most common reasons are too much sauce, excess moisture from vegetables, or overcrowding. Use a thin sauce layer and cook watery toppings before adding them.
6. Can I use a different cheese?
Yes. Provolone, Monterey Jack, cheddar, or a pizza cheese blend all work well. Mozzarella provides the classic stretchy texture.
7. Should I cook the pepperoni first?
No. Sliced pepperoni can be added directly. If using sausage, bacon, or other raw meats, cook them thoroughly before adding them to the tortillas.
8. Can I make these without butter?
Yes. Brush lightly with olive oil instead, or bake without a coating. The rolls may be a little less rich or golden.
9. Can I make them in the air fryer?
Yes. Air fry at 375°F (190°C) for approximately 7–9 minutes, turning halfway through and checking for crispness.
10. Can I prepare them the night before?
You can assemble and refrigerate them for up to 24 hours before baking. For the best texture, add the butter and Parmesan just before cooking.
11. Can I freeze them before baking?
You can, although the sauce may soften the tortillas during storage. For more reliable texture, bake them first, cool completely, and then freeze.
12. How do I make them extra crispy?
Use a thin layer of sauce, avoid wet toppings, brush the outside with butter or oil, and leave space between rolls during baking.
13. Can I use leftover pizza toppings?
Yes. Use small amounts of cooked sausage, chicken, vegetables, or bacon. Drain excess oil or moisture first.
14. Are these suitable for kids?
Yes! They’re easy to hold and dip. Use mild sauce and familiar toppings for younger or more selective eaters, and cut the rolls into age-appropriate pieces.
15. What dipping sauces go well with them?
Warm marinara, pizza sauce, ranch dressing, garlic Parmesan sauce, and spicy tomato sauce are all delicious options.
16. Can I use fresh mozzarella?
Yes, but drain it well and pat it dry before using. Fresh mozzarella contains more moisture than low-moisture shredded mozzarella and may make the rolls softer.
17. How many servings does this recipe make?
Six medium tortillas typically make six substantial rolls or many smaller bite-sized pieces. The number of servings depends on whether you’re serving them as a snack, appetizer, or main dish.
18. Can I make them vegetarian?
Yes. Omit the pepperoni and add cooked vegetables, olives, or plant-based pepperoni.
19. How long do leftovers last?
Refrigerated leftovers generally keep for 3–4 days in an airtight container. Reheat until thoroughly hot.
20. Can I serve these as party appetizers?
Definitely! Slice each roll into several pinwheels, arrange them on a platter, and provide warm marinara for dipping.
20 Tips and Secrets for the Best Pizza Roll-Ups
- Warm the tortillas first so they roll without cracking.
- Spread sauce thinly to keep the filling from becoming watery.
- Leave a border around the edges to help the rolls seal.
- Use low-moisture mozzarella for a classic stretchy cheese filling.
- Chop the pepperoni finely so every bite gets plenty of flavor.
- Don’t overfill the tortillas because excess filling can spill out.
- Roll firmly but gently to keep the filling evenly distributed.
- Place the seam underneath to help the rolls stay closed.
- Use parchment paper to reduce sticking and simplify cleanup.
- Brush with melted butter for a rich, golden exterior.
- Add Parmesan just before baking so the topping stays flavorful.
- Mix garlic powder into the butter for a garlic-bread-inspired finish.
- Cook mushrooms before adding them to remove excess water.
- Drain oily toppings so the rolls don’t become greasy.
- Avoid overcrowding the baking sheet for better browning.
- Check the rolls early because oven temperatures vary.
- Let the rolls rest for a few minutes before slicing to reduce cheese leakage.
- Use a sharp serrated knife for neat slices with less squashing.
- Serve the dipping sauce on the side to preserve the crisp texture.
- Reheat in the air fryer or oven to bring back the crunch.
When to Serve Crispy Pepperoni Pizza Roll-Ups
These easy pizza rolls are ideal for just about any casual occasion:
- After-school snacks
- Quick family lunches
- Busy weeknight dinners
- Game-day parties
- Movie nights
- Birthday parties
- Sleepovers
- Potlucks
- Picnic lunches
- Casual holiday gatherings
They’re also a great option when everyone wants pizza but you need something faster and easier than making dough from scratch.
Final Thoughts
These Crispy Pepperoni Pizza Roll-Ups are everything you love about pizza wrapped into a simple, crispy tortilla. With melty mozzarella, savory pepperoni, tangy marinara, and a buttery Parmesan crust, they’re easy to make and even easier to enjoy.
Bake them for a quick family dinner, serve them as a party appetizer, or keep a batch ready for snack time. Customize the fillings with your favorite toppings, pair them with a warm dipping sauce, and enjoy a fun twist on classic pizza.
The secret to perfect pizza roll-ups? Don’t overfill them, keep the sauce layer thin, and serve them warm while the outside is crisp and the cheese is still gooey!