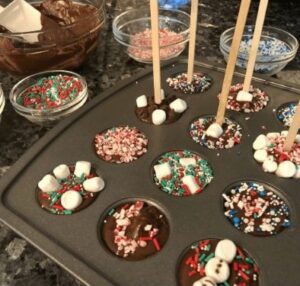
Here’s a simple recipe for Cocoa Stirrers:
Cocoa Stirrers
Ingredients:
- 1 cup dark chocolate, milk chocolate, or a mixture, finely chopped
- Mini marshmallows
- Sprinkles
- Crushed candy canes or other toppings of your choice
- Mini muffin tin
- Wooden or plastic sticks, spoons, or peppermint sticks
- Cellophane or plastic wrap for wrapping
- Hot milk for serving (1 cup per stirrer)
Instructions:
- Melt Chocolate:
- In a heatproof bowl, melt the chocolate using a double boiler or in short bursts in the microwave. Stir until smooth.
- Prepare Mini Muffin Tin:
- Line a mini muffin tin with paper liners or use a silicone mini muffin mold for easy removal.
- Pour Chocolate:
- Pour the melted chocolate into each cup of the mini muffin tin, filling them about halfway.
- Add Toppings:
- Quickly top each chocolate-filled cup with mini marshmallows, sprinkles, crushed candy canes, or any other toppings you desire.
- Insert Stirring Stick:
- While the chocolate is still soft, insert a wooden or plastic stick, spoon, or peppermint stick into the center of each cup.
- Chill:
- Place the mini muffin tin in the refrigerator and let the cocoa stirrers chill until the chocolate is completely set, usually for about 1-2 hours.
- Remove from Muffin Tin:
- Once the chocolate is firm, carefully remove the cocoa stirrers from the mini muffin tin.
- Wrap:
- Individually wrap each cocoa stirrer in cellophane or plastic wrap to keep them fresh and make them gift-ready.
- Serve:
- To enjoy, heat 1 cup of milk until hot but not boiling. Stir the cocoa stirrer into the milk until the chocolate and toppings dissolve, creating a delicious cup of hot cocoa.
- Optional:
- Customize your cocoa stirrers by experimenting with different types of chocolate, toppings, or even adding a dash of flavored extracts to the melted chocolate.
These Cocoa Stirrers make for delightful gifts and a fun way to enjoy a cozy cup of hot cocoa
Here are some tips to ensure your Cocoa Stirrers turn out delicious and visually appealing:
- Quality Chocolate:
- Use good quality chocolate for a rich and satisfying flavor. You can choose dark, milk, or a combination based on your preference.
- Proper Melting Technique:
- Melt the chocolate using a gentle heat method to avoid burning. Use a double boiler or microwave in short bursts, stirring frequently until smooth.
- Quick Toppings Application:
- Once you pour the melted chocolate into the mini muffin tin, work quickly to add the mini marshmallows, sprinkles, or other toppings before the chocolate begins to set.
- Variety of Toppings:
- Get creative with your toppings. Consider crushed nuts, shredded coconut, or even a drizzle of caramel for added flavor and texture.
- Inserting Stirring Sticks:
- Insert the stirring sticks into the center of each cup while the chocolate is still soft. Make sure they are positioned securely, so they don’t fall out when serving.
- Chilling Time:
- Allow enough time for the cocoa stirrers to chill and set properly in the refrigerator. This ensures a firm structure and easy removal from the muffin tin.
- Lining Muffin Tin:
- Use paper liners or a silicone mini muffin mold to make it easier to remove the cocoa stirrers once they are set.
- Presentation:
- Pay attention to the presentation. If gifting, consider tying a ribbon around each wrapped stirrer or adding a festive tag for a personalized touch.
- Experiment with Flavors:
- Don’t hesitate to experiment with different chocolate flavors or additional ingredients like flavored extracts to enhance the taste of your cocoa stirrers.
- Storage:
- Store the wrapped cocoa stirrers in a cool, dry place. If making them ahead, ensure they are stored properly to maintain freshness.
- Include Instructions:
- If gifting, include a small card with instructions on how to use the cocoa stirrers to make the perfect cup of hot cocoa.
- Have Fun with Shapes:
- Consider using different molds or shaping techniques to create unique designs. Heart-shaped stirrers, for example, could be perfect for a Valentine’s Day treat.
Remember, making Cocoa Stirrers can be a fun and creative process, so feel free to add your own personal touch and enjoy the delicious results


