
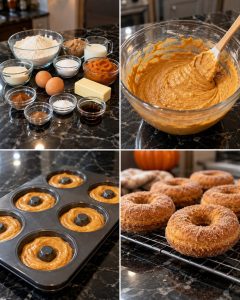
Baked Pumpkin Donuts with Cinnamon Sugar
If you’re a pumpkin lover, these Baked Pumpkin Donuts are about to become one of your favorite fall treats! 🎃🍩 Soft, fluffy, warmly spiced, and filled with delicious pumpkin flavor, these homemade donuts bring all the cozy flavors of autumn straight to your kitchen—without the mess of deep-frying.
Made with real pumpkin purée, brown sugar, melted butter, vanilla, and fragrant pumpkin pie spice, every bite is tender, moist, and wonderfully comforting. They’re baked in a donut pan until golden and finished with a sweet cinnamon-sugar coating that adds just the right amount of crunch.
These easy pumpkin donuts are perfect for chilly mornings, weekend breakfasts, afternoon coffee breaks, Halloween parties, Thanksgiving brunch, or whenever you’re craving something sweet and seasonal.
And the best part? They’re surprisingly simple to make! Just mix the wet and dry ingredients separately, combine them gently, pipe the batter into a donut pan, and bake. In about 15 minutes, you’ll have a batch of homemade pumpkin donuts that smell absolutely incredible.
Why You’ll Love These Baked Pumpkin Donuts
- Full of pumpkin flavor: Real pumpkin purée gives the donuts their signature taste and moist texture.
- Warm fall spices: Pumpkin pie spice adds cinnamon, nutmeg, ginger, and other cozy notes.
- Baked, not fried: No pot of hot oil or deep-frying required.
- Easy to prepare: The batter comes together with simple pantry ingredients.
- Perfect for sharing: Serve them at brunches, holiday gatherings, or autumn celebrations.
- Customizable toppings: Enjoy them plain, with cinnamon sugar, or with a sweet glaze.
- Freezer-friendly: Make a batch ahead for quick breakfasts and snacks.
Recipe Details
- Prep Time: 15 minutes
- Cook Time: 12–15 minutes per batch
- Cooling Time: 10–15 minutes
- Total Time: Approximately 40 minutes
- Yield: About 8–10 standard donuts, depending on your pan
- Category: Breakfast, dessert, sweet snack
- Cooking Method: Baking
- Difficulty: Easy
Ingredients
For the Pumpkin Donuts
- 1½ cups all-purpose flour: Provides the structure for soft, tender donuts.
- 1 teaspoon baking powder: Helps the donuts rise and become fluffy.
- ½ teaspoon baking soda: Works with the moisture and acidity in the batter to support a light texture.
- 1½ teaspoons pumpkin pie spice: Gives the donuts their classic warm, autumn flavor.
- ½ teaspoon salt: Balances the sweetness and brings out the pumpkin and spice flavors.
- ½ cup brown sugar: Adds sweetness, moisture, and a subtle molasses flavor.
- ½ cup pumpkin purée: The star ingredient that creates moist, flavorful donuts.
- 2 large eggs: Help bind the ingredients and provide structure.
- ½ cup unsalted butter, melted: Adds richness and a tender crumb.
- 1 teaspoon vanilla extract: Enhances the sweetness and warm spices.
- ¼ cup milk: Helps bring the batter together and keeps the donuts soft.
Optional Cinnamon-Sugar Coating
- ¼ cup granulated sugar
- 1 teaspoon ground cinnamon
- 1–2 tablespoons melted butter, for brushing if needed
The cinnamon-sugar coating is optional, but it’s highly recommended if you love that classic bakery-style finish.
Important Ingredient Tips
Use pure pumpkin purée, not pumpkin pie filling. Pumpkin pie filling usually contains added sugar and spices, which can change the flavor and sweetness of the recipe.
If your pumpkin purée seems unusually watery, blot it gently with paper towels or allow excess liquid to drain. Too much moisture can make the donuts heavier.
For the best results, bring the eggs and milk to room temperature before mixing. This helps the ingredients combine more evenly with the melted butter.
How to Make Baked Pumpkin Donuts
Step 1: Preheat the Oven
Preheat your oven to 350°F (175°C).
Lightly grease a standard donut pan with baking spray or a thin layer of butter. Make sure you grease the center posts and edges so the donuts release easily after baking.
If you have more batter than your pan can hold, plan to bake it in a second batch.
Step 2: Combine the Dry Ingredients
In a medium mixing bowl, whisk together the flour, baking powder, baking soda, pumpkin pie spice, and salt.
Whisking helps distribute the leavening agents and spices evenly throughout the flour, so every donut bakes consistently.
Set the bowl aside while you prepare the wet ingredients.
Step 3: Mix the Wet Ingredients
In a separate large bowl, combine the pumpkin purée and brown sugar. Whisk until smooth.
Add the eggs, melted butter, vanilla extract, and milk. Whisk again until the mixture is evenly combined.
Make sure the melted butter isn’t piping hot when you add it. Very hot butter can partially cook the eggs and create an uneven batter.
Step 4: Combine the Batter
Add the dry ingredients to the pumpkin mixture.
Using a spatula or wooden spoon, gently stir until the flour is just incorporated. The batter should be thick but pipeable.
Avoid overmixing. A few small lumps are fine, but there shouldn’t be large pockets of dry flour. Overworking the batter can make the finished donuts dense or tough.
Step 5: Fill the Donut Pan
Transfer the batter to a piping bag or a large resealable plastic bag with one corner snipped off.
Pipe the batter into the prepared donut cavities, filling each one about ¾ full. This leaves room for the donuts to rise without overflowing.
If you don’t have a piping bag, carefully spoon the batter into each cavity and smooth it lightly with the back of a small spoon.
For evenly baked donuts, try to distribute the batter as consistently as possible.
Step 6: Bake Until Tender
Place the pan in the preheated oven and bake for 12–15 minutes.
The donuts are ready when they spring back lightly when touched and a toothpick inserted into the thickest part comes out clean or with a few moist crumbs.
Avoid overbaking, as this can dry out the donuts and make them less tender.
If you’re baking multiple batches, allow the pan to cool slightly before greasing and filling it again.
Step 7: Cool the Donuts
Remove the pan from the oven and let the donuts rest in the pan for about 5 minutes.
Carefully turn them out onto a wire rack and allow them to cool until they’re easy to handle.
If you’re planning to add a cinnamon-sugar coating, the donuts should be slightly warm but not so hot that the butter coating immediately runs off.
Step 8: Add the Cinnamon-Sugar Coating
In a small bowl, mix the granulated sugar and cinnamon.
For a classic coating, lightly brush each warm donut with melted butter, then gently toss it in the cinnamon-sugar mixture until coated.
Shake off any excess sugar and return the donuts to the wire rack.
If you prefer a lighter finish, simply sprinkle the cinnamon sugar over the donuts or serve them plain.
Step 9: Serve and Enjoy!
Arrange the finished donuts on a serving plate and enjoy them while they’re fresh.
They’re especially delicious with hot coffee, tea, warm apple cider, or a glass of milk. The combination of pumpkin, cinnamon, and brown sugar makes every bite taste like fall!
Tips for Perfect Pumpkin Donuts
- Measure the flour correctly. Spoon flour into your measuring cup and level it off rather than packing it down.
- Use pumpkin purée, not pie filling. This keeps the flavor and sweetness balanced.
- Don’t overmix the batter. Gentle mixing helps keep the donuts tender.
- Grease the donut pan well. This makes releasing the donuts much easier.
- Use a piping bag. It creates neat, evenly filled cavities with less mess.
- Fill cavities only about ¾ full. Overfilling can cause the donuts to lose their classic shape.
- Check early. Ovens vary, so start checking around the 12-minute mark.
- Don’t skip the cooling period. Warm donuts are delicate and can break if removed too soon.
- Coat at the right temperature. Slightly warm donuts help cinnamon sugar adhere.
- Use fresh spices. Fresh pumpkin pie spice makes a noticeable difference in aroma and flavor.
Easy Variations and Substitutions
1. Pumpkin Glazed Donuts
Skip the cinnamon sugar and drizzle the cooled donuts with a simple vanilla glaze made from powdered sugar, a little milk, and vanilla extract.
2. Maple Pumpkin Donuts
Add 1–2 tablespoons of maple syrup to the wet ingredients. For a stronger maple flavor, finish with a maple glaze.
Because adding syrup changes the liquid balance, the batter may need a little adjustment. Add it gradually and avoid making the batter too thin.
3. Chocolate Chip Pumpkin Donuts
Fold ½ cup of mini chocolate chips into the finished batter. Chocolate and pumpkin spices make a delicious combination.
4. Pumpkin Cream Cheese Donuts
Serve the donuts with a cream cheese glaze made from softened cream cheese, powdered sugar, vanilla, and a little milk.
5. Pumpkin Spice Sugar Donuts
Mix the cinnamon sugar with an extra pinch of pumpkin pie spice for a more pronounced autumn flavor.
6. Brown Butter Pumpkin Donuts
Replace the melted butter with cooled brown butter for a nutty, caramel-like flavor that complements the pumpkin beautifully.
7. Nutty Pumpkin Donuts
Add ¼ cup finely chopped pecans or walnuts to the batter. Avoid adding too many, as they can make the donuts heavier.
8. Chocolate-Dipped Pumpkin Donuts
Once completely cooled, dip one side of each donut in melted chocolate. Let the chocolate set before serving.
9. Whole-Wheat Pumpkin Donuts
Replace up to half the all-purpose flour with whole-wheat flour. The texture will be slightly heartier and may be less delicate.
10. Dairy-Free Pumpkin Donuts
Use a plant-based butter alternative and unsweetened dairy-free milk. Check the ingredient labels to ensure the products suit your dietary needs.
11. Egg-Free Variation
Egg-free baking requires a little more experimentation with this recipe. A commercial egg replacer formulated for baking is a reasonable starting point, but the final texture may differ from the original.
12. Mini Pumpkin Donuts
Use a mini donut pan and begin checking for doneness earlier than the standard baking time. Smaller donuts bake faster, so watch them closely.
Optional Pumpkin Donut Glaze
If you love bakery-style donuts, this quick vanilla glaze is an easy alternative to cinnamon sugar.
Ingredients
- 1 cup powdered sugar
- 1–2 tablespoons milk
- ½ teaspoon vanilla extract
- A pinch of cinnamon, optional
Instructions
- Add the powdered sugar to a small bowl.
- Whisk in the vanilla and 1 tablespoon of milk.
- Add more milk a little at a time until the glaze reaches a thick but pourable consistency.
- Dip the completely cooled donuts into the glaze.
- Place them on a wire rack and let the glaze set before serving.
For extra fall flavor, sprinkle a little cinnamon or pumpkin pie spice over the glaze while it’s still wet.
What to Serve with Baked Pumpkin Donuts
These donuts are delicious on their own, but pairing them with a warm drink or breakfast favorite makes them even better.
- Coffee: The slightly bitter flavor of coffee balances the sweet cinnamon sugar.
- Chai tea: Warm spices complement the pumpkin beautifully.
- Hot chocolate: A cozy choice for children and chocolate lovers.
- Apple cider: Perfect for a fall-themed breakfast or afternoon treat.
- Greek yogurt and fruit: Adds a refreshing contrast to the sweet donuts.
- Scrambled eggs: Turn the donuts into part of a weekend breakfast spread.
- Fresh apples or pears: Their crisp sweetness pairs well with pumpkin spice.
- A brunch platter: Serve alongside muffins, fruit, and other baked treats.
Make-Ahead Instructions
You can prepare these pumpkin donuts ahead of time to make busy mornings easier.
Option 1: Bake in advance. Bake the donuts, allow them to cool completely, and store them in an airtight container.
Option 2: Prepare the dry ingredients. Whisk the flour, baking powder, baking soda, pumpkin pie spice, and salt together in advance. Store the mixture in a sealed container, then combine it with the wet ingredients when you’re ready to bake.
Option 3: Freeze the baked donuts. Freeze plain, cooled donuts and add the cinnamon-sugar coating after thawing and gently warming them. This gives you a fresher coating and better texture.
For the best results, add cinnamon sugar shortly before serving rather than storing the donuts with a buttery coating for several days.
Storage Instructions
Store completely cooled donuts in an airtight container at room temperature for about 1–2 days for the best texture.
If your kitchen is particularly warm or humid, or if the donuts have a perishable cream cheese topping, refrigerate them instead. Plain pumpkin donuts can generally be refrigerated for up to about 4 days, although refrigeration may make them a little firmer.
Keep the donuts away from direct sunlight and heat. Always allow them to cool before sealing the container to prevent condensation from making them sticky.
Can You Freeze Pumpkin Donuts?
Yes! These baked pumpkin donuts freeze well, making them a great make-ahead treat.
- Allow the donuts to cool completely.
- Place them in a single layer on a tray and freeze until firm.
- Transfer them to a freezer-safe container or bag, separating layers with parchment paper if needed.
- Label and freeze for up to about 2–3 months for best quality.
- Thaw at room temperature or overnight in the refrigerator.
For the best texture, freeze the donuts before adding the cinnamon-sugar coating or glaze.
How to Reheat Pumpkin Donuts
To bring back that fresh-baked softness, warm a donut in the microwave for about 5–10 seconds, then check it. Add a few more seconds if necessary.
You can also place the donuts in a preheated 300°F (150°C) oven for approximately 4–6 minutes.
Avoid overheating, as this can dry them out. If the donuts are coated in cinnamon sugar, a short warming time is usually best.
Frequently Asked Questions
1. Do baked pumpkin donuts taste like fried donuts?
They’re a little different. Baked donuts are more cake-like, soft, and tender, while fried donuts often have a lighter, richer texture from the frying process. These baked donuts are delicious in their own right.
2. Can I use canned pumpkin purée?
Yes. Plain canned pumpkin purée is convenient and works well. Do not use canned pumpkin pie filling.
3. Can I use homemade pumpkin purée?
Yes, provided it’s thick and not excessively watery. Drain or blot it if necessary to avoid making the batter too wet.
4. Do I need a donut pan?
A donut pan is the easiest way to achieve the classic shape. Without one, you can bake the batter in a greased muffin pan, but the result will be pumpkin muffins rather than donuts.
5. Why are my pumpkin donuts dense?
Overmixing, too much flour, expired leavening agents, or excess moisture in the pumpkin can contribute to dense donuts. Measure carefully and stir only until combined.
6. Why did my donuts stick to the pan?
The pan may not have been greased sufficiently, or the donuts may have been removed too early. Grease the cavities well and allow the donuts to rest for about 5 minutes before removing them.
7. How do I know when the donuts are done?
They should spring back gently when touched, and a toothpick inserted into the thickest part should come out clean or with a few moist crumbs.
8. Can I make the batter ahead of time?
It’s best to bake the batter soon after mixing because the baking powder and baking soda begin working once the wet and dry ingredients are combined. Prepare the dry ingredients ahead instead.
9. Can I make these donuts without pumpkin pie spice?
Yes. Make your own blend using cinnamon, ginger, nutmeg, and a small pinch of cloves or allspice.
10. Can I use oil instead of butter?
You can substitute a neutral-flavored oil, but the taste and texture will change. Butter adds a richer flavor, while oil may produce a slightly different crumb.
11. Can I reduce the sugar?
You can experiment with reducing the brown sugar slightly, but it also contributes moisture and texture. Reducing it too much may make the donuts less tender and less sweet.
12. Why did my donuts turn out dry?
They may have baked too long or contained too much flour. Measure flour accurately and begin checking for doneness at 12 minutes.
13. Can I add chocolate chips?
Absolutely! Mini chocolate chips distribute well throughout the batter. Fold them in gently just before filling the donut pan.
14. Can I use a gluten-free flour blend?
A cup-for-cup gluten-free baking blend may work, especially one formulated for cakes and muffins. Results depend on the blend, so follow its instructions and expect a possible texture difference.
15. Can I make mini pumpkin donuts?
Yes. Use a mini donut pan and check them early because smaller donuts bake faster.
16. Should I coat the donuts while they’re hot?
Let them cool slightly first. If they’re too hot, the butter can run off and the sugar may become wet. Slightly warm donuts are ideal for cinnamon sugar.
17. Can I glaze these donuts instead?
Yes. A simple vanilla glaze, maple glaze, or cream cheese glaze pairs beautifully with pumpkin.
18. How should I store leftover donuts?
Keep them in an airtight container at room temperature for about 1–2 days for best quality, or refrigerate them if needed for your kitchen conditions or topping.
19. Can I freeze the donuts after coating them?
You can, but the cinnamon-sugar coating may become moist or uneven after thawing. Freezing them plain and coating them afterward generally gives better results.
20. Are these donuts suitable for breakfast?
Definitely! They’re a lovely seasonal breakfast treat, especially served with fruit, yogurt, eggs, or your favorite hot drink.
20 Tips & Secrets for the Best Baked Pumpkin Donuts
- Measure flour with care. Too much flour can quickly make cake-style donuts dry.
- Use room-temperature eggs. They blend more easily into the pumpkin mixture.
- Cool the melted butter slightly. This prevents it from scrambling the eggs.
- Choose thick pumpkin purée. Excess water can weigh down the batter.
- Whisk the dry ingredients thoroughly. This distributes the baking powder and spices evenly.
- Avoid overmixing. Gentle mixing keeps the texture soft.
- Grease every donut cavity. Pay attention to the center posts.
- Pipe the batter neatly. This helps create evenly shaped donuts.
- Don’t fill the pan to the top. Three-quarter-full cavities leave space for rising.
- Check the donuts early. Every oven is different.
- Use a toothpick test. It’s a simple way to check the center.
- Let them rest before removing them. This reduces breakage.
- Use a wire rack for cooling. Air circulation prevents soggy bottoms.
- Mix cinnamon sugar in advance. It makes the finishing step quick and easy.
- Brush with butter sparingly. Too much butter can make the coating greasy.
- Coat while slightly warm. This helps the sugar stick.
- Try brown sugar with cinnamon. A small amount mixed into the coating adds a deeper flavor.
- Freeze them plain. Add the coating or glaze after thawing for better results.
- Warm gently before serving. A few seconds in the microwave can make the donuts taste freshly baked.
- Pair with a warm drink. Coffee, chai, or apple cider brings out the cozy pumpkin-spice flavor.
When to Serve Baked Pumpkin Donuts
These donuts are perfect for all kinds of cozy occasions:
- Fall breakfasts and brunches
- Halloween parties
- Thanksgiving morning
- Pumpkin-themed dessert tables
- Weekend baking with family
- School snacks and lunchbox treats, where suitable
- Afternoon coffee breaks
- Autumn potlucks
- Holiday gift boxes
- Cozy evenings with tea or hot chocolate
Final Thoughts
These Baked Pumpkin Donuts are everything a fall treat should be: soft, moist, warmly spiced, and full of pumpkin flavor. The brown sugar adds a rich sweetness, the pumpkin keeps the crumb tender, and the optional cinnamon-sugar coating creates that irresistible bakery-style finish.
They’re easy enough for beginner bakers, quick enough for weekend breakfasts, and festive enough for Halloween and Thanksgiving gatherings.
Whether you enjoy them plain, glazed, or generously coated in cinnamon sugar, these homemade pumpkin donuts are a wonderful way to celebrate pumpkin season.
Bake a batch, pour yourself a warm drink, and enjoy a little taste of autumn in every bite! 🎃🍩