
Muddy Buddy Rice Krispies Treats
Indulge in the sweet, nostalgic joy of Muddy Buddy Rice Krispies Treats—a delightful twist on the classic Muddy Buddies (also known as Puppy Chow) that combines the irresistible crunch of Rice Krispies with a rich, chocolatey coating. These treats are a perfect blend of textures: crispy cereal meets creamy peanut butter and silky chocolate, all dusted with a light coat of powdered sugar. They are not only quick and easy to make but also perfect for satisfying your sweet tooth cravings or sharing with loved ones during a cozy movie night or a fun gathering. With each bite, you’ll enjoy a delicious harmony of flavors and a comforting sense of nostalgia.
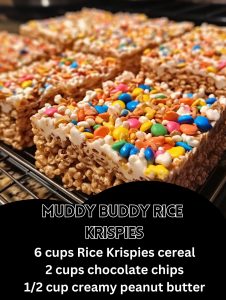
Ingredients Overview
- Rice Krispies Cereal (6 cups): The star of this recipe, providing a light and airy crunch that perfectly complements the rich, creamy coating. The cereal’s texture is ideal for soaking up all the flavors while still maintaining its crispness.
- Chocolate Chips (2 cups): These are melted down to create a luscious, creamy coating. Use high-quality semi-sweet or milk chocolate chips for a perfect balance of sweetness and cocoa flavor.
- Creamy Peanut Butter (1/2 cup): Adds a nutty, creamy depth to the chocolate, creating a rich, smooth mixture that coats the Rice Krispies evenly. Make sure to use creamy peanut butter for a smooth consistency.
- Unsalted Butter (1/4 cup): This adds a bit of richness and helps create a glossy finish for the chocolate coating. It also prevents the chocolate from becoming too thick, ensuring that each cereal piece is evenly coated.
- Vanilla Extract (1 teaspoon): A small amount of vanilla extract enhances the flavors of chocolate and peanut butter, adding a subtle depth and warmth to the overall taste.
- Powdered Sugar (1 1/2 cups, shaken or 1/2 cup, sprinkled): This sweet dusting gives the treats their classic Muddy Buddy finish, adding a touch of sweetness and a delicate, powdery texture that balances the rich chocolate and peanut butter flavors.
Step-by-Step Cooking Instructions
Step 1: Prepare Ingredients
Measure all ingredients beforehand to streamline the process. You’ll need Rice Krispies cereal, chocolate chips, peanut butter, unsalted butter, and vanilla extract. Having everything ready to go makes for a smoother cooking experience and ensures that your chocolate mixture doesn’t seize while you’re scrambling to measure ingredients.
Step 2: Melt Chocolate and Peanut Butter
In a microwave-safe bowl, combine the chocolate chips and peanut butter. Microwave in 30-second intervals, stirring after each interval until the mixture is completely smooth and melted. This method prevents the chocolate from burning and ensures a smooth, creamy mixture.
Step 3: Add Butter and Vanilla
To the melted chocolate and peanut butter mixture, add the unsalted butter and vanilla extract. Stir until the butter is fully melted and the vanilla is well incorporated. This step not only adds flavor but also ensures that the chocolate coating is perfectly smooth and glossy.
Step 4: Mix with Rice Krispies
Pour the melted chocolate mixture over the Rice Krispies cereal in a large mixing bowl. Using a spatula, gently fold the cereal into the chocolate mixture until every piece is evenly coated. Be gentle to avoid crushing the cereal, keeping the texture light and crispy.
Step 5: Spread and Cool
Spread the chocolate-coated cereal mixture onto a baking sheet lined with parchment paper or into a large pan. Allow it to cool and set completely. This step is crucial for the chocolate to harden and the treats to hold their shape when cut.
Step 6: Add Powdered Sugar
Once the mixture has cooled and set, transfer the chocolate-coated Rice Krispies into a large resealable plastic bag. Add the powdered sugar, seal the bag, and shake gently until the treats are evenly coated with sugar. Alternatively, for a more elegant presentation, you can sprinkle the powdered sugar over the top instead.
Step 7: Serve and Enjoy
Cut the Muddy Buddy Rice Krispies into squares and serve. Enjoy the delightful blend of crunchy, creamy, and sweet flavors in every bite. These treats are perfect for sharing, gifting, or indulging yourself with a comforting snack.
Valuable Tips for a Seamless Cooking Experience
- Tip 1: Use Fresh Ingredients
Always use fresh Rice Krispies and high-quality chocolate chips for the best flavor and texture. - Tip 2: Microwave in Intervals
Melting chocolate in 30-second intervals helps prevent it from burning and ensures a smooth texture. - Tip 3: Mix Gently
Be gentle when folding the cereal into the chocolate mixture to maintain the cereal’s crunch. - Tip 4: Cool Completely
Let the mixture cool completely before cutting to prevent the treats from falling apart. - Tip 5: Store Properly
Store leftovers in an airtight container to keep them fresh and crunchy.
Storage and Reheating Tips
- Storage: Store the Muddy Buddy Rice Krispies in an airtight container at room temperature for up to 5 days. To keep them crisp, avoid exposing them to moisture.
- Freezing: These treats can be frozen! Place them in a freezer-safe container or resealable bag for up to 3 months. Thaw at room temperature before serving.
- Reheating: If they lose their crispness, you can refresh them in the oven. Place them on a baking sheet and warm in a preheated oven at 300°F (150°C) for about 5 minutes. Let them cool completely before serving to regain their crunch.
20 Frequently Asked Questions
Q1: Can I use a different type of cereal?
Yes, you can substitute Rice Krispies with other cereals like Corn Chex or Cheerios for a different texture and flavor.
Q2: Can I use chunky peanut butter?
Yes, but it will change the texture slightly and add some crunch from the peanut pieces.
Q3: What if I don’t have a microwave?
You can melt the chocolate and peanut butter on the stovetop using a double boiler method.
Q4: Can I use white chocolate instead?
Absolutely! White chocolate will create a different but equally delicious flavor profile.
Q5: Are there any peanut butter alternatives?
Sunflower seed butter, almond butter, or cashew butter can be used as alternatives.
Q6: Can I add extra toppings?
Yes, feel free to add mini marshmallows, nuts, or sprinkles for added texture and flavor.
Q7: Can I use dark chocolate?
Yes, dark chocolate can be used for a richer, less sweet version of these treats.
Q8: How do I prevent the chocolate from seizing?
Make sure no water gets into the chocolate, and melt it slowly in intervals.
Q9: Can I make these vegan?
Yes, use vegan chocolate chips and a butter substitute like coconut oil.
Q10: How many servings does this recipe make?
This recipe makes approximately 16-20 squares, depending on how large you cut them.
Q11: Is there a gluten-free option?
Yes, use gluten-free Rice Krispies and check that all other ingredients are gluten-free.
Q12: Can I use powdered cocoa instead of chocolate chips?
Not recommended, as the texture and flavor will differ significantly.
Q13: What if my mixture is too sticky?
Let it cool longer to allow the chocolate to harden.
Q14: Can I add salt to enhance the flavor?
Yes, a small pinch of salt can enhance the sweetness and bring out the chocolate flavor.
Q15: Can I use this recipe for other shapes?
Yes, you can shape the mixture into balls or any shape before it sets.
Q16: Is there a way to reduce the sugar content?
You can reduce the amount of powdered sugar or use a sugar substitute.
Q17: How do I ensure even coating with powdered sugar?
Shaking in a resealable bag ensures an even coating without clumping.
Q18: Can I use honey instead of sugar?
Honey can be used but will change the texture and add stickiness.
Q19: What’s the best way to cut the bars?
Use a sharp knife and cut them while they are still slightly warm for cleaner edges.
Q20: How do I make the treats more festive?
Add colored sprinkles or edible glitter for a festive touch.
- Use high-quality chocolate chips for a richer, smoother flavor.
- Ensure all ingredients are at room temperature to blend smoothly.
- Melt chocolate slowly in intervals to avoid burning or seizing.
- Gently fold the cereal to maintain its crispness.
- Use a large mixing bowl to easily combine all ingredients without mess.
- Line the baking sheet with parchment paper for easy cleanup and to prevent sticking.
- Cool the mixture completely before cutting to ensure neat squares.
- Add a pinch of sea salt to balance the sweetness and enhance flavors.