Pineapple Bliss Bars: A Tropical Treat for Your Senses
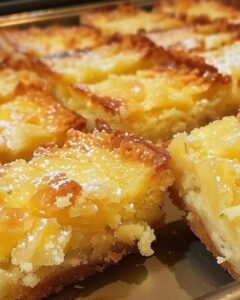
Indulge in the serene flavors of Pineapple Bliss Bars—where tangy pineapple meets a creamy filling atop a buttery, golden crust. Perfect for a relaxing afternoon treat or a delightful dessert, these bars bring a touch of tropical sunshine to your kitchen.
Ingredients Overview
- All-Purpose Flour (2 cups): The base of our buttery crust, providing structure and a slight chewiness.
- Granulated Sugar (1/2 cup + 1/4 cup): Adds sweetness to both the crust and the creamy filling, balancing the tang of the pineapple.
- Unsalted Butter (1/2 cup, softened): Ensures a tender, melt-in-your-mouth crust. Softened butter blends seamlessly into the flour and sugar.
- Crushed Pineapple (1 can, 20 oz, drained): The star ingredient, bringing a burst of tropical flavor and moisture to the filling.
- Sour Cream (1 cup): Adds a tangy richness to the filling, complementing the pineapple perfectly.
- Large Eggs (2): Help to set the filling, giving it a custard-like texture.
- Vanilla Extract (1 teaspoon): Enhances the overall flavor, adding a hint of warmth and depth.
- Powdered Sugar: For a light dusting before serving, adding a touch of elegance and extra sweetness.
Step-by-Step Cooking Instructions
- Preheat and Prepare: Preheat your oven to 350°F (175°C). Grease a 9×13 inch baking dish to ensure your bars release easily after baking.
- Create the Crust:
- In a medium bowl, combine 2 cups of all-purpose flour and 1/2 cup of granulated sugar.
- Cut in the softened butter using a pastry cutter or your fingertips until the mixture resembles coarse crumbs.
- Press this mixture evenly into the bottom of your prepared baking dish.
- Bake for 15 minutes, or until lightly golden. Remove from the oven and let it cool slightly.
- Prepare the Filling:
- In a separate bowl, combine the drained crushed pineapple, sour cream, 1/4 cup of granulated sugar, eggs, and vanilla extract.
- Mix until well blended, ensuring the ingredients are fully incorporated.
- Assemble and Bake:
- Pour the pineapple mixture over the baked crust, spreading it evenly.
- Return the dish to the oven and bake for an additional 25-30 minutes, or until the filling is set and slightly golden around the edges.
- Cool and Serve:
- Allow the bars to cool completely in the dish on a wire rack. This ensures the filling sets properly and makes cutting easier.
- Once cooled, dust with powdered sugar for an elegant finish.
- Cut into bars and serve.
Cooking Tips
- Butter Consistency: Ensure your butter is softened but not melted for the perfect crust texture.
- Draining Pineapple: Drain the crushed pineapple well to prevent the filling from becoming too watery.
- Cooling Time: Allowing the bars to cool completely before cutting helps them set properly, ensuring clean slices.
Storage and Reheating Tips
- Storage: Store the Pineapple Bliss Bars in an airtight container in the refrigerator for up to 5 days.
- Reheating: Enjoy these bars cold or at room temperature. If you prefer them warm, heat individual bars in the microwave for about 10-15 seconds.
Frequently Asked Questions
Can I use fresh pineapple instead of canned? Yes, you can use fresh pineapple, but make sure to finely crush it and drain any excess juice to maintain the right consistency.
Can I substitute Greek yogurt for sour cream? Yes, Greek yogurt can be used as a substitute for sour cream, adding a similar tangy flavor and creamy texture.
How do I know when the bars are fully baked? The filling should be set and slightly golden around the edges. A gentle jiggle in the center is okay, as it will firm up while cooling.
Can I freeze Pineapple Bliss Bars? Yes, these bars freeze well. Wrap them tightly in plastic wrap and store in an airtight container for up to 2 months. Thaw in the refrigerator before serving.
Embrace the soothing, tropical flavors of Pineapple Bliss Bars—your perfect companion for a tranquil afternoon or a sweet end to your day. Happy baking

