
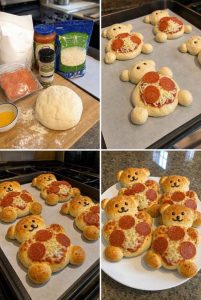
Teddy Bear Pizzas – Adorable Homemade Mini Bear-Shaped Pizzas
Looking for a fun dinner that will make everyone smile? These adorable Teddy Bear Pizzas are almost too cute to eat! Made with soft pizza dough, savory pizza sauce, gooey melted mozzarella, and pepperoni, each little bear is shaped by hand into an edible masterpiece.
The best part? Each teddy bear has its own cheesy pizza belly, tiny dough ears, arms, and feet, plus an adorable little face added after baking. They’re perfect for kids’ birthday parties, family pizza nights, sleepovers, lunchboxes, and fun weekend cooking projects.
Even better, you don’t need any special equipment or complicated ingredients. Just grab some pizza dough, your favorite toppings, and let everyone create their own little pizza bear!
Preparation & Cooking Information
- Prep Time: 25 minutes
- Cook Time: 18–22 minutes
- Total Time: Approximately 45–50 minutes
- Servings: 6 teddy bear pizzas
- Course: Dinner, Lunch, Snack
- Cuisine: American-Italian
- Cooking Method: Baking
Ingredients
- 1 pound pizza dough
- ½ cup pizza sauce
- 1 cup shredded mozzarella cheese
- 12 pepperoni slices
- Italian seasoning, to taste
- 1 egg, beaten with 1 tablespoon water for egg wash
For Decorating the Teddy Bear Faces
- Melted chocolate or an edible food marker
- Optional: Small pieces of mozzarella or pepperoni for additional decorations
Tip: If using melted chocolate, use just a tiny amount for the eyes, nose, and mouth. Apply it after the pizzas have cooled enough so the chocolate doesn’t melt away.
Instructions
Step 1: Prepare the Pizza Dough
Preheat your oven to 375°F (190°C). Line a baking sheet with parchment paper.
Lightly flour your work surface and divide the pizza dough into 6 equal portions.
Set aside a small amount of dough from each portion to make the teddy bear’s ears, arms, and feet.
Step 2: Shape the Teddy Bear Bodies
Take one portion of dough and shape it into a rounded oval or slightly pear-shaped body.
Place it on the prepared baking sheet. This will become the main body of your teddy bear.
Using the reserved dough, roll small pieces into balls for the ears. Attach two small dough balls near the top of the head area.
Shape two short dough pieces for the arms and two small pieces for the feet. Gently press each piece against the body so it sticks.
Repeat with the remaining dough portions, leaving enough space between each bear for expansion during baking.
Helpful tip: Lightly dampen the places where the dough pieces meet with a little water if they aren’t sticking together.
Step 3: Add the Pizza Sauce
Spoon a small amount of pizza sauce onto the belly of each teddy bear.
Spread it gently, leaving a border of uncovered dough around the edges. This creates the look of a little bear with a delicious pizza belly.
Avoid using too much sauce, as excess moisture can make the dough soggy.
Step 4: Add Cheese and Pepperoni
Sprinkle shredded mozzarella generously over the sauce on each bear’s belly.
Add two pepperoni slices to each teddy bear, arranging them neatly over the cheese.
Sprinkle a little Italian seasoning over the toppings for extra pizza flavor.
Step 5: Brush with Egg Wash
In a small bowl, beat one egg with a tablespoon of water.
Using a pastry brush, lightly coat the exposed dough with the egg wash. This gives the teddy bears a beautiful golden-brown finish.
Try not to brush the sauce and cheese.
Step 6: Bake the Teddy Bear Pizzas
Place the baking sheet in the preheated oven and bake for 18–22 minutes, or until the dough is cooked through, the edges are golden brown, and the mozzarella is melted and bubbly.
Baking times can vary depending on the thickness of the dough and your oven, so check that the centers are fully baked before removing them.
Allow the pizzas to cool on the baking sheet for several minutes.
Step 7: Draw the Teddy Bear Faces
Once the pizzas have cooled slightly, it’s time for the cutest part!
Use melted chocolate or an edible food marker to draw two little eyes, a nose, and a smiling mouth on each teddy bear.
You can also use small pieces of pepperoni or cheese for facial details if you prefer a completely savory decoration.
Let any melted chocolate set before serving.
Step 8: Serve and Enjoy!
Transfer your adorable Teddy Bear Pizzas to a serving platter.
Serve warm while the cheese is melty and the crust is soft and golden. Watch everyone’s faces light up when they see these little pizza bears!
Storage Instructions
- Refrigerator: Store leftover Teddy Bear Pizzas in an airtight container for up to 3–4 days.
- Room Temperature: Don’t leave cooked pizza sitting out for more than 2 hours, or 1 hour if the temperature is above 90°F (32°C).
- Freezer: You can freeze fully baked pizzas for up to 2 months for best quality. Wrap each one individually in plastic wrap or foil, then place in a freezer-safe container or bag.
- Decorations: If using melted chocolate for the faces, store the pizzas carefully so the decorations don’t get smudged.
For the best texture, allow the pizzas to cool before storing them.
Reheating Instructions
Oven: Preheat the oven to 350°F (175°C). Place the pizzas on a baking sheet and heat for approximately 5–8 minutes, or until warmed through.
Air Fryer: Reheat at 325°F (160°C) for approximately 3–5 minutes. Check frequently so the little dough details don’t become too crispy.
Microwave: Place a pizza on a microwave-safe plate and heat in short intervals until warm. The crust will be softer rather than crispy.
Reheat leftovers to an internal temperature of 165°F (74°C).
From Frozen: Thaw overnight in the refrigerator for more even reheating, or reheat directly from frozen at 350°F, allowing extra time until heated through.
Make-Ahead Instructions
These teddy bear pizzas are easy to prepare ahead, especially when making them for a birthday party or gathering.
- Prepare and divide the pizza dough into six portions.
- Shape the teddy bear bodies, ears, arms, and feet.
- Place the shaped dough on a parchment-lined baking sheet.
- Cover and refrigerate for a short period if preparing shortly before baking.
- Add the sauce, cheese, and pepperoni just before baking.
- Brush with egg wash and bake as directed.
- Allow to cool slightly before adding the faces.
For longer preparation, you can freeze the shaped, unbaked dough bears on a tray until firm, then transfer them to a freezer-safe container. Thaw in the refrigerator and allow the dough to become pliable before adding toppings and baking. The final rise and baking time may vary.
Fun Ways to Customize Teddy Bear Pizzas
Cheese Lover Bears: Skip the pepperoni and fill the belly with extra mozzarella, cheddar, and Parmesan.
Mini Sausage Bears: Replace the pepperoni with finely cooked and drained sausage crumbles.
Vegetarian Teddy Bears: Use diced bell peppers, mushrooms, black olives, or sweet corn as toppings.
BBQ Chicken Bears: Use barbecue sauce instead of pizza sauce and add cooked shredded chicken with mozzarella.
Hawaiian Bears: Add small pieces of ham and pineapple for a sweet-and-savory version.
Extra Cheesy Faces: Use small pieces of mozzarella to create the muzzle and little ears.
Whole Wheat Bears: Use whole wheat pizza dough for a slightly different crust.
Spicy Pizza Bears: Add a pinch of red pepper flakes or use spicy pepperoni for grown-up versions.
Tips & Secrets for Perfect Teddy Bear Pizzas
- Use room-temperature dough: Slightly warmed dough is easier to stretch and shape than cold dough.
- Divide evenly: Try to make all six portions similar in size so they bake at roughly the same rate.
- Reserve enough dough: Save small pieces for the ears, arms, and feet before shaping the bodies.
- Make the ears secure: Press the dough balls gently into the head so they don’t detach during baking.
- Use a little water: A tiny amount of water helps attach separate dough pieces.
- Avoid oversized ears: Smaller ears are easier to keep attached and look especially cute.
- Leave space between bears: Pizza dough expands in the oven, so don’t crowd the baking sheet.
- Don’t overload the sauce: Too much sauce can make the center wet and prevent the dough from baking properly.
- Keep toppings on the belly: Leaving the edges uncovered helps preserve the bear shape.
- Use freshly shredded mozzarella: It melts beautifully and gives the pizzas a delicious cheesy finish.
- Cut pepperoni into smaller pieces: If needed, smaller pieces fit better on the teddy bear bellies.
- Brush carefully: Apply egg wash only to the exposed dough for a lovely golden color.
- Watch the baking time: Every oven is different, so check the pizzas around the 18-minute mark.
- Check the center: Make sure the thicker body portions are fully baked before serving.
- Cool before decorating: Chocolate or edible marker details are easier to apply once the pizzas have cooled slightly.
- Use edible markers for convenience: They’re especially handy when making several teddy bear faces.
- Make every bear unique: Give each one a different expression or little smile.
- Let kids help: Children can safely help add cheese and pepperoni or decorate cooled pizzas with supervision.
- Use parchment paper: It makes removing the finished pizzas easier and helps prevent sticking.
- Serve warm: These little pizzas are at their best when the crust is fresh and the mozzarella is still gooey.
Frequently Asked Questions
1. Can I use store-bought pizza dough?
Absolutely! Refrigerated or fresh store-bought pizza dough works perfectly and saves preparation time. Just let it rest at room temperature briefly if it’s difficult to shape.
2. Can I use homemade pizza dough?
Yes! Your favorite homemade pizza dough recipe will work beautifully. Make sure the dough is soft and elastic enough to shape into little bears.
3. Can I use crescent roll dough instead?
You can, although crescent roll dough has a different texture and may spread more during baking. Pizza dough is recommended for keeping the teddy bear shapes.
4. How do I keep the ears and arms from falling off?
Press each piece firmly against the body and lightly dampen the connecting areas with water. Avoid making the attachments too large or heavy.
5. Can I use pizza sauce from a jar?
Yes! Any favorite store-bought pizza sauce works well. Marinara sauce or homemade pizza sauce is also delicious.
6. What cheese works best?
Mozzarella is the classic choice because it melts beautifully. You can also use a combination of mozzarella, cheddar, and Parmesan.
7. Can I use different toppings?
Definitely! Try cooked sausage, diced ham, mushrooms, olives, bell peppers, or cooked chicken. Keep toppings relatively small so they fit neatly on the bear’s belly.
8. Can I make these without pepperoni?
Yes. Leave the pepperoni off or replace it with vegetables, extra cheese, or another favorite pizza topping.
9. Can I make the teddy bear faces before baking?
It’s better to add the faces after baking. Chocolate can melt in the oven, and edible food markers are generally designed for decorating cooled food.
10. Can I use melted chocolate for the faces?
Yes! Let the pizzas cool slightly before using a toothpick or small piping bag to add the eyes, nose, and mouth. Use only a little chocolate so the savory pizzas aren’t overwhelmed by sweetness.
11. Are edible food markers safe to use?
Use only markers specifically labeled as edible and intended for decorating food. Regular craft markers should never be used.
12. Can kids help make Teddy Bear Pizzas?
Absolutely! Kids can help divide toppings, sprinkle cheese, add pepperoni, and decorate the cooled bears. Adults should handle the oven and hot baking trays.
13. Can I prepare these ahead of time?
Yes. Shape the dough bears ahead and refrigerate them briefly, covered, before adding toppings and baking. For longer storage, freeze the shaped dough and thaw before finishing.
14. Can I freeze Teddy Bear Pizzas?
Yes. Fully baked and cooled pizzas can be frozen individually for up to 2 months for best quality. Wrap them well to prevent freezer burn.
15. How do I reheat leftover teddy bear pizzas?
The oven or air fryer gives the best results. Heat at 350°F in the oven for about 5–8 minutes, or use an air fryer at 325°F for approximately 3–5 minutes, checking frequently.
16. Why did my teddy bear pizzas lose their shape?
The dough may have been too warm, too soft, or overfilled with toppings. Make sure the dough pieces are securely attached and leave enough room for expansion.
17. Why is the center of my pizza dough still raw?
The body portions may be too thick, or the oven may need more baking time. Shape the dough evenly and check that the center is fully cooked before serving.
18. Can I make mini teddy bear pizzas?
Of course! Divide the dough into smaller portions and reduce the baking time. Keep an eye on them because smaller pizzas cook faster.
19. What can I serve with Teddy Bear Pizzas?
Serve them with fresh fruit, vegetable sticks, a simple green salad, potato wedges, or extra pizza sauce for dipping.
20. Are Teddy Bear Pizzas good for birthday parties?
They’re perfect for kids’ birthday parties, teddy bear-themed celebrations, sleepovers, and school events. Their cute shape makes them a fun centerpiece for a party food table.
Final Thoughts
These Teddy Bear Pizzas are proof that dinner can be delicious, adorable, and fun all at once! With golden homemade pizza dough, gooey mozzarella, savory pepperoni, and the sweetest little teddy bear faces, they’re guaranteed to bring smiles to the table.
They’re easy to customize, fun to make with kids, and perfect for everything from casual family dinners to birthday parties.
Make a batch, give each bear its own personality, and get ready for a pizza night that’s almost too cute to eat!