
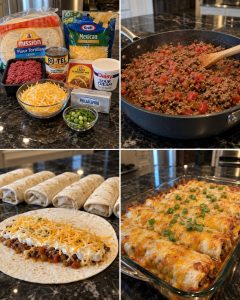
Cheesy Beef Burrito Roll-Ups – Easy, Creamy, and Loaded with Taco Flavor
If you’re looking for an easy, cheesy dinner that the whole family will love, these Beef Burrito Roll-Ups are about to become a new favorite! Made with seasoned ground beef, diced tomatoes with green chiles, creamy sour cream, softened cream cheese, and plenty of melted Mexican cheese, these delicious burritos are packed with bold Tex-Mex flavor in every bite.
Each flour tortilla is filled with a rich, creamy beef mixture, rolled up tightly, arranged in a baking dish, and topped with even more cheese. After a quick trip to the oven, the roll-ups emerge hot, bubbly, and wonderfully cheesy, with soft tortillas and a savory filling that’s hard to resist.
They’re perfect for busy weeknights, casual family dinners, potlucks, or whenever you’re craving comforting Mexican-inspired food without spending hours in the kitchen. Serve them with salsa, guacamole, or a dollop of sour cream for a satisfying meal everyone will ask for again.
The best part? You can prepare the filling ahead of time, customize the toppings, and even freeze the roll-ups for a convenient dinner later!
Why You’ll Love These Beef Burrito Roll-Ups
- Easy weeknight dinner: Simple ingredients and straightforward steps make this recipe beginner-friendly.
- Creamy and cheesy: Cream cheese and sour cream give the beef filling a rich, smooth texture.
- Packed with flavor: Taco seasoning and tomatoes with green chiles add a delicious Tex-Mex kick.
- Family-friendly: Adjust the spice level and toppings to suit everyone’s taste.
- Perfect for meal prep: Make the filling ahead or assemble the roll-ups before baking.
- Great for gatherings: Serve them with toppings and sides for a fun, build-your-own burrito dinner.
- Easy to customize: Add beans, corn, rice, jalapeños, or extra cheese to make them your own.
Recipe Overview
- Prep Time: 15 minutes
- Cook Time: 20–25 minutes
- Total Time: 35–40 minutes
- Servings: 6–8 roll-ups
- Course: Main Course, Dinner
- Cuisine: Tex-Mex, Mexican-Inspired
- Cooking Method: Stovetop and Oven
- Difficulty: Easy
Ingredients for Beef Burrito Roll-Ups
Ground Beef – 1 pound
Ground beef makes the filling hearty, savory, and satisfying. Lean ground beef is a convenient option because it produces less grease, but regular ground beef works well too as long as you drain the excess fat after browning.
Flour Tortillas – 6–8
Medium or large flour tortillas are ideal because they’re flexible and easy to roll. Larger tortillas make generously filled burritos, while smaller tortillas create convenient individual portions.
If your tortillas feel stiff, warm them briefly before filling to help prevent cracking.
Taco Seasoning – 1 packet
A packet of taco seasoning adds a delicious combination of chili, cumin, garlic, onion, and other spices. You can use your favorite store-bought blend or substitute homemade taco seasoning.
Check the seasoning packet before adding extra salt, since some brands are already quite salty.
Diced Tomatoes with Green Chiles – 1 can, drained
These tomatoes bring moisture, tanginess, and a gentle kick of heat. Draining them is important because too much liquid can make the filling watery and the tortillas soggy.
Shredded Mexican Cheese – 1½ cups
A Mexican-style cheese blend melts beautifully and adds a rich, gooey finish. Cheddar, Monterey Jack, or a combination of both are excellent alternatives.
Divide the cheese between the filling, the roll-ups, and the topping as desired.
Cream Cheese – 4 ounces, softened
Cream cheese is the secret to the luscious, creamy filling. Let it soften at room temperature before mixing so it blends smoothly with the sour cream.
Sour Cream – ½ cup
Sour cream adds a tangy flavor that balances the richness of the beef and cheese. It also helps make the filling creamy and easy to spread.
Green Onions – 2, sliced
Green onions add a fresh, slightly sharp flavor and a pop of color. Sprinkle them over the baked roll-ups just before serving.
Oil – 1 tablespoon
A little oil helps prepare the skillet for browning the beef, especially if you’re using very lean meat. If the beef releases enough fat on its own, you may not need all of it.
Optional Toppings and Add-Ins
Make these burrito roll-ups even more delicious with a few extras:
- Sliced jalapeños for extra heat
- Black beans or pinto beans for more texture
- Corn kernels for sweetness
- Cooked rice for a heartier filling
- Diced bell peppers for color and crunch
- Fresh cilantro for a bright, herbal finish
- Diced avocado or guacamole for creaminess
- Salsa or pico de gallo for freshness
- Extra shredded cheese for a golden, bubbly top
- Crushed tortilla chips for a crunchy garnish
Keep in mind that adding too many wet ingredients can make the filling difficult to roll. Drain vegetables and beans well before mixing them in.
Kitchen Equipment You’ll Need
- Large skillet
- Wooden spoon or spatula
- Mixing bowl
- Whisk or fork
- Can opener
- Measuring cups and spoons
- 9-by-13-inch baking dish, or a dish large enough to fit your roll-ups
- Cooking spray or a little oil
- Aluminum foil, if needed
How to Make Cheesy Beef Burrito Roll-Ups
Step 1: Preheat the Oven
Preheat your oven to 375°F (190°C).
Lightly grease a baking dish with cooking spray or a small amount of oil. This helps prevent the tortillas from sticking and makes serving easier.
Choose a dish that fits the burritos snugly without crushing them. A little space between the roll-ups is fine, but keeping them close together helps prevent the edges from drying out.
Step 2: Brown the Ground Beef
Heat the oil in a large skillet over medium heat.
Add the ground beef and cook for approximately 6–8 minutes, breaking it apart with a wooden spoon as it cooks. Continue until the beef is fully browned with no visible pink remaining.
If excess grease collects in the skillet, carefully drain it before proceeding.
For food safety, ground beef should reach an internal temperature of 160°F (71°C).
Step 3: Add the Taco Seasoning and Tomatoes
Sprinkle the taco seasoning over the cooked beef and stir well.
Add the drained diced tomatoes with green chiles. Mix everything together and cook for another 2–3 minutes, allowing the seasoning to coat the beef and the flavors to combine.
The mixture should be moist and flavorful without excess liquid pooling in the pan.
Remove the skillet from the heat.
Step 4: Prepare the Creamy Mixture
In a separate mixing bowl, combine the softened cream cheese and sour cream.
Stir or whisk until the mixture is smooth and creamy, with no large lumps of cream cheese remaining.
Softened cream cheese makes this step much easier. If it’s still cold and firm, it may be difficult to blend evenly.
Step 5: Combine the Creamy Sauce and Beef
Add the cream cheese and sour cream mixture to the seasoned beef.
Stir until everything is evenly combined. The filling should look creamy, rich, and well coated with the taco-seasoned beef.
Allow the mixture to cool for a few minutes if it is extremely hot. This makes the tortillas easier to handle and helps prevent them from becoming overly soft during assembly.
Step 6: Warm the Tortillas
Warm the flour tortillas briefly in the microwave, covered with a slightly damp paper towel, for about 15–30 seconds, depending on how many you’re warming.
Alternatively, warm them individually in a dry skillet for a few seconds on each side.
This simple step makes the tortillas more flexible and less likely to tear when rolled.
Step 7: Fill and Roll the Tortillas
Lay one tortilla flat on a clean work surface.
Spoon a portion of the creamy beef filling down the center, leaving some room around the edges. Sprinkle with shredded Mexican cheese.
Fold in the sides slightly, then roll the tortilla up tightly from the bottom, keeping the filling tucked inside.
Repeat with the remaining tortillas and filling.
Avoid overfilling. A moderate amount of filling makes the burritos easier to roll and helps keep the seams closed during baking.
Step 8: Arrange the Roll-Ups in the Baking Dish
Place each burrito seam-side down in the prepared baking dish.
Arrange the roll-ups in a single layer. The seam-side-down position helps them stay closed while baking.
Sprinkle the remaining shredded cheese over the tops.
If your roll-ups are tightly packed in the dish, you can cover them loosely with foil for the first part of baking to help retain moisture. Remove the foil near the end if you want a more golden, bubbly cheese topping.
Step 9: Bake Until Hot and Bubbly
Bake at 375°F (190°C) for 20–25 minutes, until the cheese has melted and the roll-ups are hot throughout.
If you prefer a lightly golden top, leave the dish uncovered for the entire baking time. If the cheese begins browning too quickly, cover the dish loosely with foil.
Because the filling is already cooked, the goal is to heat everything thoroughly and melt the cheese without drying out the tortillas.
Step 10: Garnish and Serve
Remove the baking dish from the oven and let the burrito roll-ups rest for about 3–5 minutes.
Sprinkle the sliced green onions over the top and serve warm.
Offer sour cream, salsa, guacamole, or your favorite taco toppings on the side. For a complete meal, pair the burritos with rice, beans, salad, or roasted vegetables.
Enjoy every creamy, cheesy bite!
Expert Tips for the Best Burrito Roll-Ups
- Drain the tomatoes well. Excess liquid can make the tortillas soggy.
- Soften the cream cheese. This helps create a smooth, lump-free filling.
- Brown the beef thoroughly. Cook it completely before adding the remaining ingredients.
- Drain excess grease. Too much fat can make the filling oily.
- Warm the tortillas first. Flexible tortillas are much easier to roll.
- Don’t overfill. Too much filling can cause the burritos to split.
- Place them seam-side down. This helps keep the roll-ups closed.
- Use freshly shredded cheese if possible. It often melts more smoothly than pre-shredded cheese.
- Avoid overbaking. Once the filling is hot and the cheese is melted, they’re ready.
- Let them rest briefly. A few minutes of resting makes them easier to serve.
Variations and Substitutions
1. Spicy Beef Burrito Roll-Ups
Add diced jalapeños, a pinch of cayenne pepper, or a few dashes of hot sauce to the filling. Use spicy taco seasoning if you prefer a stronger kick.
2. Mild Family-Friendly Roll-Ups
Choose mild diced tomatoes with green chiles and a mild taco seasoning blend. Serve hot sauce separately so everyone can adjust their own portion.
3. Beef and Black Bean Roll-Ups
Stir in ½ cup of drained and rinsed black beans. The beans add texture and make the filling more substantial.
4. Beef and Corn Roll-Ups
Add ½ cup of drained canned corn or cooked frozen corn. Its natural sweetness pairs nicely with the seasoned beef and creamy cheese.
5. Rice-Filled Burrito Roll-Ups
Add about 1 cup of cooked rice to the filling or place a small layer of rice inside each tortilla before adding the beef mixture. Make sure the rice is freshly cooked or properly chilled and reheated if prepared ahead.
6. Extra-Cheesy Burrito Roll-Ups
Add a little shredded cheese directly to the beef mixture and use a generous layer on top. Monterey Jack, cheddar, and Mexican cheese blends all work well.
7. Chicken Burrito Roll-Ups
Replace the ground beef with about 3 cups of cooked, shredded chicken. Mix it with the taco seasoning, tomatoes, cream cheese, and sour cream, then assemble and bake as directed.
8. Ground Turkey Burrito Roll-Ups
Use ground turkey instead of beef. Because turkey is leaner, you may need a little extra oil during browning. Cook ground turkey to an internal temperature of 165°F (74°C).
9. Vegetarian Burrito Roll-Ups
Replace the beef with a combination of black beans, pinto beans, corn, and sautéed bell peppers. Season with taco seasoning and follow the same assembly instructions.
10. Enchilada-Style Burrito Roll-Ups
Pour a thin layer of enchilada sauce into the bottom of the baking dish before adding the burritos. Spoon a little more sauce over the top before adding cheese. The result will be softer and saucier, similar to baked enchiladas.
11. Green Chile Cheese Roll-Ups
Use a can of diced green chiles and add extra Monterey Jack cheese for a flavorful variation with a creamy, mild chile taste.
12. Low-Carb-Inspired Option
Use lower-carbohydrate tortillas and check their package directions for baking suitability. The filling can also be served in lettuce cups or over cauliflower rice, although the result will no longer be a traditional tortilla roll-up.
What to Serve with Beef Burrito Roll-Ups
These cheesy burritos are satisfying on their own, but side dishes can turn them into a complete Tex-Mex dinner.
Classic Mexican-Inspired Sides
- Mexican rice
- Cilantro-lime rice
- Refried beans
- Black beans with cumin
- Street corn-style corn salad
- Tortilla chips with salsa
- Fresh pico de gallo
Fresh and Lighter Sides
- Green salad with lime dressing
- Sliced avocado
- Cucumber and tomato salad
- Roasted peppers and onions
- Grilled zucchini
- Fresh cabbage slaw
Favorite Toppings
Set out a small topping bar with sour cream, guacamole, salsa, shredded lettuce, diced tomatoes, jalapeños, cilantro, and lime wedges.
This is especially fun for family dinners or gatherings because everyone can customize their plate.
Make-Ahead Instructions
These beef burrito roll-ups are an excellent make-ahead meal.
Prepare the filling in advance: Cook the beef, add the taco seasoning and tomatoes, and combine with the cream cheese and sour cream. Transfer the filling to a shallow container and refrigerate promptly. Use within 3–4 days, and reheat thoroughly before assembling if desired.
Assemble before baking: You can assemble the roll-ups, arrange them in the greased baking dish, and cover the dish tightly. Refrigerate for up to 24 hours before baking. For the best texture, add the topping cheese shortly before baking if you want to keep the tortillas from becoming too moist.
Bake from chilled: If the dish is cold from the refrigerator, it may need additional baking time. Check that the center of the filling reaches 165°F (74°C) before serving.
Best tip: Don’t leave cooked beef or assembled burritos at room temperature for more than 2 hours, or more than 1 hour if the temperature is above 90°F (32°C).
Storage Instructions
In the Refrigerator
Allow leftover burrito roll-ups to cool slightly, then place them in an airtight container and refrigerate within 2 hours of cooking.
Store for 3–4 days in the refrigerator. Keep sauces and fresh toppings separate for the best texture.
In the Freezer
For longer storage, freeze the baked and cooled roll-ups in a freezer-safe container, separating layers with parchment paper if necessary.
For the best quality, use within 2–3 months. The tortillas may soften slightly after thawing because the filling contains dairy and tomatoes.
You can also freeze individually wrapped roll-ups for easy portioning.
Freezing Before Baking
Assemble the roll-ups without baking, then wrap them securely and freeze in a freezer-safe dish or container. For best results, freeze without the final cheese topping and add the cheese before baking.
Thaw overnight in the refrigerator before baking. Baking directly from frozen may work, but it requires more time and careful checking to ensure the center is thoroughly heated.
How to Reheat Beef Burrito Roll-Ups
Oven Method
- Preheat the oven to 325°F (165°C).
- Place the roll-ups in an oven-safe dish.
- Cover loosely with foil to prevent the tortillas from drying out.
- Heat for approximately 15–20 minutes, depending on size and starting temperature.
- Check that the center reaches 165°F (74°C). Remove the foil for the final few minutes if you want to refresh the cheese topping.
Microwave Method
- Place one roll-up on a microwave-safe plate.
- Cover with a microwave-safe lid or a slightly damp paper towel.
- Heat in 30-second intervals until hot throughout.
- Check the center and continue heating as needed until it reaches 165°F (74°C).
Microwave times vary with the size of the burrito and the power of the appliance.
Air Fryer Method
- Preheat the air fryer to 325°F (165°C).
- Place a roll-up in the basket without overcrowding.
- Heat for about 5–8 minutes, turning carefully if needed.
- Check that the filling reaches 165°F (74°C).
The air fryer can help crisp the tortilla, although the cheese topping may need protection from direct airflow.
20 Frequently Asked Questions About Beef Burrito Roll-Ups
1. Can I use corn tortillas instead of flour tortillas?
Flour tortillas are recommended because they’re more flexible and easier to roll. Corn tortillas are more likely to crack, so if you use them, warm them thoroughly and consider making smaller, enchilada-style rolls instead.
2. What size tortillas work best?
Medium or large flour tortillas are ideal. Medium tortillas make smaller portions, while large tortillas hold more filling and create bigger burritos.
3. Can I make these burrito roll-ups spicy?
Yes! Add jalapeños, cayenne pepper, hot sauce, or spicy taco seasoning. You can also use hot diced tomatoes with green chiles.
4. Why is my filling watery?
The tomatoes may not have been drained well enough, or the beef mixture may contain too much liquid. Drain the tomatoes thoroughly and simmer the beef mixture briefly before adding the creamy ingredients.
5. Can I use pre-cooked ground beef?
Yes. Use previously cooked ground beef that has been refrigerated safely, then reheat it with the taco seasoning and tomatoes. Make sure the completed filling reaches 165°F (74°C) when reheated.
6. Can I substitute ground turkey?
Absolutely. Ground turkey works well with taco seasoning and creamy cheese. Cook it thoroughly to 165°F (74°C).
7. Can I make these without cream cheese?
Yes. You can use additional sour cream or a thick, mild cream cheese alternative, although the filling will have a different consistency and flavor. Add liquid gradually to avoid making it too loose.
8. Can I replace sour cream with Greek yogurt?
Yes. Plain, unsweetened Greek yogurt is a useful substitute. Full-fat Greek yogurt usually gives a creamier result than fat-free varieties.
9. Which cheese melts best?
Mexican cheese blends, Monterey Jack, and cheddar are all good choices. Monterey Jack is especially smooth and melty, while cheddar adds a stronger flavor.
10. How do I stop the tortillas from tearing?
Warm the tortillas briefly before filling. Avoid overfilling and roll gently without pulling too tightly on the tortilla.
11. Do I need to cover the dish while baking?
Not necessarily. Baking uncovered helps the cheese brown slightly. Cover loosely with foil if the tortillas or cheese are browning too quickly or if you want a softer finish.
12. Can I make the roll-ups ahead of time?
Yes. Assemble them and refrigerate in a covered baking dish for up to 24 hours before baking. Add extra baking time if they are cold.
13. Can I freeze leftover burrito roll-ups?
Yes. Cool them promptly, wrap securely, and freeze for up to 2–3 months for best quality. Thaw in the refrigerator or reheat carefully from frozen until the center reaches 165°F (74°C).
14. How long do leftovers last in the refrigerator?
Store them in an airtight container for 3–4 days. Refrigerate within 2 hours of cooking and reheat leftovers thoroughly.
15. Can I add rice or beans?
Definitely. Add cooked rice, black beans, or pinto beans for a heartier filling. Drain beans well and avoid adding too much moisture.
16. Can I make a vegetarian version?
Yes. Replace the beef with black beans, pinto beans, corn, and sautéed vegetables, then season with taco seasoning and follow the same assembly and baking process.
17. What can I serve with these burritos?
Mexican rice, refried beans, corn salad, tortilla chips, guacamole, salsa, or a fresh green salad are excellent choices.
18. How do I know when the roll-ups are ready?
The cheese should be melted and bubbly, and the filling should be hot throughout. For reliable food safety, check that the center reaches 165°F (74°C).
19. Can I cook these in an air fryer?
You can, provided the roll-ups fit comfortably in an oven-safe air-fryer dish or basket arrangement. Cook in batches if necessary, monitor the cheese closely, and ensure the center reaches 165°F (74°C).
20. Can I serve these as appetizers?
Yes. Use smaller tortillas, make smaller rolls, bake them, and slice each roll-up into bite-sized pieces after a brief rest. Serve with salsa, guacamole, or sour cream for dipping.
20 Tips and Secrets for Perfect Beef Burrito Roll-Ups
- Use lean ground beef if you prefer less grease. It keeps the filling flavorful without leaving excess fat in the dish.
- Drain the beef after browning. This helps prevent oily filling.
- Drain the tomatoes thoroughly. Less liquid means firmer, easier-to-roll burritos.
- Soften the cream cheese ahead of time. Room-temperature cream cheese blends more smoothly.
- Mix the creamy ingredients separately first. This prevents cream cheese lumps in the beef mixture.
- Warm tortillas before filling. Flexible tortillas roll without cracking.
- Use an even amount of filling. Consistent portions help the roll-ups bake evenly.
- Leave room around the edges. This gives you space to fold and seal the tortillas.
- Roll them snugly, not tightly. Too much pressure can tear the tortillas or push out the filling.
- Place the seam underneath. This helps the burritos stay closed during baking.
- Choose a properly sized baking dish. A snug fit helps keep the roll-ups in shape.
- Shred cheese from a block when practical. Freshly shredded cheese often melts smoothly.
- Reserve some cheese for the top. It creates a delicious, bubbly finish.
- Add foil if the cheese browns too fast. This protects the top while the centers heat.
- Don’t overbake. The filling is already cooked, so the oven mainly needs to heat the roll-ups and melt the cheese.
- Let them rest briefly before serving. This helps the filling settle and makes the burritos easier to handle.
- Add fresh toppings after baking. Green onions, cilantro, avocado, and salsa taste brighter when added at the end.
- Keep wet toppings separate. Adding salsa or sour cream inside the roll-ups can make them soggy.
- Make individual freezer portions. Wrapping each burrito separately makes future meals easier.
- Use a thermometer for safe reheating. Leftovers should reach 165°F (74°C) in the center before serving.
When to Serve Beef Burrito Roll-Ups
These cheesy roll-ups fit almost any casual meal or gathering.
- Busy weeknight dinners: A straightforward meal with easy cleanup.
- Family taco night: Serve with bowls of toppings so everyone can customize their plate.
- Game-day gatherings: Cut the roll-ups into smaller pieces for sharing.
- Potlucks: Transport them in a covered baking dish and keep them at a safe serving temperature.
- Meal-prep lunches: Portion leftovers with rice, beans, or vegetables.
- Casual parties: Offer salsa, guacamole, and sour cream for dipping.
- Comfort-food weekends: Pair them with rice and a fresh salad for a satisfying dinner.
Final Thoughts
These Cheesy Beef Burrito Roll-Ups bring together everything we love about comfort food: seasoned ground beef, creamy filling, soft tortillas, and plenty of melted cheese. They’re easy enough for a weeknight dinner but delicious enough to serve when friends and family come over.
With simple ingredients, flexible variations, and make-ahead options, this is the kind of recipe you can adapt to whatever you have in the kitchen. Keep them mild for the kids, add jalapeños for spice lovers, or load them with beans and rice for an even heartier meal.
Serve them hot from the oven with sour cream, salsa, and your favorite sides, and don’t be surprised if everyone reaches for seconds. These beef burrito roll-ups are cheesy, comforting, and destined to become a regular on your dinner menu!